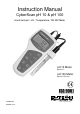
Instruction Manual CyberScan pH 10 & pH 100 Hand-held pH / mV / Temperature / RS 232 Meter pH 10 Meter pH/mV/°C pH 100 Meter pH/mV/°C/RS 232 68X007106 09/2001 rev 4 Technology Made Easy ...
PREFACE This manual serves to explain the use of the Standard CyberScan series hand-held meters. The models covered are the CyberScan pH 10 and the CyberScan pH 100 hand-held meters. The manual functions in two ways, firstly as a step by step guide to help the user operate the meter. Secondly, it serves as a handy reference guide. This instruction manual is written to cover as many anticipated applications of the CyberScan pH meters as possible.
TABLE OF CONTENTS 1 INTRODUCTION 2 DISPLAY AND KEYPAD FUNCTIONS 2.1 2.2 3 3.1 3.2 3.3 3.4 4 4.1 4.2 4.3 4.4 4.5 4.6 5 5.1 5.2 5.
15 15.1 15.2 15.3 15.
1 INTRODUCTION Thank you for selecting Eutech Instruments standard CyberScan pH 10/100 meter. These meters are microprocessor-based instrument and are designed to be handy, capable of allowing one-hand operation. Each has a large custom dual LCD for clear and easy reading. It is a unique and intelligent instrument that has the capability to cater to the preferences of the discerning individual.
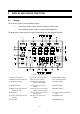
2 2.1 DISPLAY AND KEYPAD FUNCTIONS Display The LCD has a primary and secondary display. • The primary display shows the measured pH or ORP values. • The secondary display shows the measured temperature. The display also shows error messages, keypad functions and program functions. Figure 1: Full LCD Screen 1. SETup mode indicator 9. pH buffer selection indicator 16. ON & OFF indicator 2. MEASurement mode indicator 10. Temperature indicator 17. Low battery indicator 3.
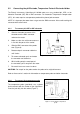
2.2 Keypad A large membrane keypad with tactile feedback makes the instrument easy to use. Each button, when pressed, has a corresponding graphic indicator on the LCD (Figure 1). Some buttons have several functions depending on its mode of operation. Key ON/OFF Function Powers on and shuts off the meter. The meter will start in pH measurement mode. HOLD Freezes the measured reading. To activate, press HOLD while in measurement mode. To release, press HOLD again.
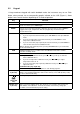
Figure 2: Keypad of pH 10 meter Figure 3: Keypad of pH 100 meter 4
3 3.1 PREPARATION Inserting the Batteries The CyberScan is packaged with 4 “AAA” alkaline batteries required for operation. To insert the batteries into the CyberScan, follow the procedure outlined below. 1. 2. Use a Phillips Head screwdriver, remove the two screws (Figure 4) with the hinge closed. Remove the battery cover. Note the polarity and insert the batteries into the battery compartment correctly (Figure 5). 3.
3.2 Connecting the pH Electrode, Temperature Probe & Electrode Holder The Eutech Instruments CyberScan pH 10/100 meter uses any standard pH, ORP, or Ion Selective Electrode (ISE) with a BNC connector. For Automatic Temperature Compensation (ATC), this meter requires a temperature probe with a phono-jack connector. NOTE: It is important that water does not get onto the BNC connector. Also avoid touching the connector with soiled hands. 3.2.1 1.
3.2.3 Attaching the electrode onto the electrode Holder The CyberScan pH meter is packed with two electrode holders (provided). They are designed for easy use and installation. Care must be taken to avoid use of excessive force in the process of attaching these components. 1. 2. Locate the slot on the right-hand side of the meter. Gently slide the flange of the holder into the slot on the meter. Make sure the holder is secured properly into the slot (Figure 8). 3.
3.2.5 1. 2. Insert the electrode into the holder Do not use excessive force when inserting electrodes into the holders. Insert the pH electrode into the opening of the first holder until the top housing of the electrode touches the top of the holder. 3. If you are using a separate temperature probe, insert the probe into the opening of the second holder until the ridge on the housing touches the top of the holder. NOTE: The holder is designed for probes 12 mm in diameter.
3.4 Connecting the RS232C Cable (Only For CyberScan pH 100) The CyberScan pH 100 meter provides a RS232C output for you to transmit your readings either to a printer or a computer via a cable. This is useful in instances where the CyberScan meter is used for continuous monitoring of a certain process or experiment. Data output to the printer or the computer can then be evaluated. The data is output in the ASCII format.
Figure 13: Pin number position of the 9-pin RS 232C port In case CyberScan pH 100 meter’s output has to be sent to a 25 pin RS232C connector, the following cable configuration may be used: 1. CyberScan pH 100 25 pin connector 2 (TxD) (RxD) 3 4 (DSR) (DTR) 20 5 (GND) (GND) 7 7 (CTS) (RTS) 4 CyberScan pH 100 uses hardware handshake i.e. CyberScan pH 100 expects both DSR and CTS lines to be active before it sends data. 2.
4 4.1 CALIBRATION Preparing the Meter for Calibration Before starting calibration, make sure you are in the correct measurement mode. When you switch on the meter, the meter starts up in the pH measurement mode. Before calibrating, select the correct mode by pressing the MODE key. There are 4 modes: [pH] for pH measurements, [Temp] for Temperature measurements, [Rel] [mV] for Relative mV measurements (only for pH 100 meter) [mV] for millivolt measurements.
4.2 To pH Calibration with ATC activate Compensation the Automatic (ATC), simply Temperature plug in the temperature probe into the phono jack. The ATC indicator will be displayed on the LCD (Figure 15). If the ATC indicator is not displayed, it indicates that the temperature probe is either not properly connected to the instrument or is faulty. 1. Switching ‘ON’ the meter by pressing the ON/OFF key. 2.
NOTE: In pH 100 meter, you can program the meter to turn off the ‘READY’ indicator through the SETup mode. 10. Press the CON key to confirm the calibration. The ‘CON‘ indicator flashes for one second and disappears. 11. Upon confirmation, the instrument is calibrated to the buffer indicated in the secondary display. 12. The secondary display automatically scrolls to the next pH buffer calibration option i.e. pH 10.01. 13.
4.3 pH Calibration (without ATC) When the CyberScan meter is not used with a temperature probe, it is necessary to calibrate the temperature first prior to pH calibration. 1. Calibrate for temperature as described in the procedure in Section 4.4.1 - Temperature Calibration Without ATC Probe. 2. Next, proceed with the pH calibration as described in the above section. 3. The meter is now calibrated at a fixed temperature.
4.4 Temperature Calibration The temperature sensor is factory calibrated. Calibrate the temperature probe only if you suspect the temperature errors that may have occurred over a long period of time or if you have a replacement temperature probe. This procedure offers offset adjustment of probe to ensure more accurate temperature measurement. In the event where there is no temperature sensor, this procedure can also be performed for Manual Temperature Compensation (MTC). 4.4.1 1.
4.4.2 1. Temperature Calibration With ATC Probe Make sure the ATC probe is attached to the meter. Refer to Figure 7 in Section 3.2.2. 2. 3. Switch the meter on. Note the ATC indicator. Press the MODE key to select temperature mode, [Temp]. 4. Dip the ATC probe into a solution of known temperature (i.e. a temperature bath). Allow time for the temperature probe to stabilize. 5. Press the CAL/MEAS key to enter temperature calibration mode.
4.5 Calibration Procedure for Relative mV Measurements (For pH 100 Only) Relative millivolt calibration is used in ISE measurements, where it is common to use the lowest concentration mV value as the base value for measurements. All subsequent measurements will then be based on this reference value. For Relative mV calibration, carry out the following procedure: 1. Press the MODE key to enter the Relative mV mode. 2.
4.6 Erasing Calibrated Values (For pH 100 only) To erase the calibrated values in the memory follow either one of the following procedures: 1. Enter the SETUP mode. (See section 9.1). Program 1.0 clears all memory in storage, including the calibrated values. You cannot selectively delete data. 2. Or you can recalibrate the instrument. A new calibration value automatically overwrites the existing value in the memory.
5 MEASUREMENT This meter is capable of taking measurements with automatic or manual temperature compensation. Automatic temperature compensation only occurs when a temperature sensor is plugged into the meter. If there is no temperature sensor plugged into the meter, the default manual temperature setting is automatically 25.0 °C. You can manually set the temperature to match your working conditions using a separate thermometer.
5.2 Manual Temperature Compensation IMPORTANT: For manual compensation, you must disconnect the temperature probe. The [ATC] annunciator will disappear from the LCD. 1. Switch the meter on. Press the MODE key to select [TEMP] mode. 2. Press the CAL/MEAS key to enter Temperature calibration mode. The CAL indicator will appear above the primary display. 3. The primary display shows the current pH reading and the secondary display shows the default temperature value 25 ºC. 4.
5.3 Taking Measurements Be sure to remove the electrode soaker bottle or protective rubber cap on the electrode before measurement. To take readings: 1. Rinse the probe with de-ionized or distilled water Figure 23: Measurement mode before use to remove any impurities adhering to the probe body. If the pH electrode has dehydrated, soak it for 30 minutes in Eutech Instruments electrode storage solution or 2M – 4M KCl solution (sold separately). 2. Press ON to switch on meter.
6 HOLD FUNCTION This feature allows you to hold the value of the measurement reading until it is more convenient to note the reading. This mode can be invoked at any time when you are in the MEAS mode. You may also store the held value into memory using MI/! key (available only in pH 100 meter). 1. In the measurement mode (either pH, mV or Rel mV, press the HOLD key. 2. 3. “HOLD” indicator will appear on the display. To release the held value, press HOLD again. You can continue to take measurements.
7 MEMORY FUNCTION (FOR pH 100 ONLY) The memory function is available only in the CyberScan pH 100 meter. This meter stores data in sets: • • • pH and temperature mV and temperature Relative mV and temperature The pH 100 meter can store up to 16 sets of data in any combination of values. For example, you can store 7 pH and 9 mV values. This meter uses the Last-In-First-Out (LIFO) method of memory management.
7.2 Memory Recall This function recalls the previous readings stored in the memory. You can only access MR from the measurement mode. Make sure you are in the correct measurement mode to retrieve previously stored data. For example, if you want to retrieve data stored during pH measurement mode, you will need to be in pH measurement mode to retrieve the data. To recall readings: 1. Switch the meter ON, and press MODE key for the appropriate measurement parameter. 2.
8 PRINT FUNCTION (FOR pH 100 ONLY) The CyberScan pH 100 is equipped with a PRINT key that facilitates the printing of data from a printer or storage of data into the computer in the form of a data file. 8.1 1. Using the CyberScan pH 100 With The Printer To use the CyberScan pH 100 directly with a printer, the printer should have either a 9 pin or a 25 pin RS 232C serial port. 2. Printer dip switches should match with the CyberScan meter communication setup.
8.2 Sending Data To Computer To send data to the computer, connect the RS232C cable from the base of the CyberScan pH 100 to the communication port of the computer. Load and run the CYDATA data acquisition program ensuring that the parameters of the settings in the CyberScan pH 100 and the CYDATA are identical (See Section 10.4 “Setting Up CYDATA” on page 37). To print, press the PRINT key. 8.2.
The data will be printed in the following format: pH : 5.41 pH : 5.43 pH : 5.74 pH : 6.03 R.mv: 1.4 R.mv: -1.1 R.mv: -3.2 R.mv: -4.9 mv : -6.9 mv : -8.2 mv : -10.3 mv : -11..2 mv : -12.9 mv : -14.1 mv : -15.9 mv : -17.4 mv : -17.8 mv : -18.6 mv : -19.7 mv : -22.5 mv : -20.9 mv : -33.0 pH : 5.69 pH : 5.45 Temp: 25.0 Temp: 25.0 Temp: 25.0 Temp: 25.0 Temp: 25.0 Temp: 25.0 Temp: 25.0 Temp: 25.0 Temp: 25.0 Temp: 25.0 Temp: 25.0 Temp: 25.0 Temp: 25.0 Temp: 25.0 Temp: 25.0 Temp: 25.0 Temp: 25.0 Temp: 25.
9 ADVANCED SETUP FUNCTIONS (FOR pH 100 ONLY) The advanced setup mode lets you customized your meter’s preferences and defaults. The Eutech Instruments’ standard CyberScan meter features four different programs that organize all setup parameters. Each has been divided into several options. The programs and options are elaborated under the following sections: Program Description Sub-Group Functions Section P 1.0 Software Initialization Memory Clear and Reset Options 9.1 P 2.
9.1 Program 1 – Software Initialization This program deals with the initialization of the memory and calibration data. “OFF” is the default setting for both Memory Clear and Reset. Accidental selection of wrong option will wipe out the memory. 9.1.1 P1.0 : Memory Clear Activation of this option by selecting ‘ON‘ clears all stored measurement values in the memory (5 sets of values each for pH, mV and Rel. mV with temperature). Under default condition this option is not activated (set to OFF).
9.2 Program 2 – Electrode Data This program allows you to check on electrode parameters for diagnostic purposes. 9.2.1 P2.0 : Electrode Offset The primary display shows the pH electrode offset value in mV. The offset is calculated based on the buffer 7.00 calibration. If no calibrations have been performed, the primary display shows -0.00 mV. 9.2.2 P2.1 : Electrode Slope The primary display indicates the electrode slope in percentage.
9.2.4 P2.3: Calibration Temperature Indicates the temperature of the last calibration performed. This is a View Only mode. Default setting is 25 degrees C. See Figure 31. Figure 31: Temperature of the last calibration performed 9.2.5 P2.4: Relative mV offset value The primary display indicates the Relative mV base value in mV. This base value is based on your preselected value during calibration for REL mV measurement.
9.3 Program 3 –Meter Configuration The following three options are available to the user for customization: 9.3.1 P3.0 : Resolution The resolution of the instrument in the pH measurement mode can be user selected to 0.1 or 0.01 pH. Under default condition, the instrument is set for 0.01 pH resolution. LCD Value Description 0.01 A resolution of 0.01 pH is shown. 0.1 A resolution of 0.1 pH is shown. 1. Use MI/! or MR/" keys to select the resolution desired. See Figure 33. 2.
9.3.3 P3.2 : Auto-Off Activation of the AUTO-OFF option automatically powers off the instrument 20 minutes after the last key selection. This feature is useful for conserving battery power. Under default condition, the instrument has this option activated. • ON - Meter will automatically switch off 20 minutes after the last key operation. • OFF - Auto Off mode is switched off.
9.4 Program 4 – Communication Setup This program allows you to set up the instrument’s communication parameters of the CyberScan 100 to enable proper communication with the printer or computer of choice. 9.4.1 P4.0: Baud Rate You can select a baud rate either at 2.4, 4.8, 9.6 or 19.2 Kbps. Under default conditions, the baud rate is set to 9.6 Kbps. 1. From pH or mV measurement mode, press SETUP key. 2. 3. Press CON key (10 times) until P4.0. Use MI/! or MR/" key to change different baud rate.
9.4.2 P4.1 : Parity Parity check allows the unit to monitor the integrity of the data that it transmits. To accommodate for the variances in standards used, three different parity checks have been provided in the table below. The default parity is even (2). 9.4.3 Value Parity 0 No Parity 1 Odd Parity 2 Even Parity (Default) P4.2 : Stop Bit The Stop Bit allows the selection of the appropriate stop bit when transmitting to other peripheral devices (such as printers).
10 CYBERCOMM PORTABLE - DATA ACQUISITION SOFTWARE (DAS FOR pH 100 ONLY) The CyberComm Portable software is designed for Eutech’s CyberScan pH 100 and CON 200 meters to allow you a convenient means of capturing data for future analysis using other © software program such as LOTUS 123, EXCEL or DBASE in Windows . Often one finds it cumbersome to record and transfer data from one media to another before the required processing can be done.
Figure 40 - Click on 'Browse' button and locate CD-ROM drive Figure 41 - Locate the CyberComm Portable Setup program in the CD-ROM under "CyberComm Portable" subdirectory.
Figure 42 - Select "Setup" program and click the OPEN button. Figure 43 - InstallShield Wizard dialog box appears. Figure 44 - Click on Next button.
Figure 45 - Key in your name and company name and click NEXT button. Figure 46 - To select another Destination Directory to install the program, click on BROWSE button. Otherwise, click NEXT button.
Figure 47 - Creating a new program folder. Click on NEXT button. Figure 48 - Click on NEXT button.
Figure 49 - The CyberComm Portable DAS program is fully installed. Click on FINISH button to end installation.
10.3 Running CyberComm Portable Before running the CyberComm Portable program, please ensure that the RS232 cable is connected between the computer’s serial port and the meter’s port. A 1-meter RS232 cable, 9-pin male to 9-pin female connector (order no. EC-CA01M09F09) is supplied with the CyberScan pH 100 meter. For additional information on the connection, please refer to section 3.4 “Connecting the RS232C Cable (Only For CyberScan pH 100)”.
Figure 51 - The opening screen will appear as above. BUTTONS & CHECK-BOX • Enable Connection - Click this button to enable communication between meter and computer. • Clear Readings - To clear all data and start all over again. • Save Readings - To save all data displayed in either *.dat or *.txt format. • Time Stamp - To include Time and Date stamp when collecting the data. Time and date information comes from the computer.
Figure 52 - Under File Menu setting, you can change various parameters. Under ABOUT menu, details of Eutech Instruments' contact information, email address and updates are shown. MENU • Communication Settings - To set communication port number, baud rate speed, parity and stop bits protocol. • Open - To open previously saved data file. • Save - To save current data captured. • Save As - To save current data set in another format such as *.dat or *.txt.
Figure 53 - Communication Settings for computer's Com port. It must match with COM port settings on CyberScan pH 100 meter. Please refer to Section 3.4.1 “RS232C Configuration” for the settings. COMMUNICATION SETTINGS • Connecting Use - To select communication port, 1 or 2. • Baud Rate - To select different baud rate, 2400, 4800, 9600 or 19200 bps (bits per second). • Parity - To select different parity, Even, Odd or None. • Stop Bits - To select different stop bits, 1 or 2.
10.4 Capturing And Printing Data Into Computer Using CyberComm Portable After matching the Communication Settings between your computer using CyberComm Portable and the CyberScan pH 100 meter, you can now capture data into your computer for analysis and storage purposes. 1. Ensure the 1-meter RS232 communication cable (supplied with the meter) is connected between the computer and the CyberScan pH 100 meter’s Com port. Refer to section 3.
10.5 a) Trouble-shooting Guide Problem: Unable to PRINT When press PRINT key on CyberScan pH 100 meter, the “Print” and “Err” annunciators blink on the meter’s LCD screen as shown in Figure 56. Figure 56 - "Print" and "Err" icons blinking POSSIBLE CAUSES SOLUTIONS You have not "ENABLE CONNECTION" in the CyberComm Portable DAS program. Click on "ENABLE CONNECTION" in the CyberComm Portable DAS program. The "Communication Settings" in the CyberComm Portable DAS program is different from meter's setup.
11 ELECTRODE CARE 11.1 Electrode Maintenance pH electrodes are susceptible to dirt and contamination and need to be cleaned regularly depending on the extent and condition of use. 11.1.1 Storage The best results, always keep the pH bulb wet, preferably in pH 4 buffer with 1/100 part of saturated KCl. Other pH buffers or tap water are also acceptable storage media, but avoid storage in de-ionized water. The protective rubber cap filled with the buffer solution provides ideal storage for long periods.
11.2 Electrode Cleaning Electrodes that are mechanically intact can be restored to normal performance by one or combination of the following procedures. a) Salt deposits: Dissolve the deposit by immersing the electrode in tap water for ten to fifteen minutes. Then thoroughly rinse with deionized water. b) Oil / Grease Films: Wash electrode pH bulb in a little detergent and water. Rinse electrode tip with deionized water. c) Clogged Reference Junction: Heat a dilute KCl solution to 60-80 °C.
g) Test with standard calibration buffer solutions. CAUTION: Proper eyewear and gloves must be worn when preparing these chemicals and performing this operation. Finally, test with standard calibration buffer solutions to see if the electrode yields acceptable results. You may repeat steps ‘c’ to ‘f’ again for better response (maximum 3 times). If the response does not improve, then the electrode has completed its useful life. Replace with a new electrode.
12 ERROR MESSAGES The following table provides a guideline to enable diagnosis of possible problems indicated by the messages generated by the CyberScan meter. The table also provides possible solutions to the problems encountered. ERROR MESSAGE INDICATES POSSIBLE CAUSE CORRECTIVE ACTION Err. 1 (in primary display) Memory write error Instrument too old (> 10 years) or hardware failure. Turn OFF meter and turn it ON. Return to dealer if necessary. Err.
13 TROUBLE-SHOOTING PROBLEM PROBABLY CAUSE REMEDIAL ACTION Nothing is displayed when the ON/OFF key is selected. 1. Batteries not in place. 1. Insert batteries. 2. Batteries (+ & - poles) not in correct polarity. 2. Re-insert batteries in the correct polarity. 3. Weak batteries. 3. Replace batteries or attach AC adapter. 1. Insufficient reference electrolyte in electrode. 1. Fill electrode with reference electrolyte. 2. Broken electrode. 2. Replace electrode. 3.
14 INFORMATION ON pH MEASUREMENT & ELECTRODE The previous sections of this manual describe the various features of the instrument and practical aspects of its operation. This section provides a general description of pH measurement principles. It also provides tabulations of pH buffer changes with temperature. Lastly, it includes a list of available accessories. 14.1 14.1.
14.1.3 pH and Temperature The electromotive force generated in the glass electrode varies with the temperature of the solution. As a result the response of the pH electrode is subjected to variations in temperature. Automatic Temperature Compensation compensates for this variance. The temperature dependable of solutions vary considerably. Some may show an increase in pH while others a decrease for the same temperature variation.
14.3 Standard pH Buffers The following table shows the various pH values at different temperature of the solution during calibration. Temperature (ºC) pH 1.68 (oxalate) pH 4.01 (phthalate) pH 7.00 (neutral Phosphate) pH 10.01 (carbonate) pH 12.45 (Saturated Calcium Hydroxide Solution) 0 1.67 4.01 7.12 10.32 13.43 5 1.67 4.01 7.09 10.25 13.21 10 1.67 4.00 7.06 10.18 13.00 15 1.67 4.00 7.04 10.12 12.81 20 1.68 4.00 7.02 10.06 12.63 25 1.68 4.01 7.00 10.01 12.
15 15.1 LIST OF ACCESSORIES Replacement Meter and Meter accessories Ordering Code No. Item EC-PH10/01N Basic CyberScan pH 10 hand-held meter (pH/mV/ºC) complete with 1 pc of temperature probe (EC-pH-TEM01P) and 2 pcs of electrode holders (15X000700) EC-PH100/01N Deluxe CyberScan pH 10 hand-held meter (pH/Rel mV/mV/ºC/R232C) with communication interface.
15.2 Calibration Solutions Ordering Code No. Item EC-BU-4BX pH 4.01 buffer tablets (box of 100 tablets, 10 strips X 10 tablets) EC-BU-7BX pH 7.00 buffer tablets (box of 100 tablets, 10 strips X 10 tablets) EC-BU-10BX pH 10.01 buffer tablets (box of 100 tablets, 10 strips X 10 tablets) EC-BU-1BT pH 1.68 buffer solution, 480 ml bottle EC-BU-4BT pH 4.01 buffer solution, 480 ml bottle EC-BU-7BT pH 7.00 buffer solution, 480 ml bottle EC-BU-10BT pH 10.
15.4 pH & ORP Electrodes There is a wide range of electrodes for the user’s applications. A sampling is shown below. Note that although only one electrode for each application is shown, there are multiple electrodes available and these electrodes are often multi-application adaptable. APPLICATION ELECTRODE General purpose, aqueous pH measurements. Quality control, general laboratory and aquarium water.
16 METER SPECIFICATIONS SPECIFICATIONS pH Range Resolution Accuracy Slope Range Temperature Range Resolution Accuracy Millivolt Range (400 mV) Resolution Accuracy Millivolt Range (2000 mV) Resolution pH 10 pH 100 0.00 to 14.00 pH -2.00 to 16.00 pH 0.01 pH 0.01/0.1 pH (Selectable) ± 0.01 pH ± 0.01/0.1 pH 80% to 120% 80% to 120% 0.0 to 100.0 ºC 0.0 to 100.0 ºC 0.1 ºC 0.1 ºC ± 0.5 ºC ± 0.5 ºC -400 to +400 mV -400 to +400 mV 0.1 mV 0.1 mV ± 0.2 mV ± 0.
17 ADDENDUM 1: FACTORY DEFAULT SETTINGS (pH 100 ONLY) PROGRAM P 1.0 FUNCTION ACTIVE KEYS OPTIONS DEFAULT SETTING Memory Clear MI/!; MR/" ON ; OFF OFF P 1.1 Reset MI/!; MR/" ON ; OFF OFF P 2.0 Electrode Offset - Viewing Only 0.0 mV P 2.1 Electrode Slope - Viewing Only 100.0 P 2.2 pH Calibration Buffer Data Display 1.68; 4.01; 7.00; 10.01; 12.45 (Viewing only) “ ——” No calibration performed. P 2.3 Last pH Calibration Temperature - Viewing Only 25.0 P 2.
18 WARRANTY & RETURN OF ITEMS Eutech Instruments warrants this meter to be free from significant deviations in material and workmanship for a period of three years from date of purchase. Eutech Instruments warrants this probe to be free from significant deviations in material and workmanship for a period of six months from date of purchase. Each instrument will have a warranty card with a specific serial number. The warranty card must be endorsed by the Authorized Distributor at the point of sale.
NOTES: Date Time Recorded Value 62 Remarks
For more information on Eutech Instruments products, contact your nearest Eutech Instruments distributor or visit our website listed below: Manufactured by: Eutech Instruments Pte Ltd. Blk 55, Ayer Rajah Crescent, #04-14/24 Singapore 139949 Tel: (65) 6778 6876 Fax: (65) 6773 0863 E-mail: marketing@eutechinst.com Web-site: http://www.eutechinst.