Instruction Manual PC 510 Bench pH/Conductivity Meter 68X090816 Technology Made Easy ... Rev.
Preface Thank you for choosing the PC 510 pH and Conductivity bench meter series. This manual serves to explain the use of the PC 510 bench meter. The manual functions as a step-bystep operational guide to help you familiarise with the meter’s features and as a handy reference guide. This instruction manual is written to cover as many anticipated applications and uses of the PC 510 bench meter as possible.
TABLE OF CONTENTS 1 INTRODUCTION 1 2 METER INFORMATION 1 2.1 2.2 2.3 2.4 2.5 2.6 2.7 3 Keypad Display 8 5 5 5 5 5 6 6 6 7 7 7 7 9 9 11 11 11 12 13 MEASUREMENT 6.1 Taking pH Measurements 6.1.1 Automatic Temperature Compensation 6.1.2 Manual Temperature Compensation (pH) 6.1.3 Taking pH Measurements 6.2 Taking Conductivity or TDS Measurement 6.2.1 Automatic Temperature Compensation 6.2.2 Manual Temperature Compensation 6.2.3 Setting a manual temperature compensation value 6.2.
9 PROBE CARE AND MAINTENANCE 9.1 9.
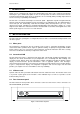
Instruction Manual 1 PC 510 INTRODUCTION Thank you for selecting the PC 510 pH and Conductivity bench meter. This step-by-step instruction manual gives you a detailed description on the use and operation of features on the meter. This PC 510 pH and Conductivity bench meter is designed to be user-friendly while providing unprecedented levels of accuracy, repeatability and reliability.
Instruction Manual PC 510 Connector Function For connecting 6-pins conductivity/TDS sensor with built-in temperature sensor to the meter or optional temperature probe for use with pH electrode (when applicable). Always make sure that the connector is clean and dry. For connecting pH sensor with a BNC connector to the meter. Always make sure that the connector is clean and dry. For connection to the AC power source to the power jack (DC). CON/TEMP pH DC 2.
Instruction Manual PC 510 HO O M T SE LD O N/ O FF R TE GE N E AN R DE L CA AS E M Figure 4: Keypad ON/OFF Powers the meter on or off. When meter is switched on, it starts in the mode the meter was last in when powered off. SET Enters advanced setup mode. SETUP mode lets you customise meter preferences and defaults, and view calibration and probe data. Measurement: Press MODE to toggle between pH, mV, conductivity and TDS.
Instruction Manual 3.2 PC 510 Display The PC 510 features a large dual display that shows the measured parameter in the primary display, plus temperature in °C or °F in the secondary display. It also features mode annunciators that describe the meter’s functions. Primary Display 1 2 SETUP 20 READY 19 HOLD ON 18 OFF 3 MEAS CAL -8.8.8.8 K= ERR -1.8.8.8 17 16 15 14 mV % pH mS µS ppt ppm °C °F pH ATC 4 5 6 7 8 9 10 11 12 Secondary Display 13 Figure 5: Full LCD Screen 1.
Instruction Manual 4 PC 510 PREPARATION 4.1 Connecting the Sensor Electrode 4.1.1 To connect the pH electrode: 1. Slide the BNC connector of the probe over the BNC connector socket on the meter. Make sure the slots of the connector are in line with the posts of the socket. Rotate and push the connector clockwise until it locks. 2. To remove electrode, push and rotate the connector anti-clockwise.
Instruction Manual 5 5.1 PC 510 CALIBRATION Important information on meter calibration When you calibrate your meter, old calibration points are replaced on a “point by point” basis in pH, and on a “range by range” basis in conductivity or TDS. For example: • pH: if you previously calibrated your meter at pH 4.01, 7.00 and 10.01, and you recalibrate at pH 7.00, the meter retains the old calibration data at pH 4.01 and pH 10.01.
Instruction Manual 5.3 PC 510 pH calibration NOTE: We recommend that you perform at least a 2-point calibration using standard buffers that bracket (one above and one below) the expected sample range. 5.3.1 Preparing for pH calibration This meter is capable of up to 5-point pH calibration to ensure accuracy across the entire pH range of the meter. Select from the following buffer options: • USA: pH 1.68, 4.01, 7.00, 10.01 and 12.45 • NIST: pH 1.68, 4.01, 6.86, 9.18 and 12.
Instruction Manual • PC 510 If you are performing one-point calibration, go to step 9. 7. Rinse the electrode with de-ionised water or rinse solution, and place it in the next pH buffer. CAL READY 8. Follow steps 5 to 7 for additional calibration points. 4.15 4.01 9. When calibration is complete, press CAL/MEAS to return to pH measurement mode. pH pH ENTER RANGE CAL READY NOTE: To exit from pH calibration mode without confirming calibration, DO NOT press ENTER in step 6. Press CAL/MEAS instead.
Instruction Manual 5.4 PC 510 Conductivity/TDS calibration The PC 510 has 5 measuring ranges. You can calibrate 1 point each of the measuring ranges (up to 5 points). If you are measuring values in more than 1 range, make sure to calibrate each of the ranges you are measuring. All new calibration data will over-ride existing stored calibration data for each measuring range you calibrate.
Instruction Manual PC 510 MEAS Calibrating for Conductivity: 1409 1. If necessary, press the MODE key to select conductivity mode. 22.3 2. Rinse the probe thoroughly with de-ionised water or a rinse solution, then rinse with a small amount of calibration standard. 3. If necessary, ensure that the probe’s yellow probe guard is attached. Dip the probe into the calibration standard. Immerse the probe tip beyond the upper steel band. Stir the probe gently to create a homogeneous sample.
Instruction Manual 5.5 5.5.1 PC 510 TDS Calibration MEAS Calibrating for TDS directly 265 The factory default setting for TDS conversion factor is 0.5. If your solution has a different TDS factor, you can improve calibration accuracy by setting the TDS factor prior to calibration. See Program P7.4 on page 36 for directions. 1. If necessary, press the MODE key to select TDS mode. 25.8 ppm °C ATC CAL MEAS 2.
Instruction Manual 5.6 PC 510 Calibration with Conductivity Standard and TDS factor The concentration of salts dissolved in solution increases the conductivity of that solution. This relationship varies from salt to salt and is roughly linear over a given range for a given salt. The TDS conversion factor is the number used by the meter to convert from conductivity to TDS. Instead of calibrating for TDS directly (described above), you can calibrate the PC 510 bench meter by: 1.
Instruction Manual 5.7 PC 510 Temperature Calibration MEAS The conductivity electrode (EC-CONSEN91W / 35608-50) supplied has a built-in temperature sensor. Alternatively, a separate temperature sensing element can be used (such as temperature probe EC-WPPHTEM-01W / 35618-05), or a “3-in-1” pH/Temperature combination electrode with ATC connection. The conductivity probe is factory calibrated.
Instruction Manual 6 PC 510 MEASUREMENT 6.1 6.1.1 Taking pH Measurements Automatic Temperature Compensation Automatic Temperature Compensation only occurs when a temperature sensing element is plugged into the meter. Temperature sensing element refers to the following probes made specifically for this meter. See accessories for ordering information • The conductivity electrode with a built-in temperature sensor • Temperature probe; or • The 3-in-1 pH/Temperature combination electrode.
Instruction Manual 6.1.3 PC 510 Taking pH Measurements Be sure to remove the electrode storage bottle or protective rubber cap on the electrode before measurement. MEAS 8.23 To take readings: 1. Rinse the pH electrode with de-ionised or distilled water before use to remove any impurities adhering to the probe body. If the pH electrode has dehydrated, soak it for 30 minutes in electrode storage solution or 2M – 4 M KCL solution (sold separately). pH °C 21.3 ATC Figure 15: Measurement mode 2.
Instruction Manual 6.2.2 PC 510 Manual Temperature Compensation IMPORTANT: For manual compensation, you must deactivate the temperature probe. SETUP COF Selecting Manual Temperature Compensation for conductivity mS µS ppt ppm P7.0 Selecting between Automatic Temperature Compensation (ATC) and Manual Temperature Compensation in the SETUP program P7.3 on page 35. Meter default is ATC on. Figure 17: P7.0 configuration setup for conductivity & TDS From Conductivity or TDS measurement mode 1.
Instruction Manual 6.2.3 PC 510 Setting a manual temperature compensation value To use manual temperature compensation, you need to enter the temperature value of your process into the meter. This is the value at which reading will manually temperature compensate. You can select any temperature between 0 and 100 °C (32 to 212 °F). Default value is 25 °C (77 °F). To select a manual temperature compensation value 1. Switch the meter on. Press the MODE key to select conductivity or TDS measurement mode.
Instruction Manual PC 510 4. If necessary, ensure that the probe’s yellow probe guard is attached. Dip the probe into the sample. When dipping the probe into the sample, take care to ensure that the liquid level is above its upper steel band. Stir the probe gently in the sample to create a homogeneous sample. 5. Allow time for the reading to stabilise. Note the reading on the display. If the READY indicator is selected on, it will appear when the reading is stable. See Program P7.
Instruction Manual PC 510 Manual-ranging The manual ranging function lets you select the specific range you want to work in. Refer to page 9 for the table of range. 1. To select the desired measuring range manually, press the RANGE key while in measurement mode. The meter will lock on to the appropriate range and the “MEAS” indicator blinks. MEAS 1413 READY 22.3 2. Press RANGE key again (if needed) until desired range is selected. 3.
Instruction Manual 7 PC 510 HOLD FUNCTION This feature lets you freeze the display for a delayed observation. HOLD can be used any time in MEAS mode. 1. To hold a measurement, press the HOLD key while in measurement mode. “HOLD” will appear on the display. 2. To release the held value, press the HOLD key again. Continue to take measurements MEAS READY HOLD 678 20.7 µS °C ATC Figure 23: HOLD function NOTE: 8 • If the meter is shut off manually, the HOLD value will be lost.
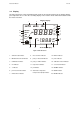
Instruction Manual PC 510 SETUP SETUP SETUP SETUP CAL pH CAL P 1.0 P 5.0 SETUP SETUP ELE pH ELE P 2.0 COF mS µS ppt ppm P 6.0 SETUP SETUP pH COF P 3.0 SETUP mS µS ppt ppm mS µS ppt ppm P 7.0 MEAS SETUP pH mS µS ppt ppm P 4.0 P 8.0 SETUP °C °F MEAS mS µS ppt ppm P 9.
Instruction Manual 8.1 PC 510 Advanced SETUP mode Overview 1. In either pH or Conductivity measurement mode, press the SETUP key to enter Setup mode. 2. Press the or key to scroll through sub-groups. 3. Press ENTER key to enter a particular parameter. See Addendum 4 on page 49 for a table of meter factory default settings. SETUP in pH measurement mode SETUP CAL pH P1.0 P1.0: View previous calibration data P1.1 First calibration point (pH 1.68) P1.2 Second calibration point (pH 4.01) P1.
Instruction Manual PC 510 SETUP in Conductivity Measurement Mode SETUP CAL mS µS ppt ppm P5.0 SETUP ELE mS µS ppt ppm P6.0 SETUP COF mS µS ppt ppm P7.0 P5.0: View previous calibration data P5.1 First range calibration point (0.00 – 19.99 µS) P5.2 Second range calibration point (0.0 – 199.9 µS) P5.3 Third range calibration (0 – 1999 µS) P5.4 Fourth range calibration point (0.00 – 19.99 mS) P5.5 Fifth range calibration point (0.0 – 199.9 mS) P6.0: View electrode data P6.
Instruction Manual PC 510 SETUP in TDS Measurement Mode SETUP CAL mS µS ppt ppm P5.0 SETUP ELE mS µS ppt ppm P6.0 SETUP COF mS µS ppt ppm P7.0 P5.0: View previous calibration data P5.1 First range calibration point (0.00 – 9.99 ppm) P5.2 Second range calibration point (0.0 – 99.9 ppm) P5.3 Third range calibration point (0 – 999 ppm) P5.4 Fourth range calibration point (0.00 – 9.99 ppt) P5.5 Fifth range calibration point (0.0 – 200 ppt) P6.0: View electrode data P6.
Instruction Manual 8.2 PC 510 P1.0: Viewing previous pH calibration data SETUP cal This mode lets you recall previous pH calibration data, which helps you know when to re-calibrate your meter. This is a “view-only” mode. pH p 1.0 From measurement mode: 1. Press the MODE key to select pH measurement mode if necessary. 2. Press the SETUP key to enter Setup mode. 3. Press the or parameter P1.0. ENTER RANGE SETUP --- key to scroll through sub-groups until you view 4.
Instruction Manual 8.3 PC 510 P2.0: Viewing pH electrode data Program 2 has two “view-only” options that let you check the electrode parameters for diagnostic purposes. It lets you view: • P2.1 = Electrode offset • P2.2 = Electrode slope SETUP ele pH p 2.0 ENTER From pH measurement mode RANGE 1. Press the MODE key to select pH measurement mode. SETUP 5.3 2. Press the SETUP key to enter Setup mode. 3. Press the or parameter P2.0. key to scroll through sub-groups until you view 4.
Instruction Manual 8.4 PC 510 P3.0: pH Measurement configuration This sub-group program allows customising the meter to your specific needs. You can program the meter to: SETUP 1. Select READY indicator ON or OFF. cof 2. Select the number of pH calibration points. pH p 3.0 3. Select between USA and NIST buffers. 4. Select between °C and °F units for temperature readings. ENTER RANGE Figure 26 on the right shows the setup sequence for this program subgroup. SETUP READY ON p 3.
Instruction Manual 8.4.1 PC 510 P3.1: READY Indicator and auto endpoint function SETUP cof This program lets you select: • “READY indicator on” to indicate when the reading is stable • “READY indicator off” for faster meter response. • Auto endpoint function on. Select auto endpoint on to “hold” the reading when it is stable for more than 5 seconds. The display automatically freezes, and the HOLD indicator appears on the left side of the display.
Instruction Manual 8.4.2 PC 510 P3.2: Selecting number of pH calibration points SETUP Program P3.2 lets you select the number of calibration points that appear in pH calibration mode: 2, 3, 4 or 5. The meter will automatically exit calibration mode after you have calibrated to your selected number of points. READY ON 2 p p 3.2 From measurement mode 1. Press the MODE key to select pH measurement mode. SETUP 2. Press SETUP key to enter Setup mode. 3. Press the or parameter P3.0.
Instruction Manual 8.4.4 PC 510 P3.4 Selecting °C or °F This meter lets you select between °C and °F units for temperature readings. From measurement mode ENTER 1. Press the MODE key to select pH measurement mode. 2. Press SETUP key to enter Setup MODE. 3. Press the or parameter P3.0. RANGE SETUP C key to scroll through sub-groups until you view p 3.4 4. Press the ENTER key four times to select parameter P3.4. 5. Press the or °C key to toggle between °C and °F. 6.
Instruction Manual 8.5 PC 510 P4.0: Resetting to factory default settings (pH) This program lets you reset all pH parameters to factory default settings. This clears all calibration data and any other pH setup functions you might have changed. The following settings will remain as you have set them: SETUP • Temperature unit of measure (°C or °F) • The temperature offset calibration value • All conductivity calibration data and parameters MEAS pH From measurement mode 1.
Instruction Manual 8.6 PC 510 P5.0: Viewing previous conductivity calibration data This mode lets you recall previous calibration data, which helps you know when to re-calibrate your meter. This is a “view-only” mode. This function applies for conductivity & TDS mode. SETUP From conductivity or TDS mode cal 1. Press the MODE key to select conductivity or TDS measurement mode. p 5.0 2. Press the SETUP key to enter Setup mode. 3. Press the or parameter P5.0.
Instruction Manual 8.7 PC 510 P6.0: Viewing conductivity probe data Program 6 has five “view-only” options that let you check the probe’s parameters for diagnostic purposes. These options show you the effective cell constant for each range. The cell constant adjusts according to your calibration. This function applies for conductivity & TDS mode. SETUP ele From conductivity or TDS measurement mode 1. Press the MODE key to select conductivity or TDS measurement mode. 2.
Instruction Manual 8.8 PC 510 P7.0: Conductivity or TDS measurement configuration 8.8.1 P7.1: READY indicator and auto endpoint function SETUP cof This program lets you select: • “READY indicator on” to indicate when the reading is stable. • “READY indicator off” for faster meter response. • Auto endpoint function on. Select auto endpoint on to “hold” the reading when it is stable for more than 5 seconds.
Instruction Manual 8.8.2 PC 510 P7.2: Selecting °C or °F You can select between °C and °F units for temperature readings. Meter default is °C. From measurement mode ENTER RANGE 1. Press the MODE key to select conductivity measurement mode. SETUP 2. Press the SETUP key to enter Setup mode. 3. Press the or parameter P7.0. C key to scroll through sub-groups until you view p 7.2 °C 4. Press the ENTER key two times to select parameter P7.2. 5. Press the or key to toggle between °C and °F. 6.
Instruction Manual 8.8.4 PC 510 P7.4: Setting the TDS factor The concentration of salts dissolved in solution increases the conductivity of that solution. This relationship varies from salt to salt and is roughly linear over a given range for a given salt. The TDS conversion factor is the number used by the meter to convert from conductivity to TDS.
Instruction Manual 8.9 8.9.1 PC 510 P8.0: Temperature P8.1: Selecting the temperature coefficient The temperature coefficient is the amount of change in conductivity per degree of temperature; it is expressed in percent per °C. Entering the exact temperature coefficient of your solution lets you accurately compensate temperature for almost any solution*. You can adjust 0.0 to 10.0% per °C. The meter default is 2.1% per °C. A temperature coefficient setting of 0.
Instruction Manual PC 510 SETUP 8.9.2 P8.2: Adjusting the normalisation temperature Your meter will normalise its conductivity measurement to a standard temperature that you can select. This feature is useful if your samples are consistently at a temperature other than 25°C (77 °F). You can adjust the normalisation temperature from 15 to 30 °C (59 to 86 °F). Meter default is 25 °C (77 F).
Instruction Manual 9 9.1 PC 510 PROBE CARE AND MAINTENANCE pH Electrode care Since your pH electrode is susceptible to dirt and contamination, clean as necessary depending on the extent and condition of use. NOTE: For specialty electrode care, consult your electrode instruction manual . pH electrode storage For best results, keep the pH bulb hydrated. Use the protective electrode storage bottle or rubber cap filled with electrode storage solution to store your electrode.
Instruction Manual PC 510 pH electrode activation (for glass body electrodes only) WARNING: Only qualified persons with proficient with the safe handling of dangerous chemicals should perform the procedure below. Provide proper containers, fume hoods, ventilation and waste disposal. Safety goggles and protective clothing must be worn while performing this procedure. If possible, replace with another electrode instead of performing this re-activation procedure. 1.
Instruction Manual PC 510 10 TROUBLE SHOOTING GUIDE Problem Cause Solution Press ‘ON’ key but no display. a) AC outlet power not is switched on. a) Switch on the power supply. b) DC adapter socket is not properly inserted. b) Re-insert socket. a) HOLD mode in operation. a) Cancel HOLD mode by pressing Hold key. b) Damaged keypad. b) Return to dealer. c) Internal program error. c) a) Air bubbles in probe. a) Tap probe to remove bubbles. b) Dirty probe. b) Clean the probe and recalibrate.
Instruction Manual PC 510 11 ERROR MESSAGES LCD Display Indicates Cause Solution Err annunciator. Unrecognised input from keypad. Wrong input in selected mode. Release key. Select valid operations depending on mode. CAL & Err annunciators on / Buffer and electrode indicators blink. Calibration error. Wrong value input at calibration. Check your input value, clean probe. Dirty probe. See Calibration section or Probe Maintenance section.
Instruction Manual PC 510 12 SPECIFICATIONS Mode Range Resolution Accuracy Calibration pH -2.00 to 16.00 pH 0.01 pH ±0.01 pH Up to 5 points, with automatic buffer recognition Temperature Conductivity -10.0 to 110.0 °C (14 to 230 °F) 0 to 19.99 µS 0 to 199.9 µS 0 to 1999 µS 0 to 19.99 mS 0 to 199.9 mS 0.01 µS 0.1 µS 1 µS 0.01 mS 0.1 mS 0.1 °C (0.1 °F) TDS mV 0 to 9.99 ppm 0 to 99.9 ppm 0 to 999 ppm 0 to 9.99 ppt 0 to 99.9 ppt -600 to +600 mV Max. of 199.9 ppt based on factor setting 0.
Instruction Manual PC 510 13 ACCESSORIES Replacement Meter and Meter accessories Eutech Instruments Eutech Instruments Item Description Order Code No. PC 510 meter, pH electrode (EC-FC72522-01B), conductivity/temp probe (ECCONSEN91W) and integral electrode stand. EC-PC510/03S PC 510 meter, pH electrode (EC-FC72522-01B), conductivity/temp probe (ECCONSEN91W), integral electrode stand and 110 VAC power adapter.
Instruction Manual PC 510 Oakton Instruments Item Description Oakton Instruments Order Code No. PC 510 meter, pH electrode (35641-51), ,conductivity/temp probe ( 35608-50), integral electrode stand, (110 & 220 VAC Adapters) 35610-10 PC 510 meter, “3-in-1” pH electrode (35808-71), ,conductivity/temp probe (35608-50), integral electrode stand, (110 & 220 VAC adapters) 35610-11 PC 510 meter, integral electrode stand, 110 & 220 VAC adapters.
Instruction Manual PC 510 Calibration Solutions Item Eutech Instruments Oakton Instruments Ordering Code Ordering Code pH 4.01 buffer solution, 480 mL bottle (1 pint) EC-BU-4BT 00654-00 pH 7.00 buffer solution, 480 mLmL bottle (1 pint) EC-BU-7BT 00654-04 pH 10.01 buffer solution, 480 mLmL bottle (1 pint) EC-BU-10BT 00654-08 pH 4.01 buffer sachets, 20 mL x 20 pcs. EC-BU-4BS 35653-01 pH 7.00 buffer sachets, 20 mL x 20 pcs. EC-BU-7BS 35653-02 pH 10.01 buffer sachets, 20 mL x 20 pcs.
Instruction Manual PC 510 14 ADDENDUM 1: CONDUCTIVITY TO TDS CONVERSION FACTORS 1. Factor – the conductivity to ppm TDS conversion factor. Multiply conductivity by this factor to get ppm TDS for the type of TDS reading needed. 2. 442 – a formulation that most closely represents the conductivity to ppm relationship, on average, for naturally occurring fresh water. (40% NaSO4, 40% NaHCO3, 20% NaCl) 3.
Instruction Manual PC 510 15 ADDENDUM 2: CALCULATING TDS CONVERSION FACTORS You can calibrate your meter using TDS calibration standard solutions. The calibration standard only needs to give the TDS value at a standard temperature such as 25 °C.
Instruction Manual PC 510 17 ADDENDUM 4: CALCULATING TEMPERATURE COEFFICIENTS To determine the temperature coefficient of your sample solution use this formula: tc = 100 CT2 – CT1 x CT1(T2 – 25) – CT2(T1 - 25) Where: tc = Temperature coefficient 25 = 25 °C CT1 = Conductivity at Temp 1 CT2 = Conductivity at Temp 2 T1 = Temp 1 T2 = Temp 2 NOTE: A controlled temperature water bath is ideal for this procedure. 1.
Instruction Manual PC 510 18 ADDENDUM 5: METER FACTORY DEFAULT SETTINGS Resetting the meter to factory default settings clears all calibration data and most other setup functions you might have changed. The following settings will remain as you have set them: • Temperature unit of measure (°C or °F) • The temperature offset calibration value. NOTE: Conductivity and pH data are cleared separately from each other. Type • To clear pH data, see Sub group P4.0.
Instruction Manual PC 510 19 WARRANTY The PC510 bench meter is supplied with a 3-year warranty from manufacturing defects and electrodes for 6 months from the date of purchase. If repair or adjustment is necessary and has not been the result of abuse or misuse within the designated period, please return – freight pre-paid – and correction will be made without charge. Eutech Instruments/ Oakton Instruments will determine if the product problem is due to deviations or customer misuse.
For more information on Eutech Instruments/ Oakton Instruments’ products, contact your nearest distributor or visit our website listed below: Oakton Instruments P.O Box 5136, Vernon Hills, IL 60061, USA Tel: (1) 888-462-5866 Fax: (1) 847-327-2984 E-mail: info@4oakton.com Web: www.4oakton.com Eutech Instruments Pte Ltd Blk 55, Ayer Rajah Crescent, #04-16/24 Singapore 139949 Tel: (65) 6778 6876 Fax: (65) 6773 0836 E-mail:marketing@eutechinst.com Web: www.eutechinst.