
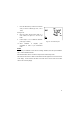
Instruction manual


10
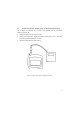
3. Dip the probe into the calibration buffer. The
end of the probe must be completely immersed
into the sample. Stir the probe gently to create
a homogeneous sample.
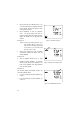
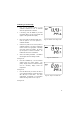
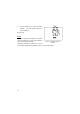
4. Press CAL/MEAS to enter pH calibration
mode. The primary display will show the
measured reading while the smaller secondary
display will indicate the pH standard buffer
solution.
See Figure 9.
NOTE: If using a pH buffer other than pH 7,
press the
V
or
W
key to scroll up or
down until the secondary display value
is the same as your pH buffer value
(pH 4.00, 7.00 or 10.00).
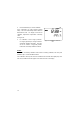
5. Wait for the measured pH value to stabilize.
The READY indicator will display when the
reading stabilizes.
See Figure 10.
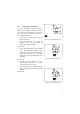
6. After the READY indicator turns on, press
ENTER to confirm calibration. A confirming
indicator (CON) flashes and disappears. The
meter is now calibrated at the buffer indicated
in the secondary display.
See Figure 11.
The secondary display automatically scrolls to the
next buffer calibration option.
x If you are performing multi-point calibration, go
to step 7.
x If you are performing one-point calibration, go
to step 10.
Figure 9 - Calibration at pH 7.00
Figure 10 - READY when reading is stable
Figure 11 - CONFIRM calibration point