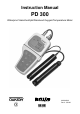
Instruction Manual PD 300 Waterproof Hand-held pH/Dissolved Oxygen/Temperature Meter Technology Made Easy ... 68X248910 Rev.
Preface This manual serves to explain the use of the PD 300 hand-held meter. The manual functions as a step by step guide to help the user operate the meter and as a handy reference guide. This instruction manual is written to cover as many anticipated applications of the meter as possible. If there are doubts in the use of the PD 300 meter, do not hesitate to contact the nearest Authorised Distributor.
TABLE OF CONTENTS 1 INTRODUCTION 2 DISPLAY AND KEYPAD FUNCTIONS 2.1 2.2 3 3.1 3.2 4 4.1 4.2 4.3 4.4 4.5 4.6 5 5.1 5.2 5.
16 ADDENDUM 3: METER FACTORY DEFAULT SETTINGS 68 17 WARRANTY 69 18 RETURN OF ITEMS 70
Instruction Manual 1 PD 300 INTRODUCTION Thank you for selecting the PD 300 waterproof portable meter. This meter is a microprocessor-based instrument that is designed to allow one-hand operation. It is capable of measuring pH, Dissolved Oxygen (mg/L or % Saturation of Oxygen) and Temperature. It is completely WATERPROOF --- and it FLOATS! This meter has many user-friendly features ---- all of which are completely accessible through the water-resistant membrane keypad.
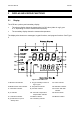
Instruction Manual 2 2.1 PD 300 DISPLAY AND KEYPAD FUNCTIONS Display The LCD has a primary and secondary display. • The primary display shows the measured pH or DO value (either in mg/L, ppm or %, depending on units of measurement selected). • The secondary display shows the measured temperature. The display also shows error messages, keypad functions, and program functions. See Figure 2. Figure 2: Full LCD Screen 1. SETUP mode indicator 7. Oxygen solubility indicator in mg/L or ppm. 13.
Instruction Manual 2.2 PD 300 Keypad The large membrane keypad makes the instrument easy to use. Each button, when pressed, has a corresponding graphic indicator on the LCD. See Figure 1. Some buttons have several functions depending on its mode of operation. Key Function ON/OFF Powers meter on and off. The meter powers on in the mode that you were last using. For example, if you shut the meter off in mg/L measurement mode, the meter will be in mg/L measurement mode when switched on.
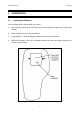
Instruction Manual 3 3.1 PD 300 PREPARATION Inserting the Batteries Four AAA batteries are included with your meter. 1. Use a Philips screwdriver to remove the two screws holding the battery cover. See Figure 3 below. 2. Remove battery cover to expose batteries. 3. Insert batteries. Follow the diagram inside the cover for correct polarity. 4. Replace the battery cover into its original position and secure into place using the two screws removed earlier.
Instruction Manual 3.2 PD 300 Probe Information Your meter includes two probes: • pH electrode with BNC connector. • DO/temperature probe with a notched 6-pin connector The temperature sensing element built into the DO probe will also compensate for pH readings as long as both probes are in your solution at the same time. You can use any standard pH electrode with a BNC connector with this meter.
Instruction Manual PD 300 To connect the DO/ temperature probe: 1. Line up the notch and 6 pins on the probe connector with the holes in the connector located on the top of the meter. Push down and turn the metal locking ring clockwise to lock the probe connector into place. See Figure 4. 2. To remove probe, unscrew the metal locking ring by turning the ring counterclockwise and slide up the probe connector. While holding onto metal sleeve, pull probe away from the meter.
Instruction Manual 4 PD 300 CALIBRATION 4.1 Important Information on Meter Calibration When you recalibrate your meter, old calibration points are replaced on a “point by point” basis in pH and completely for % saturation and mg/L (ppm). For example: • pH: if you previously calibrated your meter at pH 4.01, 7.00 and 10.01, and you recalibrate at pH 7.00, the meter retains the old calibration data at pH 4.01 and pH 10.01.
Instruction Manual 4.2 PD 300 Temperature Calibration The temperature sensor of the the DO probe is factory calibrated. Calibrate your sensor only if you suspect temperature errors that may have occurred over a long period of time or if you have a replacement probe. Make sure the DO probe is attached prior to performing the calibration. 1. Switch the meter on. Press MODE to select either pH or mg/L (ppm) measurement mode. 2. Press the CAL/MEAS key to enter pH or mg/L (ppm) calibration mode.
Instruction Manual 4.3 PD 300 pH calibration Before starting calibration, make sure you are in pH measurement mode. NOTE We recommend calibration with at least two calibration standards that bracket (one above and one below) the expected sample range. One point calibration is possible as long as the chosen buffer is close to the expected sample value. When you re-calibrate your meter, old calibration points are replaced on a “point-by-point” basis.
Instruction Manual PD 300 To Calibrate pH: 1. If necessary, press the MODE key to select pH mode. The pH indicator appears in the upper right hand corner of the display. 2. Rinse the probe thoroughly with de-ionised water or a rinse solution. Do not wipe the probe; this causes a build-up of electrostatic charge on the glass surface. 3. Dip the probe into the calibration buffer. The end of the probe must be completely immersed into the sample. Stir the probe gently to create a homogeneous sample.
Instruction Manual 7. PD 300 Rinse the electrode with deionised water or in rinse solution, and place it in the next pH buffer. 8. Follow steps 5 to 8 for additional calibration points. See Figure 7. 9. When calibration is complete, press CAL/MEAS to return to pH measurement mode. NOTE To exit from pH calibration mode without confirming calibration, DO NOT press ENTER in step 6. Press CAL/MEAS instead. If the selected buffer value is not within ±1.
Instruction Manual 4.4 PD 300 Dissolved Oxygen Calibration Before calibrating your meter, make sure to rinse the probe well with de-ionised water or rinse solution. NOTE Do not let membrane surface of the probe touch any other surface. The probe guard (the piece with holes fitted over the end of the probe) protects the membrane; make sure this is always attached to the probe while it is in use. See Figure 9. You can calibrate for dissolved oxygen in either % saturation or mg/L (ppm).
Instruction Manual 4.5 PD 300 Dissolved Oxygen Calibration in % Saturation You can calibrate this meter quickly and easily in air. The exact calibration value depends on barometric pressure. The meter is set to a factory default of 760 mm Hg, which results in a calibration value of 100% saturation in air. NOTE If the barometric pressure setting has been changed from 760 mm Hg, the calibration value in air will automatically adjust to a value other than 100%.
Instruction Manual PD 300 To calibrate 0% Saturation: 1. READY touch the membrane. 2. 3. MEAS Rinse the probe well with deionised rinse water. Do not 1 28.5 23.4 Press the MODE key to select the % saturation mode. % °C ATC Place the probe in zero oxygen solution. Stir the probe CAL AS ME gently to homogenise the sample. Make sure that the sample is continuously flowing past the membrane sensor. 4. CAL Press the CAL key. The CAL indicator will appear above % the primary display.
Instruction Manual 4.6 PD 300 Dissolved Oxygen Calibration in mg/L (ppm) mode Calibrating the meter to 100% in saturation mode will also calibrate the mg/L mode at the value in mg/L corresponding to 100% saturation. This should produce acceptable results in most applications. This meter also lets you make a calibration adjustment in mg/L (ppm) mode without affecting your % saturation calibration. To select between mg/L and ppm units, see page 46.
Instruction Manual PD 300 To calibrate in mg/L (ppm) mode: 1. Calibrate 100% saturation as per Section 4.5. 2. Rinses the probe well with deionised rinse water. Wipe the outside of the probe carefully (do not touch the membrane). 3. Dip the probe into a sample of known oxygen concentration. Wait for the reading to stabilise. If the READY indicator feature is enabled, it will appear when the reading is stable. 4. Press the MODE key to select the mg/L (ppm) mode. 5. Press the CAL key.
Instruction Manual 5 PD 300 MEASUREMENT 5.1 5.1.1 Taking pH Measurements Automatic Temperature Compensation Automatic Temperature Compensation only occurs when a compatible temperature sensing element is plugged into the meter. If there is no temperature sensor plugged into the meter, the default manual temperature setting is 25 °C. You can manually set the temperature to match your working conditions using a separate thermometer.
Instruction Manual PD 300 Manual Temperature Compensation (pH only) IMPORTANT: For manual compensation, you must disconnect the temperature probe (see page 10). 1. Switch the meter on. Press the MODE key to select pH mode. 2. Press the CAL/MEAS key to enter pH calibration mode. The CAL indicator will appear above the primary display. 3. While in pH calibration mode, press the MODE key to enter temperature calibration mode.
Instruction Manual PD 300 Taking Measurements (pH) Be sure to remove the electrode storage bottle or protective rubber cap on the electrode before taking measurements. To ensure Automatic Temperature Compensation (ATC) for pH measurements, the DO or ATC probe must be plugged in and immersed into the sample. Figure 15: Measurement mode To take readings: 1. Rinse the pH electrode with deionised or distilled water before use to remove any impurities adhering to the probe body.
Instruction Manual PD 300 Taking measurements with READY indicator selected on If the READY indicator has been activated, the READY annunciator lights when the reading is stable*. Switch the READY indicator on or off in SETUP Section 8.4 Program P3.1. * The READY indicator appears and the reading holds until the measured value exceeds the tolerance. Then, the READY annunciator turns off.
Instruction Manual 5.2 PD 300 Taking DO readings During measurement, the probe can be: z Fully immersed in the solution z Partially immersed in the solution Do not allow the probe’s membrane surface to touch anything! The probe guard (the piece with holes fitted over the end of the probe) protects the membrane; you should leave this piece attached to the probe at all times.
Instruction Manual PD 300 Taking measurements with READY ON indicator selected on If the READY indicator has been activated, the READY annunciator lights when the reading is stable. To switch the READY indicator on or off in the SETUP program – see Section 8.10.1 on page 45 for directions. Taking measurements with READY HOLD indicator selected on When a reading is stable for more than 5 seconds, the auto endpoint feature will automatically “HOLD” the reading.
Instruction Manual 5.3 PD 300 Taking Pressure/Salinity Compensated DO measurements If necessary, you can adjust the pressure and salinity values of your measurements in the SETUP mode. The DO meter will automatically compensate for salinity and pressure based on the values entered in the SETUP functions. The meter is factory set at 760 mm Hg (101.3 Pascals) pressure adjustment and a factor of 0.0 ppt salinity adjustment. See Addendum 2 on page 67 for a “Pressure vs Altitude” table.
Instruction Manual 6 PD 300 HOLD FUNCTION This feature lets you freeze the pH, dissolved oxygen, and temperature readings for a delayed observation. HOLD can be used any time when in MEAS mode. To hold a measurement, press the HOLD key while in measurement mode. “HOLD” will appear on the display. To release the held value, press HOLD again. Continue to take measurements. NOTE The meter shuts off automatically 20 minutes after the last key press.
Instruction Manual 7 7.1 PD 300 BACKLIT LCD Using the backlit LCD This feature lets you view readings in low light situations. 1. To activate the backlit LCD feature, press the key to activate. To conserve batteries, the backlight automatically shuts off after 20 seconds. To keep the LCD backlit, keep the backlight key pressed. 7.2 Adjusting the LCD brightness This mode lets you adjust the brightness of the backlit LCD. Selecting a dimmer backlighting level helps conserve batteries.
Instruction Manual 8 PD 300 ADVANCED SETUP FUNCTIONS The advanced SETUP mode lets you customise your meter’s preferences and defaults. Your waterproof meter features different sub groups that organise all set-up parameters. Each measurement parameter (pH, % saturation, & mg/L) has its own sets of customisable setup functions. Some of which are unique and independent while others are common for the whole meter. The full selection of available sub groups is shown in the following three pages. 8.
Instruction Manual PD 300 SETUP in pH Measurement Mode P1.0: View previous calibration data P1.1 P1.2 P1.3 P1.4 P1.5 First calibration point (pH 1.68) Second calibration point (pH 4.01) Third calibration point (pH 7.00) Fourth calibration point (pH 10.01) Fifth calibration point (pH 12.45) Instructions on page 30. P2.0: View electrode data P2.1 P2.2 pH electrode offset pH electrode slope Instructions on page 31. P3.0: Unit configuration P3.
Instruction Manual PD 300 % Saturation Measurement Mode dPr: Dissolved Oxygen parameters • Select Hg or Pa barometeric pressure units • Select barometric pressure Instructions on page 37. OFS: % saturation offset adjustment • Set % saturation offset adjustment Instructions on page 40. CAL: Viewing previous calibration data • View previous calibration data Instructions on page 41.
Instruction Manual PD 300 mg/L (ppm) Measurement Mode dPr: Dissolved Oxygen parameters • Select Hg or Pa barometric pressure units • • Select barometric pressure Select salinity adjustment factor Instructions on page 37. CAL: Viewing previous calibration data • View previous calibration data Instructions on page 41. ELE: Viewing probe data • • • View probe slope View mV value equivalent to 100% saturation View mV value equivalent to 0% saturation Instructions begin on page 42.
Instruction Manual 8.2 PD 300 P1.0: Viewing previous pH calibration data This mode lets you recall previous pH calibration data, which helps you know when to re-calibrate your meter. This is a “view only” mode. From measurement mode: 1. Press the MODE key to select pH measurement mode if necessary. 2. 3. Press the SETUP key to enter Set up mode. Press the ▲ or ▼ keys to scroll through subgroups until you view parameter P1.0. 4. Press the ENTER key repeatedly to view previous calibration data.
Instruction Manual 8.3 PD 300 P2.0: Viewing pH electrode data Program 2 has two “view only” options that let you check the electrode parameters for diagnostic purposes. It lets you view: • • P2.1 = Electrode offset P2.2 = Electrode slope From pH measurement mode 1. Press the MODE key to select pH measurement mode. 2. 3. Press the SETUP key to enter Set Up mode. Press the ▲ or ▼ keys to scroll through subgroups until you view parameter P2.0. 4. 5. Press the ENTER key to select parameter 2.1.
Instruction Manual 8.4 PD 300 P3.0: pH Measurement configuration This subgroup program allows to customise the meter to your specific needs. You can program the meter to: 1. Select READY indicator ON or OFF 2. Select the number of pH calibration points 3. Select between °C and °F units for temperature readings Figure on the right shows the setup sequence for this program subgroup. Figure 23 – P 3.
Instruction Manual PD 300 P3.1: READY Indicator and auto endpoint function This program lets you select: • “READY indicator on” to indicate when the reading is stable. • “READY indicator off” for faster meter response. • Auto endpoint function on. Select auto endpoint on to “hold” the reading when it is stable for more than 5 seconds. The display automatically freezes, and the HOLD indicator appears on the left side of the display. Press the HOLD key to release the display and access other functions.
Instruction Manual PD 300 P3.2: Selecting number of pH calibration points Program P3.2 lets you select the number of calibration points that appear in pH calibration mode: 2, 3, 4, or 5. The meter will automatically exit calibration mode after you have calibrated to your selected number of points. From measurement mode. 1. Press the MODE key to select pH measurement mode. 2. 3. Press SETUP key to enter Set Up mode. Press the ▲ or ▼ keys to scroll through subgroups until you view parameter P3.0. 4. 5.
Instruction Manual PD 300 P3.3 Selecting °C or °F This meter lets you select between °C and °F units for temperature readings. From measurement mode 1. Press the MODE key to select pH measurement mode. 2. 3. Press SETUP key to enter Set Up mode. Press the ▲ or ▼ keys to scroll through subgroups until you view parameter P3.0. 4. Press the ENTER key three times to select parameter 3.3. 5. Press the ▲ or ▼ keys to toggle between °C and °F. 6.
Instruction Manual 8.5 PD 300 P4.0: Resetting to factory default settings (pH) This program lets you reset all pH parameters to factory default settings. This clears all calibration data and any other pH setup functions you might have changed. The following settings will remain as you have set them: • • • Temperature unit of measure (°C or °F) The temperature offset calibration value All DO calibration data and parameters There are also some other parameters that retain settings when reset is done.
Instruction Manual 8.6 PD 300 P1.0 (dPr): Dissolved Oxygen Parameters This sub group is available in % saturation and mg/L (ppm) mode and lets you adjust the barometric pressure and salinity (% saturation mode only). 8.6.1 P1.1 Pressure adjustment mode Barometric pressure is vital to correct dissolved oxygen measurements. You need to enter the correct barometric pressure of the area you are measuring.
Instruction Manual PD 300 Figure 28: Change pressure units (mm Hg or kPa) & adjusting its values 8.6.
Instruction Manual PD 300 P1.2: Salinity Adjustment Mode NOTE This mode appears in mg/L (ppm) measurement mode only. Salinity correction mode lets you correct for the variations in oxygen solubility due to salt concentration in the sample. From measurement mode: 1. Press the MODE key to select mg/L (ppm) mode. 2. Press the SETUP key to enter SETUP mode. 3. Press ▲ or ▼ keys to scroll through subgroups until you view parameter “dPr” in the upper display. 4. Press the ENTER key five times.
Instruction Manual 8.7 PD 300 P2.0 (OFS): Offset for % Saturation Measurement NOTE This sub group appears in % saturation measurement mode only. From measurement mode: 1. Press the MODE key to select % saturation mode. 2. Press the SETUP key to enter SETUP mode. 3. Press ▲ or ▼ keys to scroll through subgroups until you view parameter “OFS” in the upper display. 4. Press the ENTER key. The upper display shows the current measurement in % saturation and the lower shows “OFS”. 5.
Instruction Manual 8.8 PD 300 P3.0 [P2.0] (CAL): Previous Calibration Information (*Program numbers in “[ ]” are for setup in mg/L (ppm) mode. This sub group shows you the previous calibration data. This is a “view only” parameter. In % saturation mode: Calibration information is shown in % saturation units. In mg/L (ppm) mode: Calibration information is shown in mg/L (ppm) units. From measurement mode: 1. Press the MODE key to select the calibration data you want to view: % or mg/L (ppm). 2. 3.
Instruction Manual 8.9 PD 300 P4.0 [P3.0] (ELE): Electrode Properties These “view only” parameters show you the electrode properties for diagnostic purposes: A. P4.1 [P3.1] Probe Slope: Provides an indication of the probe’s efficiency. The value displayed is the ratio of the theoretical value to the actual value produced by the probe. The higher the number, the lesser output from the probe. The ratio displays from 0.5 to 1.999% (1.0 = 100%). B. P4.
Instruction Manual 6. PD 300 Press the ENTER key. The upper display shows the 100% saturation mV value. 7. Press the ENTER key. The upper display shows the 0% saturation mV value. 8. Press the ENTER key to move back to subgroup “ELE”. If you want to return to measurement mode, press CAL/MEAS. (The values shown above are for illustration purpose.
Instruction Manual 8.10 PD 300 P5.0 [P4.0] COF: Unit Configuration Unit configuration mode lets you select the following parameters: A. P5.1 [P4.1] READY indicator and auto endpoint function. B. [P4.2] mg/L or ppm units (available in mg/L or ppm mode only) C. P5.2 [P4.3] Temperature in °C or °F. 8.10.
Instruction Manual PD 300 P5.1 [P4.1] READY Indicator and Auto Endpoint Function The first program lets you select: • “READY indicator ON” to indicate when the reading is stable. • • “READY indicator OFF” for faster meter response. Auto Endpoint Function ON. Select auto endpoint ON to “HOLD” the reading when it is stable for more than 5 seconds. The display automatically freezes, and the HOLD indicator appears on the left side of the display.
Instruction Manual 8.10.2 PD 300 [P4.2] Selecting mg/L or ppm units NOTE This mode appears in mg/L (ppm) measurement mode only. This mode lets you select between mg/L or ppm dissolved oxygen units. From measurement mode 1. Press the MODE key to select mg/L (ppm) mode. 2. Press SETUP key to enter SETUP mode. 3. Press ▲ or ▼ keys to scroll through subgroups until you view parameter “COF” in the upper display. 4. Press the ENTER key until “dO” appears in the upper display. 5.
Instruction Manual 8.10.3 PD 300 P5.2 [P4.3] Selecting °C or °F Temperature Unit This meter lets you select between °C and °F units for temperature readings. From measurement mode 1. 2. Press SETUP key to enter SETUP mode. Press ▲ or ▼ keys to scroll through subgroups until you view parameter “COF” in the upper display. 3. Press the ENTER key until “C” or “F” appears in the upper display. 4. 5. Press ▲ or ▼ keys to toggle between °C and °F.
Instruction Manual 8.11 PD 300 P6.0 [P5.0] LCd: Adjusting LCD Brightness NOTE This function is only available through DO measurement mode (% saturation or mg/L) This mode lets you adjust the brightness of the backlit LCD. Selecting a dimmer back-lighting level helps conserve batteries. From measurement mode 1. 2. Press SETUP key to enter SETUP mode. Press ▲ or ▼ keys to scroll through subgroups until you view parameter “LCd” in the upper display. 3. Press the ENTER key.
Instruction Manual 8.12 PD 300 P7.0 [6.0] rSt: Resetting to Factory Default Setting (DO) This program lets you reset all DO (% saturation and mg/L) parameters to factory default settings. This clears all calibration data and any other DO setup functions you might have changed.
Instruction Manual 9 9.1 PD 300 PROBE CARE AND MAINTENANCE pH Electrode care Your pH electrode should be kept clean and free from dirt and contamination. Probes that are not clean may provide slow or unusual readings. With proper care and normal usage, the pH electrode will need to be replaced every 6 to 18 months on average. NOTE: For specialty electrode care, consult the instruction manual included with your electrode. pH electrode storage For best results, always keep the pH bulb wet.
Instruction Manual PD 300 Reactivating the pH electrode If stored and cleaned properly, your pH electrode should be ready for immediate use. However, a dehydrated bulb may cause sluggish response. To rehydrate the bulb, immerse the electrode in a pH 4 buffer solution for 10 to 30 minutes. If this fails, the electrode requires activation. Never touch or rub glass bulb. Contact builds up an electro-static charge.
Instruction Manual 9.2 PD 300 Dissolved Oxygen Principle The probe is a galvanic measuring element which produces an output proportional to the oxygen present in the medium in which it is placed. The galvanic probe design lets you take measurements immediately – without the typical 15 minute wait of other dissolved oxygen probes. The probe consists of two parts: • An upper part consisting of an anode, a cathode, and cable.
Instruction Manual 9.3 PD 300 Probe Care and Maintenance Under typical operating conditions, the DO probe should last for several years. Proper care and maintenance will help you receive the maximum probe life and ensure more accurate readings. Since any deposits on the membrane surface act as a barrier to oxygen diffusing through the membrane, the membrane must be cleaned at regular intervals to assure maximum reliability.
Instruction Manual 9.4 PD 300 Membrane Housing Replacement Replacement of the membrane cap housing/membrane is required only when you cannot calibrate the probe, or if the membrane is damaged. Typical membrane damages are punctures or wrinkles caused during measurements or cleaning. For more information see Trouble-Shooting Guide section on page 60. Your new DO probe comes with a replacement membrane housing. To order more replacement membrane housing, , see the Accessories section on page 63. 9.4.
Instruction Manual 9.5 PD 300 Membrane/O-ring Replacement (Optional Procedure) It is recommended only experienced service personnel can perform this procedure. This procedure is OPTIONAL, and should only be performed if you have new membrane and O-ring. You are also required to have a membrane installation tool. These items are available as optional accessories in the Accessories section. 1. Pull off the probe guard. See figure on right. 2. Unscrew the membrane cap from the probe. 3.
Instruction Manual PD 300 10. Using the installation tool, screw the membrane lock back into the cap. Tighten the lock firmly over the membrane and O-ring, but do not over tighten. 11. Inspect the membrane for wrinkles. If wrinkles Close Open Installation tool exist, remove the membrane and repeat steps 8 – 11. 12. Fill the membrane cap with water and inspect the bottom for leaks.
Instruction Manual 9.6 PD 300 Electrolyte Solution The electrolyte solution in your probe’s cap will deplete on usage and will need to be replaced periodically. Your new DO probe comes with accessories of one 50-ml replacement electrolyte solution and a spare membrane cap. The replacement electrolyte comes premixed and ready to use. To order more electrolyte solution, see Accessories section.
Instruction Manual 9.7 PD 300 DO Probe Troubleshooting Table When experiencing difficulties with the equipment, keep in mind of the following: 1. Check for the obvious, such as physical condition of the probe, any signs of damage to the cable, power and signal connections etc. 2. Determine whether it is the probe, meter or the surrounding environment that is causing the problem. The following troubleshooting table identifies most of the problems likely to occur: Problem 1.
Instruction Manual Problem 3. It is not possible to calibrate the probe in air – the display will not read high enough after fully adjusting the offset. PD 300 Probable Causes Probe has dried out – no electrolyte inside. Probe is overdue for servicing – excessive build-up of anode oxide. A deposit has built-up on the silver cathode, which is inhibiting the reduction of oxygen at its surface. Solution Service probe and change membrane. Use a stiff nylon brush to remove the oxide built-up from the anode.
Instruction Manual 10 PD 300 TROUBLE SHOOTING GUIDE Problem Cause Solution Press ‘ON’ key but no display a) Batteries not in place a) Check that batteries are in place and making good contact. b) Batteries not in correct polarity (+ and – position). b) Re-insert batteries with correct polarity. c) Weak batteries c) Replace batteries. a) HOLD mode in operation. a) Cancel HOLD mode by pressing Hold key. b) Damaged key pad. b) Return to dealer. c) Internal program error.
Instruction Manual 11 PD 300 ERROR MESSAGES LCD Display Indicates Cause Solution Err annunciator Unrecognised input from keypad Wrong input in selected mode. Release key. Select valid operations depending on mode. CAL & Err annunciators on / Buffer and electrode indicators blink. Calibration error. Wrong value input at calibration. Check your input value, clean probe. Dirty probe. See Calibration or Probe Maintenance section. Battery indicator blinks Low battery level.
Instruction Manual 12 PD 300 SPECIFICATIONS pH Range Resolution Relative accuracy -2.00 to 16.00 pH 0.01 pH ±0.01 pH Dissolved Oxygen Range Resolution Relative accuracy 0.00 – 20.00 mg/L or ppm 0.01 mg/L; 0.01 ppm ± 1.5% of Full Scale % Saturation of Oxygen Range Resolution Relative accuracy 0.0 – 200.0 % 0.1 % ± 1.5% of Full Scale Temperature Range Resolution °C Resolution °F Relative accuracy -10.0 to 110.0 °C, (14.0 to 230°F) 0.1°C 0.1°F (14.0°F – 199.9°F) and 1°F(200°F to 230°F) ± 0.
Instruction Manual 13 PD 300 ACCESSORIES Replacement Meters and accessories Eutech Instruments Item Eutech Instruments Waterproof CyberScan PD 300 portable pH/DO meter (with backlit) – with pH electrode (EC-DA93506-03B), DO probe with built-in temperature sensor (ECDOHANDYNEW, 1 assembled membrane cap housing, 50-ml refilling electrolyte & hard plastic carrying case with pH calibration solutions (ECPHWP-KIT).
Instruction Manual PD 300 Oakton Instruments Item Oakton Instruments Ordering Code PD 300 meter with DO/Temp probe (35640-50) and pH probe (35805-23) 35632-00 PD 300 meter only 35632-02 PD 300 meter with DO/Temp probe (35640-50) and pH probe (35805-23), electrode maintenance kit (35640-80), pH calibration solutions, and hard carrying case.
Instruction Manual PD 300 Calibration Solutions Item Eutech Instruments Oakton Instruments Order Code Order Code pH 4.01 buffer solution, 480 ml bottle (1 pint) EC-BU-4BT pH 7.00 buffer solution, 480 ml bottle (1 pint) EC-BU-7BT 00654-04 pH 10.01 buffer solution, 480 ml bottle (1 pint) EC-BU-10BT 00654-08 pH 4.01 buffer sachets, 20 ml x 20 pcs. EC-BU-4BS 35653-01 pH 7.00 buffer sachets, 20 ml x 20 pcs. EC-BU-7BS 35653-02 pH 10.01 buffer sachets, 20 ml x 20 pcs.
Instruction Manual 14 PD 300 ADDENDUM 1: DISSOLVED OXYGEN & METER THEORY Dissolved Oxygen (DO) refers to the volume of oxygen that is contained in water. There are two main sources of DO in water: from atmosphere and photosynthesis. Waves and tumbling water mix air into the water where oxygen readily dissolves until saturation occurs. Oxygen is also produced by aquatic plants and algae as a by-product of photosynthesis.
Instruction Manual 15 PD 300 ADDENDUM 2: PRESSURE VS ALTITUDE TABLE Barometric pressure affects DO readings, therefore this meter lets you enter the correct barometric pressure at your altitude. If you do not have equipment that lets you measure the exact barometric pressure at your altitude, you can estimate it using the chart below.
Instruction Manual 16 PD 300 ADDENDUM 3: METER FACTORY DEFAULT SETTINGS Resetting the meter to factory default settings clears all calibration data and most other setup functions you might have changed. The following settings will remain as you have set them: • • Temperature unit of measure (°C or °F) The temperature offset calibration value. NOTE DO and pH data are cleared separately from each other. • • Type To clear pH data, see Sub group P4.0 on page 36. To clear DO data, see Sub group P7.
Instruction Manual 17 PD 300 WARRANTY This meter is supplied with a three -year meter warranty and six-month pH/ DO probe warranty, against significant deviations in material and workmanship. If repair or adjustment is necessary and has not been the result of abuse or misuse within the designated period, please return – freight pre-paid – and correction will be made without charge. Eutech Instruments/ Oakton Instruments will determine if the product problem is due to deviations or customer misuse.
Instruction Manual PD 300 18 RETURN OF ITEMS Authorisation must be obtained from our Customer Service Department or authorised distributor before returning items for any reason. A “Return Goods Authorisation” (RGA) form is available through our authorised distributor. Please include data regarding the reason the items are to be returned. For your protection, items must be carefully packed to prevent damage in shipment and insured against possible damage or loss.
For more information on Eutech Instruments/ Oakton Instruments’ products, contact your nearest distributor or visit our website listed below: Oakton Instruments P.O Box 5136, Vernon Hills, IL 60061, USA Tel: (1) 888-462-5866 Fax: (1) 847-327-2984 E-mail: info@4oakton.com Web-site:www.4oakton.com Eutech Instruments Pte Ltd. Blk 55, Ayer Rajah Crescent, #04-16/24 Singapore 139949 Tel: (65) 6778 6876 Fax: (65) 6773 0836 E-mail: marketing@eutechinst.com Web-site: www.eutechinst.