Instruction Manual CyberScan DO 1500 Dissolved Oxygen Meter Technology Made Easy ... 68X292336 Rev.
PREFACE Thank you for selecting the Eutech Instruments CyberScan DO 1500 bench meter. The instruction manual serves to explain the use of the CyberScan DO 1500 bench meter as a step-by-step operational guide to help you familiarise with the meter’s features and functions. It is structured sequentially with illustration of diagrams that explains the various functions and setup menus available.
TABLE OF CONTENTS 1. INTRODUCTION 1 2. GETTING STARTED 2 2.1. Connectors 2 3. USING THE METER 3.1. 3.2. 3.3. 3.3. 3 The Electrode Display/ Keys Screen Display Screen Display 3 4 4 5 4. SETUP PROCEDURE CHECK 4.1. CyberScan DO 1500 Setup Pages 4.1.1. Setup P 1.0: View the Calibration Data 4.1.2. Setup P 2.0: Set Pressure 4.1.3. Setup P3.0: Set the Salinity Value 4.1.4. Setup P4.0: Select Number of User Cal Points for 4.1.5. Setup P5.0: Enable/ Disable Auto Cal 4.1.6. Setup P6.
Instruction Manual CyberScan DO1500 1. INTRODUCTION Thank you for selecting a Eutech Instruments CyberScan Dissolved Oxygen bench-top meter. This instruction manual describes the operation of the meter. The state-of-art meter that you have purchased is easy to operate and will guide you through the various functions by displaying easy to understand prompts.
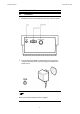
Instruction Manual CyberScan DO 1500 2. GETTING STARTED 2.1. Connectors 1. Review the layout and arrangement of the rear connector panel. 2. Connect the power adapter’s output power jack to the meter’s rear panel DC input power socket and plug in the adapter to a power source. ) Make sure the power adapter centre is negative.
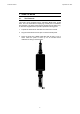
Instruction Manual CyberScan DO 1500 3. USING THE METER 3.1. The Electrode This meter comes equipped with a self-stirring BOD probe, model 5010, from YSI. Read the accompanying manual prior to installation and operation. The 5010 probe need be plugged into the meter only, as the meter supplies both its operation power and stirring power. 1. Prepare the electrode as described in its instruction manual. 2. Plug the electrode into the DO jack on the back meter panel. 3.
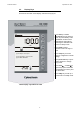
Instruction Manual CyberScan DO 1500 3.2. Display/ Keys Overview of the meter screen display and function key layout. Measure Press std key to initiate standardisation from measure mode. Or press std key at the ‘Standardize’ mode to exit to Measurement mode without confirming the calibration OR to exit from Setup mode. % Sat Press mode to select operation mode to be mg/L or %sat. STABLE Press setup key to access setup for configuration of meter settings.
Instruction Manual CyberScan DO 1500 3.3. Screen Display Familiarise yourself with the layout of the digital screen display.
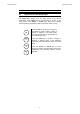
Instruction Manual CyberScan DO 1500 4. SETUP PROCEDURE CHECK 4.1. CyberScan DO 1500 Setup Pages The setup button brings you to the setup menus of the various parameters. Press setup while in measurement to access to the setup menus. The ▲/save or ▼/view keys allow you to change several operating parameters. While in the setup mode you may: std print enter Press the std key at any time to return to the Measure screen without making a change or selection in the setup mode.
Instruction Manual CyberScan DO 1500 P 1.0: View calibration data View P 8.0: Set the Baud Rate - View the last calibrated cal factor and 0% offset value if two points are calibrated. Print - Set baud rate as 4800, 9600, 19200 or 38400 bps. P 9.0: Set the Parity Bit P 2.0: Set the pressure (425-850mmHg) - Set parity bit as none(0), odd(1) or even(2). - Adjust and select Pressure value. mmHg Print P 3.0: Set the Salinity (0.0 - 45.0 ppt) P 10.
Instruction Manual CyberScan DO 1500 4.1.1. Setup P 1.0: View the Calibration Data This setup menu allows you to view the last calibrated Cal factor in % Sat and mg/L mode. View press to set value press enter to accept 1. Access the Setup pages while in measurement mode by pressing the setup key.
Instruction Manual CyberScan DO 1500 2. Press enter to access View Last calibrated Cal factor setup page.
Instruction Manual CyberScan DO 1500 3. If the unit has not been standardised, a series of dashes will appear on the display rather than a number. 4. Press enter key to confirm selection and to go to next setup page, OR press std to exit from this page without confirming the change mode. ) If you access the setup page from %Sat mode and if you have calibrated one point (100% Sat) then you can view the last calibrated Cal Factor.
Instruction Manual CyberScan DO 1500 4.1.2. Setup P 2.0: Set Pressure The setup option allows you to set the atmospheric pressure (mmHg) value. You are able to set the salinity value in the range of (450mmHg to 825 mmHg). mmHg press to set value press enter to accept To set Pressure 1. Access the Setup pages while in measurement mode by pressing the setup key. 2. Press or to access Set the Pressure setup page.
Instruction Manual CyberScan DO 1500 3. Press enter to go to the ‘Pressure adjustment’ setup page as shown below. 4. Adjust the pressure value using the and keys. 5. Press enter key to confirm selection and to go to next setup page OR press std to exit from this page without confirming the change mode. mmHg press to set value press enter to accept ) You can escape setup mode at any time by pressing std.
Instruction Manual CyberScan DO 1500 4.1.3. Setup P3.0: Set the Salinity Value The setup option allows you to set the Salinity (as ppt) value. You are able to set the salinity value in the range of 0.0- 45.0 ppt. Salinity press to set value press enter to accept To set Salinity 1. Access the Setup pages while in measurement mode by pressing the setup key. 2. Press or to access Set the Salinity Value setup page.
Instruction Manual CyberScan DO 1500 3. Press enter to go to the ‘Salinity adjustment’ setup page as shown below. 4. Adjust the salinity value using the 5. Press enter key to confirm selection and to go to next setup page OR press std to exit from this page without confirming the change mode. Salinity press to set value press enter to accept 14 and keys.
Instruction Manual CyberScan DO 1500 4.1.4. Setup P4.0: Select Number of User Cal Points for %Sat calibration This setup option allows you to select the number of user cal points for % Sat calibration to be either 1 or 2. % Sat press to set value press enter to accept To Select Number of User Cal Points. 1. Access the Setup measurement mode pages by pressing setup while in 2. Press the or key in setup mode to access the Select Number of User Cal Points setup page.
Instruction Manual CyberScan DO 1500 3. Press enter to accept the current value or press adjust and set the value to be 1 or 2. or to 4. Press enter key to confirm selection and to go to next setup page OR press std to exit from this page without confirming the change mode.
Instruction Manual CyberScan DO 1500 4.1.5. Setup P5.0: Enable/ Disable Auto Cal This setup option allows you to enable the auto calibration for % Sat and mg/L modes. % Sat press to set value press enter to accept To Enable/ Disable Auto Cal 1. Access the Setup measurement mode pages 2. Press the or key in setup mode to access the Auto Cal setup page. Press enter to access the setup page.
Instruction Manual CyberScan DO 1500 3. Press or to select YES or NO. 4. Press enter key to confirm selection and to go to next setup page OR press std to exit from this page without confirming the change mode.
Instruction Manual CyberScan DO 1500 4.1.6. Setup P6.0: Select the Temperature Unit press to set value press enter to accept select This setup option allows you to select unit of measure for Temperature either in °C or °F. To Select Temperature Unit 1. Access the Setup pages menu from the measurement mode by pressing the setup key. 2. Press the or key in setup mode to access the Select Temperature Unit setup page. Press enter to access the setup page.
Instruction Manual CyberScan DO 1500 3. Press or key to select °C or °F. 4. Press enter key to confirm selection and to go to next setup page OR press std to exit from this page without confirming the change mode.
Instruction Manual CyberScan DO 1500 4.1.7. Setup P7.0: Enable/ Disable Stability Indicator This setup option allows you to set the stability indicator to be displayed on the screen whenever reading has stabilised, thus minimises guesswork. STABLE press to set value press enter to accept To Set Stability Indicator 1. Access the Setup pages menu from the measurement mode by pressing the setup key. 2. Press the or key in setup mode to access the Set Stability Indicator setup page.
Instruction Manual CyberScan DO 1500 3. Press or key to select ON or OFF. 4. Press enter key to confirm selection and to go to next setup page OR press std to exit from this page without confirming the change mode.
Instruction Manual CyberScan DO 1500 4.1.8. Setup P8.0: Baud Rate This setup option allows you to set the baud rate (bits per second) of the communication protocol interface. Print press to set value press enter to accept To Set Baud Rate 1. Access the Setup pages menu from the measurement mode by pressing the setup key. 2. Press the or key in setup mode to access the Set Baud Rate setup page. Press enter to access the setup page.
Instruction Manual CyberScan DO 1500 3. Press 38400. or key to toggle between 4800, 9600, 19200 or 4. Press enter key to confirm selection and to go to next setup page OR press std to exit from this page without confirming the change mode.
Instruction Manual CyberScan DO 1500 4.1.9. Setup P9.0: Parity Bit This setup option allows you to set the parity bit of the communication protocol interface. Print Print press to value set value press to set press enter to accept press enter to accept To Set Parity Bit 1. Access the Setup pages menu from the measurement mode by pressing the setup key. 2. Press the or key in setup mode to access the Set Parity Bit setup page. Press enter to access the setup page.
Instruction Manual CyberScan DO 1500 3. Press or key to toggle between toggle between 0 (none), 1 (odd) or 2 (even). 4. Press enter key to confirm selection and to go to next setup page OR press std to exit from this page without confirming the change mode.
Instruction Manual CyberScan DO 1500 4.1.10. Setup P10.0: Stop Bit This setup option allows you to set the stop bit of the communication protocol interface. Print Print press to value set value press to set press enter to accept press enter to accept To Set Stop Bit 1. Access the Setup pages menu from the measurement mode by pressing the setup key. 2. Press the or key in setup mode to access the Set Stop Bit setup page. Press enter to access the setup page.
Instruction Manual CyberScan DO 1500 3. Press or key to toggle between 1 or 2. 4. Press enter key to confirm selection and to go to next setup page OR press std to exit from this page without confirming the change mode.
Instruction Manual CyberScan DO 1500 4.1.11. Setup P11.0: Print Data This setup option allows you to print current displayed data or data stored in the meter’s memory to a computer or printer via its RS232 interface port. Note all the communication protocol for both the meter and computer/printer must match before successful printing can be performed. Print press to set value press enter to accept To Select Print Data Option (Current / Memory) 1.
Instruction Manual CyberScan DO 1500 3. Press or key to toggle between Curr or Store. 4. Press enter key to confirm selection and to go to next setup page OR press std to exit from this page without confirming the change mode.
Instruction Manual CyberScan DO 1500 4.1.12. P12.0: Clear Stored Data This setup option allows you to clear all stored data sets (from previous measurements) in the meter’s memory for new data to be stored. Note old data sets will be overwritten by any new data sets in the event when the stored locations have exceeded. Print clear press tosset value press to et value press enter to accept press enter to accept To Clear Stored Data 1.
Instruction Manual CyberScan DO 1500 3. Press or key to toggle between YES or NO. 4. Press enter key to confirm selection and to go to next setup page OR press std to exit from this page without confirming the change mode. ) When you press enter key to confirm the clearing of memory, meter displays blinking “clear” wait until meter display stop blinking to proceed with next button press.
Instruction Manual CyberScan DO 1500 4.1.13. P13.0: Clear Buffer Values This setup option allows you to clear the standardised buffer values. mg/L % Sat clear BUFFER press to set value press enter to accept To Clear Buffer Values 1. Access the Setup pages menu from the measurement mode by pressing the setup key. 2. Press the or key in setup mode to access the Clear Buffer Values setup page. Press enter to access the setup page.
Instruction Manual CyberScan DO 1500 3. Press or key to toggle between YES or NO. 4. Press enter key to confirm selection and to go to next setup page OR press std to exit from this page without confirming the change mode. ) If you are doing user reset from %sat setup page, it will clear both % sat and mg/L calibration. If you are doing user reset from mg/L setup page, meter will clear mg/L calibration only.
Instruction Manual CyberScan DO 1500 5. USER CALIBRATION 5.1. %Sat – One Point calibration (Auto) User can do the 100%Sat calibration. The pressure that has been set in the setup will be applied only during the calibration. Accepted window for 100% sat= 50% - 200%Sat 1. Press std to enter to ‘Standardize’ screen. Upper display shows the present measured value, while lower display shows the pressure compensated 100% sat. 2. Hold probe in air. 3. Wait for the upper display value to stabilise.
Instruction Manual CyberScan DO 1500 5.2. %Sat – Two Point calibration (Auto) User must do the 0.0%Sat cal first. This point will be considered as offset. After successful 0%Sat calibration, meter will prompt for the 100% Sat calibration. User must do the two points. Otherwise meter displays the error message. Press enter if meter displays the error message. Accepted window for 0% Sat= below 5% Sat. Accepted window for 100% Sat= 50% - 200%Sat 1. Press std to enter to ‘Standardize’ screen.
Instruction Manual CyberScan DO 1500 5.3. %Sat – One Point calibration (Manual) User can calibrate to the know value. Accepted window is 70% of the default value. Lowest value that can be calibrated is 20.0 %Sat. 1. Press std to enter to ‘Standardize’ screen. Both Upper and lower display shows the present measured value. 2. Dip the electrode into the standard solution. Wait for the upper display value is stabilised. Use / keys to adjust the lower display to the known cal value. 3.
Instruction Manual CyberScan DO 1500 5.4. mg/L– One Point calibration (Auto) User can do calibration in mg/L. 1. Press std to enter to ‘Standardize’ screen. Upper display shows the present measured value while lower display shows theoretical value. [Based on pressure and salinity setting] 2. User can just confirm the theoretical reading. 3. Acceptance window is 70% of the theoretical value. 4. Press enter key to confirm calibration.
Instruction Manual CyberScan DO 1500 5.5. mg/L– One Point calibration (Manual) User can do calibration in mg/L. 1. Press std to enter to ‘Standardize’ screen. Both upper and lower display shows the present measured value. 2. Use the / keys to adjust the known standard value. 3. Window provided for the adjustment is 70% of the present reading. Lowest value that can be set is 2.00mg/L; highest value is 60.00 mg/L. 4. After set the value, press enter key to confirm calibration.
Instruction Manual CyberScan DO 1500 5.6. ATC Calibration User can adjust the ATC temperature offset. 1. From the measurement mode, press std and followed by mode key to go into the temperature calibration mode. 2. Use the / keys to adjust the offset. 3. After set the value, press enter to confirm calibration.
Instruction Manual CyberScan DO 1500 6. MEMORY 6.1. save In any measurement mode, press ▲/save key to store the displayed reading into the meter’s non-volatile memory. A memory location is shown momentarily and the meter returns to measurement mode. 6.2. print enter save view Store Value into Memory Recall Value from Memory In any measurement mode, pressing ▼/view key retrieves data from the meter’s memory on the Last-In-First-Out (LIFO) basis. The screen displays the last stored memory location.
Instruction Manual CyberScan DO 1500 7. PRINT DATA 7.1. print enter std Printing Data Depending on the print option in the meter setup, pressing print key allows you to print either current displayed reading or stored data from meter to a PC or printing device via a RS232 communication cable. Ensure that both meter and peripheral have the same configuration in terms of baud rate, parity bit and stop bit.
Instruction Manual CyberScan DO 1500 8. DO THEORY The polarographic type Oxygen probe used with the CyberScan DO 1500 meter responds to the partial pressure exerted by oxygen in a given sample. As Oxygen reaches the probe's cathode, it is reduced according to the following equation: O2 + 2 H2O + 4e- = 4 OHWhen oxygen is reduced at the cathode (along with concurrent oxidation of silver at the anode) current flows through the cell. The more oxygen that is reduced, the more current is generated.
Instruction Manual CyberScan DO 1500 9. METER SPECIFICATIONS Description CyberScan DO 1500 DO range 0.00 to 60.00 mg/L Resolution 0.01 mg/L DO range (% saturation) 0.01% to 600.0%Sat Resolution (% saturation) 0.1% Accuracy ±0.5% Full Scale + 1 LSD Temperature range 0.0 to 45.0°C (32.0 to 113.
Instruction Manual CyberScan DO 1500 10. CLEANING This meter requires no regular maintenance, but it is recommended to occasionally wipe down the front with a damp cloth from time to time. 11. TROUBLESHOOTING The CyberScan DO 1500 displays pertinent error messages to guide you should an error occur with a measurement or meter operation. Message Description Error Icon Error message for %Sat Cal error.
Instruction Manual CyberScan DO 1500 12. ACCESSORIES Consult your Authorised Distributors for these items. 12.1. Replacement Meters and Accessories CODE NO.
Instruction Manual CyberScan DO 1500 13. WARRANTY Eutech Instruments supplies this bench meter with a 3-year warranty and 6-month warranty for electrode against manufacturing defects from the date of purchase. If repair or adjustment is necessary and has not been the result of abuse or misuse within the warranty period, please return, freight prepaid, and correction will be made without charge. Out of warranty items will be repaired on a charge basis.
Instruction Manual CyberScan DO 1500 14. NOTICE OF COMPLIANCE Warning This meter generates, uses, and can radiate radio frequency energy. If not installed and used properly, that is in strict accordance with the manufacturer’s instructions, it may cause interference to radio communications.
For more information on Eutech Instruments products, contact your nearest Eutech Instruments distributor or visit our website listed below: Manufactured by: Eutech Instruments Pte Ltd. Blk 55, Ayer Rajah Crescent, #04-16/24 Singapore 139949 Tel: (65) 6778 6876 Fax: (65) 6773 0836 E-mail: marketing@eutechinst.com Web-site: www.eutechinst.