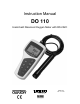
Instruction Manual DO 110 Hand-held Dissolved Oxygen Meter with RS 232C 68X361305 Rev. 0 - 11/05 Technology Made Easy ...
Preface This manual serves to explain the use of the hand-held series meters. The model covered is the DO 110 hand-held meter. The manual functions in two ways, firstly as a step by step guide to help the user operate the meter. Secondly, it serves as a handy reference guide. This instruction manual is written to cover as many anticipated applications of the DO meter as possible. If there are doubts in the use of the DO110 meters, do not hesitate to contact the nearest Authorised Distributor.
TABLE OF CONTENTS 1 INTRODUCTION .................................................................................................... 1 2 DISPLAY & KEYPAD FUNCTIONS ...................................................................... 2 2.1 2.2 3 DISPLAY ................................................................................................................................... 2 KEYPAD ..............................................................................................................
8.6.2 User Reset .................................................................................................................... 30 8.7 P 6.0: MEMORY CLEAR (CLR)................................................................................................. 31 8.8 P7.0: DISSOLVED OXYGEN PARAMETERS (DPR) ....................................................................... 32 8.8.1 Pressure Setting Adjustment .........................................................................................
Instruction Manual 1 CyberScan DO 110 INTRODUCTION Thank you for selecting the DO 110 meter. These meters are microprocessor-based instruments and are designed to be handy, capable of allowing one-hand operation. It is capable of measuring Dissolved Oxygen (DO) in mg/L or ppm units, % saturation and temperature. This meter has many user-friendly features – all of which are completely accessible through the water-resistant membrane keypad. Please read this manual thoroughly before operating your meter.
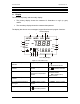
Instruction Manual 2 CyberScan DO 110 DISPLAY & KEYPAD FUNCTIONS Display 2.1 The LCD has a primary and secondary display. • The primary display shows the measured % Saturation or mg/L (or ppm) values. • The secondary display shows the measured temperature. The display also shows error messages, keypad functions and program functions. Primary Display 1 2 SETUP 17 READY 16 HOLD ON 15 OFF 3 MEAS 4 CAL MEM -1.8.8.8 MEM -1.8.8.
Instruction Manual 2.2 CyberScan DO 110 Keypad A large membrane keypad makes the instrument easy to use. Some buttons have several functions depending on its mode of operation. KEY ON OFF CAL MEAS FUNCTION • ON/OFF - Powers on and shuts off the meter. The meter will start in a measurement mode similar to the last measurement mode it is in before being switched off.
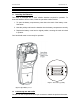
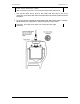
Instruction Manual 3 3.1 CyberScan DO 110 PREPARATION Inserting the Batteries This meter is packaged with 4 “AAA” alkaline batteries required for operation. To insert the batteries into the meter, follow the procedure outlined below. 1. To open the battery compartment, press down the catch of the battery cover. See below. 2. Note the polarity and insert the batteries into the battery compartment correctly 3. Replace the battery cover into its original position, ensuring the catch is locked in position.
Instruction Manual CyberScan DO 110 NOTE: Do not substitute other probes or electrodes. For replacement probe, see the “Accessories” section. Keep connector dry and clean. Do not touch connector with soiled hands. 1. Line up the notch and 6 pins on the meter with the holes in the 6 pin connector. Push down and screw the metal sleeve to lock the probe connector into place. 2. To remove probe, unscrew the metal sleeve and slide up the probe connector.
Instruction Manual 3.3 CyberScan DO 110 Connecting the AC/DC Adapter Besides using four AAA-sized batteries as a power source, the DO 110 meter can also operate from the power mains using an AC/DC power adapter. This is extremely useful if you have an A.C. power source available (e.g. laboratory). Before plugging in, switch off the meter and the power source of adapter. This is a safety precaution that should be adhered to safeguard your meter. 1. Switch off the meter and power sources. 2.
Instruction Manual 3.4.1 CyberScan DO 110 RS232C Configuration The DO 110 meter has a 9 pin female RS232C connector with the following pin out: PIN NO. DESCRIPTION 1 - 2 Transmit Data 3 - 4 - 5 CTS (Clear to Send) 6 - 7 GND (Ground) 8 - 9 - A one-to-one connection can be made with a 9 pin RS232C port of the computer.
Instruction Manual 4 4.1 CyberScan DO 110 CALIBRATION Important Information on Meter Calibration The amount of oxygen dissolved in water will depend on its temperature, atmospheric pressure and its salinity. While the pressure and salinity values are manually entered into the instrument, the temperature is being measured by the probe. It is therefore very important that the temperature is calibrated if necessary prior to the DO calibration.
Instruction Manual 4.2 CyberScan DO 110 Temperature Calibration DO in mg/L is dependent on temperature, so it is first necessary to calibrate or verify the temperature reading. The temperature sensor is part of the DO probe and the “ATC” annunciator will light up on the LCD screen once the probe is connected correctly to the meter. MEAS 98.9 22.3 83.4 MODE CAL 22.3 4. Dip the DO probe into a solution of known temperature (i.e. a temperature bath). Allow time for the temperature probe to stabilise.
Instruction Manual 4.3 CyberScan DO 110 DO Calibration (with ATC) –% Saturation Mode Dissolved Oxygen exact calibration value depends on barometric pressure. The meter is set to a factory default of 760 mm Hg, which results in a calibration value of 100% saturation in air. NOTE: If the barometric pressure setting has been changed from 760 mm Hg, the calibration value in air will automatically adjust to a value other than 100%. The adjusted value will be correct for the new barometric pressure setting.
Instruction Manual 4.4 CyberScan DO 110 DO Calibration in mg/L (ppm) Mode The amount of oxygen dissolved in a liquid will depend on its temperature, pressure and salinity. It is therefore very important to set these parameters correctly before attempting to do a calibration. Temperature is measured by the meter automatically. Pressure and salinity values are keyed in manually as described in Sections 8.8.1 and 8.8.2. MEAS READY 8.10 24.5 CAL READY 8.10 8.10 MR 8.24 8.
Instruction Manual 5 CyberScan DO 110 MEASUREMENT During measurement, care must be taken not to allow the membrane of the DO probe touch any surface. The probe can either be fully or partially immersed in the solution. The READY indicator appears on the display when the readings stabilize. It will turn off if the readings start to fluctuate. NOTE: It is important that the sample is stirred constantly to allow it to flow past the membrane for better readings. 5.
Instruction Manual 5.3 CyberScan DO 110 Taking Measurements 1. Rinse the probe with deionised or distilled water before use to remove any impurities adhering to the probe body. If it is dehydrated, soak it for 30 minutes in tap water. 2. Switch on the meter. The MEAS annunciator appears on the top of the LCD. The ATC indicator appears in the lower right hand corner to indicate Automatic Temperature Compensation. 3.
Instruction Manual 6 CyberScan DO 110 MEMORY FUNCTION The DO 110 meter can store up to 100 sets of data. You can store data in any combination of values such as “% Saturation and temperature” or “mg/L (or ppm) and temperature”. 6.1 MEAS Memory Input 98.9 1. During any measurement function (MEAS), press MI/▲ key to input any data into the memory. 24.5 % °C ATC MI 2. MEM, “Sto” and memory number will flash. The meter then returns to measurement mode. MEM 3.
Instruction Manual 7 CyberScan DO 110 PRINT FUNCTION The DO 110 meter is equipped with an RS232 communication port and a PRINT ( ) key that facilitate the printing of data from the meter to a printer or computer. 7.1 Using DO 110 Meter With Printer or Computer 1. To use the DO 110 directly with a printer, the printer should have either a 9 pin or a 25 pin RS 232C serial port. 2.
Instruction Manual CyberScan DO 110 Sending Data To Computer or Printer 7.2 When the PRINT key is pressed, there are two options: • dAt / CUr: Print Data on Timed Interval basis. You can print any data automatically based a pre-set timing from 5 to 30 seconds. • dAt / StO: Print Stored Data from Memory. This simply dumps all data stored in memory. You cannot print data from selected memory locations. See Figure below. From measurement mode.
Instruction Manual 7.2.1 CyberScan DO 110 Print Current Data Manually MEAS To manually print any data that is currently being measured: READY 8.10 HOLD 24.5 1. From measurement mode, press HOLD key to freeze reading. See Figure 10. 2. Print PRINT ( mg/l °C ATC ) key. 3. The “Prn – CUr” annunciator will appear and flash for about 0.5 seconds. The data is transmitted to the printer or computer. Flash for 0.5 seconds 4. The meter returns to measurement mode. 5.
Instruction Manual 7.3 CyberScan DO 110 Print Data from Stored Memory The DO 110 meter can print data that is stored in the memory. You can print out all stored data or selected data based on its memory location. To Print All Stored Data 1. From measurement mode, press PRINT key. 2. Use MI/▲ or MR/▼ key, select “dAt – StO” option and press HOLD/ENTER key. See Figure 9. 3. At the “SEC – 0” option, use MI/▲ or MR/▼ key to select number of seconds to print each set of stored data.
Instruction Manual CyberScan DO 110 To Print Selected Stored Data: 1. From measurement mode, press MR/▼ key. 2. “MEM” indicator appears and the last memory input location is displayed. 3. Press MI/▲ or MR/▼ key to select a specific memory location, and press HOLD/ENTER key. 4. When ready, press PRINT key. 5. The screen flashes “Prn/CUr” for about 0.5 seconds and switches back to the stored data of the specific memory location. 6. Press HOLD/ENTER key.
Instruction Manual 8 CyberScan DO 110 ADVANCED SETUP FUNCTIONS The advanced setup mode lets you customize your meter to suit your preference. The DO 110 meters feature different sub groups that organize all setup parameters. The sub-groups are: For %Saturation For mg/L P1.0 Unit Configuration P1.0 Unit Configuration P2.0 Calibration Points P2.0 Calibration Points P3.0 Electrode Status P3.0 Electrode Status P4.0 Auto Power Mode P4.0 Auto Power Mode P5.0 Reset P5.0 Reset P6.
Instruction Manual 8.1 CyberScan DO 110 Advanced SETUP Mode Overview Press the SETUP key to enter Setup mode. Press the MI/▲ and MR/▼ keys to scroll through the sub groups. P1.0: Unit Configuration SETUP COF P 1.0 P1.1 Ready indicator (On, Off or Auto Hold) P1.2 Select °C or °F temperature units P1.3 Select Automatic Temperature Compensation (ATC) P1.4 Select mg/L or ppm mode (from mg/L or ppm mode only) P2.0: View Previous pH Calibration Data (View only) SETUP CAL pH P2.
Instruction Manual CyberScan DO 110 P7.0: Dissolved Oxygen Parameter SETUP P7.0 Select Barometric Pressure unit Set Barometric Pressure value Set Salinity value (from mg/L or ppm mode only) p 7.0 P8.0: % Saturation Offset Adjustment SETUP OFS (only in % Saturation Set up mode) P8.0 Set offset adjustment p 8.
Instruction Manual CyberScan DO 110 P1.0 : Unit Configuration (COF) 8.2 This subgroup program allows customising the meter to your specific needs. In Program 1.0, features like the ‘READY’ Indicator, Auto Hold function, °C or °F mode selection, ATC or MTC mode selection and DO mg/L or ppm mode selection are available for customization. 8.2.1 P1.1: READY Indicator and Auto Hold function Program P1.
Instruction Manual 8.2.2 CyberScan DO 110 P1.2: Select °C or °F temperature units The DO 110 meter lets you select between °C and °F units for temperature readings. SETUP C From measurement mode p 1.2 1. Press SETUP key to enter Set Up mode. 2. Press the MI/▲ or MR/▼ keys to scroll through subgroups until you view parameter P1.0. 3. Press the HOLD/ENTER key two times to select parameter 1.2. 4. Press the MI/▲ or MR/▼ keys to toggle between °C and °F. 5.
Instruction Manual CyberScan DO 110 measurement mode. 8.2.4 P1.4: Select mg/L or ppm mode SETUP (Only in mg/L (ppm) Set Up mode) mg/l From the mg/L (ppm) Set Up mode, p 1.4 1. Press the HOLD/ENTER key four times to enter the mg/L or (ppm) mode selection menu “dO”. 2. Use the ▲ and ▼ keys to select the desired mode of measurement. 3. Press the HOLD/ENTER key to confirm the selection made and to return to the subgroup menu. MR MI SETUP ppm p 1.4 4.
Instruction Manual 8.3 CyberScan DO 110 P2.0: Viewing Previous Calibration Data (CAL) This mode lets you recall previous calibration data, which helps you know when to re-calibrate your meter. This is a “view only” mode. SETUP cal p 2.0 From measurement mode: 1. Press the SETUP key to enter Set up mode. HOLD ENTER 2. Press the MI/▲ or MR/▼ keys to scroll through subgroups until you view parameter P2.0. SETUP 3. Press the HOLD/ENTER key to view previous calibration data. CAL 100.0 % p 2.1 4.
Instruction Manual 8.4.2 CyberScan DO 110 EL.2 Viewing the % Saturation Offset (Only available in % Saturation Set Up menu): This parameter shows you the amount of the % Saturation Offset entered in the other parameter “OFS” P7.0. From Step 3 above, HOLD ENTER 4. Press the HOLD/ENTER key to enter the % Saturation Offset viewing menu. The meter will display the last offset adjustment made. 8.4.3 SETUP % 10.0 EL.
Instruction Manual 8.5 CyberScan DO 110 P4.0 : Auto-Off (AtO) In Program P4.0 you can activate the AUTO-OFF option to automatically power off the instrument 20 minutes after the last key selection. This feature is useful for conserving battery power. Under default conditions, the instrument has this option activated. SETUP 1. Press the SETUP key to enter Set Up mode. 2. Press the MI/▲ or MR/▼ keys to scroll through subgroups until you view parameter P4.0. P4.0 3. Press the HOLD/ENTER key.
Instruction Manual 8.6 CyberScan DO 110 P5.0 : Reset to Factory Default (rSt) This mode lets you reset all parameters to factory default settings. There are two levels of reset: • Calibration Reset: Reset only the calibration values of % Saturation and mg/L (or ppm). This clears all previous calibrated values and reset to factory default. SETUP P5.0 • User Reset: Clears all data including calibration, memory and other customised setup functions and reset it to factory default. HOLD ENTER SETUP 8.
Instruction Manual 8.6.2 CyberScan DO 110 User Reset This program clears all data including calibration, memory and other customised setup functions and reset it to factory default. SETUP You can skip program P5.1 (Calibration Reset) and proceed straight to Program P5.2: P5.2 1. From Program P5.0 - rSt, press HOLD/ENTER key three times to P5.2. Press HOLD/ENTER key again to enter the User Reset menu. 2. Press the MI/▲ or MR/▼ keys to select or deselect the user reset function.
Instruction Manual 8.7 CyberScan DO 110 P 6.0: Memory Clear (CLr) Use this parameter to clear all memory values when you need to store a new series of values. This lets you avoid confusing the old values with the new ones. NO is the default setting. SETUP MEM NOTE: Selecting YES will wipe out all memory. From measurement mode: p 6.0 1. Press the SETUP key to enter Set Up mode. 2. Press the MI/▲ or MR/▼ keys to scroll through subgroups until you view the parameter P6.0. 3. Press the HOLD/ENTER key.
Instruction Manual 8.8 CyberScan DO 110 P7.0: Dissolved Oxygen Parameters (DPr) SETUP This Set Up menu allows you to set the barometric pressure and the salinity value of the sample to be measured. You are given the option to use mmHg (Hg) or kilo Pascal (PA) barometric pressure units. The Salinity (SAL) value to be entered will be based on ppt and is available in mg/L (ppm) Set Up menu. 8.8.1 Pressure Setting Adjustment P7.0 HOLD ENTER SETUP PA From the mg/L or ppm measurement mode, 1.
Instruction Manual 8.9 CyberScan DO 110 P 8.0: % Saturation Offset Adjustment (OFS) This is a useful feature that allows you to offset meter’s value when cross referenced with another DO meter. That way, it can be standardized without you having to perform manual calculation. Your DO 110 meter allows % Saturation Offset adjustment within +/- 10.0% offset and its adjusted offset value can be viewed in the P3.0 Electrode Properties menu “EL.2”. From the % Saturation measurement mode, SETUP 1.
Instruction Manual 9 CyberScan DO 110 CYBERCOMM PORTABLE DAS The DAS software is designed for pH 110, CON 110 and DO 110 meters to allow you a convenient means of capturing data for future analysis using other software program such as LOTUS 123, EXCEL or DBASE in Windows©. Often one finds it cumbersome to record and transfer data from one media to another before the required processing can be done. With the DAS software, this redundant processing can be eliminated or reduced.
Instruction Manual CyberScan DO 110 Figure 26: Click on 'Browse' button and locate CD-ROM drive Figure 27: Locate the CyberComm Portable Setup program in the CD-ROM under "Eutech DAS" directory.
Instruction Manual CyberScan DO 110 Figure 28: Select ‘Portable Meters’ directory to go to CyberComm Portable. Figure 29: Open ‘CyberComm Portable’ to enter to the Setup program.
Instruction Manual CyberScan DO 110 Figure 30: Select "SETUP.EXE" program and click the OPEN button Figure 31: InstallShield Wizard dialog box appears.
Instruction Manual CyberScan DO 110 Figure 33: Key in your name and company name and click NEXT button Figure 34: To select another Destination Directory to install the program, click on BROWSE button. Otherwise, click NEXT button.
Instruction Manual CyberScan DO 110 Figure 35: Creating a new program folder. Click on NEXT button. Figure 36: Click on NEXT button.
Instruction Manual CyberScan DO 110 Figure 37: The CyberComm Portable DAS program is fully installed. Click on FINISH button to end installation.
Instruction Manual 9.3 CyberScan DO 110 Running CyberComm Portable Before running the DAS program, please ensure that the RS232 cable is connected between the computer’s serial port and the meter’s port. See section 3.4 Connecting the RS232C Cable on page 6.
Instruction Manual CyberScan DO 110 i. Buttons & Check-Box • Enable Connection - Click this button to enable communication between meter and computer. • Clear Readings - To clear all data and start all over again. • Save Readings - To save all data displayed in either *.dat or *.txt format. • Time Stamp - To include Time and Date stamp when collecting the data. Time and date information comes from the computer. Figure 40: Under File Menu setting, you can change various parameters.
Instruction Manual CyberScan DO 110 Figure 41: Communication Settings for computer's Com port. It must match with COM port settings on CyberScan DO 110 meter. Please refer to Section 7.1 Using DO 110 Meter With Printer or Computer on page 15 for the settings. iii. Communication Settings • Connect Using - For selecting communication port. (Select ‘1’) • Baud Rate – For selecting baud rate. (Select ‘9600’ bps (bits per second)). • Parity – For selecting parity.
Instruction Manual 9.4 CyberScan DO 110 Capturing And Printing Data Into Computer Using Data Acquisition After matching the Communication Settings between your computer using Data Acquisition program and the DO 110 meter, you can now capture data into your computer for analysis and storage purposes. 1. Ensure the 1-meter RS232 communication cable (Refer to Accessories Section) is connected between the computer and the DO 110 meter’s Com port. Refer to section 3.
Instruction Manual 10 CyberScan DO 110 Dissolved Oxygen Probe 10.1 Dissolved Oxygen Principle The probe is a galvanic measuring element which produces an output proportional to the oxygen present in the medium in which it is placed. The galvanic probe design lets you take measurements immediately – without the typical 15 minute wait of other dissolved oxygen probes. The probe consists of two parts: • An upper part consisting of an anode, a cathode, and cable.
Instruction Manual CyberScan DO 110 10.3 Membrane Housing Replacement Replacement of the membrane cap housing/ membrane is required only when you cannot calibrate the probe, or if the membrane is damaged. Typical membrane damages are punctures or wrinkles caused during measurements or cleaning. Your new DO probe comes with replacement membrane housing. To order more replacement membrane housing, see the “Accessories” section page. 10.3.1 To replace the membrane cap (with pre-installed membrane) 1.
Instruction Manual CyberScan DO 110 10.4 Membrane/O-ring Replacement (Optional Procedure) It is recommended only experienced service personnel can perform this procedure. This procedure is OPTIONAL, and should only be performed if you have new membrane and O-ring. You are also required to have a membrane installation tool. These items are available as optional accessories in the “Accessories” section. Pull off the probe guard. 1. Unscrew the membrane cap from the probe. 2.
Instruction Manual CyberScan DO 110 14. Replace probe guard. 15. Calibrate the probe (see section 4) after the % saturation readings have stabilised. Note: Membranes can only be used once. When a membrane cap is screwed onto the probe, the membrane is stretched by the cathode. If the same O-ring and the membrane is used a second time it will not fit perfectly onto the cathode. This will result in erratic readings. 10.
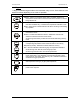
Instruction Manual 11 CyberScan DO 110 ERROR MESSAGES The following table provides a guideline to enable diagnosis of possible problems indicated by the messages generated by the meter. The table also provides possible solutions to the problems encountered. ERROR MESSAGE INDICATES POSSIBLE CAUSE CORRECTIVE ACTION Err. Annunciator Wrong keypad input Wrong input in selected mode. Release key. Select valid operations depending on mode.
Instruction Manual CyberScan DO 110 then there is probably moisture somewhere. See Problem 2. With membrane cap removed and probe internals thoroughly dry, the reading from the probe is not zero and/or is erratic. Moisture has entered the system – either into the probe itself or at junctions or points in the cable. This moisture creates a secondary galvanic action in addition to that produced by the probe and results in non-zero or erratic readings.
Instruction Manual 13 CyberScan DO 110 LIST OF ACCESSORIES 13.
Instruction Manual 14 CyberScan DO 110 SPECIFICATIONS Dissolved Oxygen Range Resolution Relative accuracy % Saturation of Oxygen Range Resolution Relative accuracy Temperature Range (Meter) Resolution Relative accuracy 0.00 – 19.99 mg/L or ppm 0.01 mg/L; 0.01 ppm ± 1.5% of Full Scale 0.0 – 199.9 % 0.1 % ± 1.5% of Full Scale -10 to 110 °C ( 14 to 230 °F) 0.1 °C / 0.1°F (14oF - 199.9oF) & 1.0 (200oF to 230oF) +/- 0.5oC (+/- 0.
Instruction Manual 15 CyberScan DO 110 WARRANTY This meter is supplied with a three-year warranty, six-month warranty for probe against significant deviations in material and workmanship. If repair or adjustment is necessary and has not been the result of abuse or misuse within the designated period, please return – freight pre-paid – and correction will be made without charge. Eutech Instruments/ Oakton Instruments will determine if the product problem is due to deviations or customer misuse.
For more information on Eutech Instruments/ Oakton Instruments’ products, contact your nearest distributor or visit our website listed below: Oakton Instruments P.O Box 5136, Vernon Hills, IL 60061, USA Tel: (1) 888-462-5866 Fax: (1) 847-247-2984 E-mail: info@4oakton.com Web-site: www.4oakton.com Eutech Instruments Pte Ltd Blk 55, Ayer Rajah Crescent, #04-16/24 Singapore 139949 Tel: (65) 6778 6876 Fax: (65) 6773 0836 E-mail: marketing@eutechinst.com Web-site: www.eutechinst.