
User Guide


Operating Instructions αlpha-RES1000
22
8 Auto/Manual Mode
Regardless of mode, control devices connected to Relay A or Relay B can be operated from front panel
of controller. In Automatic mode, controller’s set point values activate relays. In Manual mode, manual
control of relays is possible to prime the pump or check pump status.
8.1 Auto mode (mode after switch-on)
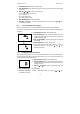
To view set-point values:
1) Press RELAY SELECTION (Rel A/Rel B) key. Upper display shows set-point value for Relay A;
lower display shows “SP1”.
2) After two seconds upper display shows set-point value for Relay B; lower display shows “SP2”.
3) After an additional two seconds controller returns to Measurement mode.
8.2 Manual mode
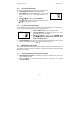
1) Press RELAY CONTROL (auto/manu) key. Upper display shows “000”; lower display shows
“S.Cd” to prompt to enter Advanced Set-up code.
2) Press ∆ or ∇ keys to scroll upper display until it reads “22”.
3) Press ENTER key. Manual indicator by the RELAY CONTROL key lights up.
Note: Pressing ENTER key at a value other than “22” will cause controller to revert to Measurement
mode, and relays will remain in automatic mode.
4) Press RELAY SELECTION key to select either Relay A or Relay B. LED next to currently selected
relay (A or B) will light.
The manual control options are now available.
- Limit control selected: Upper display reads current measured value. Lower display shows “oFF”
or “on” depending on relay status of currently selected relay.
5) Press ∆ or ∇ keys to change Relay on/off status. LED indicators at the right of controller will also
change between Red and Green to indicate Relay status.
Note: If you wish to manually change the status of both relays, press RELAY SELECTION key at this
point and repeat step 5 for second relay. This first relay will remain under manual control while you are
setting the second relay.
6) Press RELAY CONTROL key to return to Measurement mode. Relays are now back under
automatic control.