
User Guide


Operating Instructions αlpha-RES1000
20
7.6.3 Selecting the alarm time lag (if the relay 3 is set to Alarm)
This parameter group lets you select a period of time before the alarm activates when your set point has
been overshot. You can select from 0 to 1999 seconds.
1) Follow directions in 7.6.1 to enter Configuration mode.
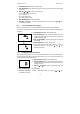
2) Press the ENTER key until the upper display shows a numerical
value (in seconds) and the lower display shows “AL.d”.
3) Press the ∆ or ∇ keys to select how long of an alarm delay (0 to
1999 seconds) you want.
4) Press the ENTER key to confirm your selection.
5) Proceed to 7.6.4, or return to Measurement mode by pressing the
∆ and ∇ keys simultaneously (escape).
7.6.4 Selecting steady or pulse contact for the alarm relay (if the relay 3 is set to Alarm)
This parameter group selects whether alarm contact will operate as a steady contact or a fleeting (single
pulse) contact. Pulse contact closing time is 1 second.
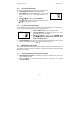
1) Follow directions in 7.6.1 to enter Configuration mode. Press
ENTER key until the upper display shows “Stdy” or “FLEt” and
lower display shows “AL.C.”.
AL.C = alarm contact
StdY = steady contact
FLEt = fleeting (single pulse) contact
2) Press ∆ or ∇ keys to select steady or pulse contact. Press
ENTER key.
3) Proceed to 7.6.5, or return to Measurement mode by pressing ∆
and ∇ keys simultaneously (escape).
7.6.5 Wash Contact (if the relay 3 is set to Wash)
1) Follow directions in 7.6.1 to enter Configuration mode. Press
the ENTER key when choosing CLn.
2) Press the ∆ or ∇ keys to select the wash cycle (int. 0.1 to 199.9
hours).
3) Press the ENTER key to confirm your selection.
4) Press the ∆ or ∇ keys to select the wash duration (1 to 1999
seconds) and press ENTER to confirm.
5) Proceed to 7.6.6, or return to Measurement mode by pressing
the ∆ and ∇ keys simultaneously.
FLEt
AL.C
HOLD SETUP
Stdy
AL.C
HOLD SETUP
CLn
rL3
HOLD SETUP
30
AL.d
HOLD SETUP