
Instruction manual


22
6.3 Setting temperature (Set
o
C) sub-function
SETU P
HOLD
SETUP
HOLD
O
C
SETUP
HOLD
O
SETUP
HOLD
SETUP
HOLD
O
C
SETUP
HOLD
O
C
atc
SETUP
HOLD
SETUP
HOLD
ENT
ENT
ENT
ENT
ENT
ENT
ENT
ENT
1
2
3
3
4
5
6
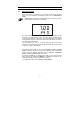
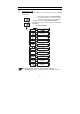
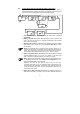
1. Select the “SET °C°F” sub-function, then press the ENT key.
2. Selecting temperature unit: press the ▲ or ▼ key to select the desired
temperature unit “°C” or “°F”. Press the ENT key to confirm your selection.
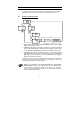
3. Enable/disable ATC mode: press the ▲ or ▼ key to enable (ATC ON)
or disable (ATC OFF) automatic temperature compensation. Press the
ENT key to confirm your selection.
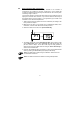
ATC disabled (ATC OFF):
For manual temperature compensation you can set the process and
calibration temperatures. This allows calibration at a temperature other
than the process temperature.
Example: setting a calibration temperature of 25°C lets you calibrate
using standard buffer solutions at 25°C, even if your process temperature
is different from 25°C.
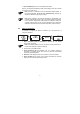
4. Setting the process temperature: press the ▲ or ▼ key to adjust the
process temperature (upper value, setting range: –9.9 to 125°C / 15 to 257
°F). Press the ENT key to confirm process temperature.
5. Setting calibration temperature: press the ▲ or ▼ key to adjust the
calibration temperature (upper value, setting range: –9.9 to 125°C / 15 to
257 °F). Press the ENT key to confirm the calibration temperature.
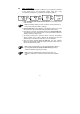
ATC enabled (ATC ON):
6. Setting temperature offset: The display shows the current temperature
offset (upper value) and the temperature currently measured (lower value).
Compare the current temperature displayed on the controller to a
thermometer known to be accurate. Note down the correct temperature
value. Press the ▲ or ▼ key to adjust the lower value. The upper number
indicates the offset value. You can offset the temperature by up to
±10°C/±18°F. Press the ENT key to confirm your setting.
Continue with additional Setup procedures, or return to the Measurement
mode by pressing the ▲ and ▼ keys (escape) simultaneously.