
Instruction manual

Instruction manual αlpha DO 2000
14
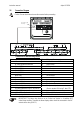
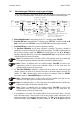
5.2 Dissolved oxygen Calibration in mg/l or ppm of oxygen
If the unit of measure is in mg/l (default) or ppm, then the calibration is also carried out in mg/l
or ppm. This transmitter features a one-point or two-point calibration for dissolved oxygen.
SETUP
SETUP
SETUP
HOLD
HOLD
HOLD
HOLD
CAL
HOLD
ENT
ENT
ENT
ENT
1-PT
2-PT
CAL
CAL
8.24
1.00
Lo
24.5
CAL
CAL
MEAS
CAL
ERR
24.5
8.24
HOLD
ERR
ENT
ENT
0.30
mg/l
HOLD
READY
READY
CAL
mg/l
HI
o
C
o
C
mg/l
CAL
A
TC
ENT
ENT
ENT
Displayed value should be
< 10% of high point
Displayed value should be
within +/- 50 % of high point
Calibration error occurs if calibration value
is > 10% or > +/- 50% of high point
during 1 or 2 point calibration
DO
CAL
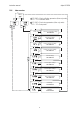
4. Enter Calibration mode as described in section 5.1. The display shows “CAL DO”.
5. Press the ENT key to start calibration. The display shows “1-PT CAL” by default. Use ▲ or ▼
keys to select one point “1-PT CAL” or two point “2-PT CAL” dissolved oxygen calibration.
6. Press the ENT key to confirm the one point or two points selection.
7. For One-Point Calibration, only Hi-value calibration is possible. The probe is allowed to
equilibrate in a solution containing 8.24 mg/l of dissolved oxygen. The “CAL” indicator flashes at
the top. When reading is stable, the “READY” annunciator comes on. Use ▲ or ▼ keys to
adjust the displayed value to the correct value. Press the ENT key to accept the value and the
controller displays the status of the probe.
Note: If the displayed value is not within ±50% of the high point value, the controller will
not accept the high-level calibration and retains the previous calibration values.
Note: If there is a calibration error, the controller displays “CAL ERR” and exits to the
measurement mode (for direct access calibration mode) or to the setup menu (for
calibration mode accessed via Setup mode).
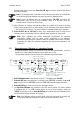
8. For Two-Point Calibration, calibration is carried out at the Lo-value first, usually zero oxygen
solution. Immerse the probe in the solution (low levels of dissolved oxygen) and allow it to
stabilize. The “CAL” indicator flashes at the top. When the reading is stable, the “READY”
annunciator comes on. Press the ENT key to accept the value.
Note: If the displayed value is < 10% of high point, the controller will accept the zero
calibration (0.00 mg/l or ppm) and switches to the second point.
Note: If the displayed value is > 10% of high point, the controller will not accept the zero
calibration and retains the previous calibration values.
Note: If there is a calibration error, the controller displays “CAL ERR” and exits to the
measurement mode (for direct access calibration mode) or to the setup menu (for
calibration mode accessed via Setup mode).
9. If the calibration is successful, the controller switches to the second point, which is the high-
level of dissolved oxygen. Take the probe out of the zero oxygen solution and immerse it in a
solution with a higher concentration of dissolved oxygen. The “CAL” indicator flashes at the top.
When the reading is stable, “READY” annunciator comes on. Use ▲ or ▼ keys to adjust the