
Operating instructions


6
Fig. L
A
FIG.E
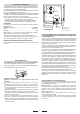
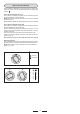
MINIMUM FLOW ADJUSTMENT FOR OVEN THERMOSTAT
In order to adjust the minimum, act as follows: switch the burner
on turning the knob to the maximum position.
Remove the knob and unscrew of some turns the by-pass screw
(fig. H).
Assemble the knob and let the oven warm up for 15 minutes; after
that turn the knob to the minimum position.
After having removed the knob once again, making sure that the
thermostat rod has not been moved, screw slightly the above
mentioned by-pass screw, to obtain a flame of 3 or 4 mm of length.
For U-LPG gas, the adjusting screw must be tight screwed. Make
sure that the flame does not extinguish passing quickly from the
maximum flow to the minimum flow, and closing and opening the
oven door (the oven door must be closed softly).
Attention: for taps with safety device, the minimum adjusting screw
is on the outside of the thermostat rod (fig. H ).
Fig. H
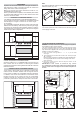
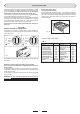
REGULATION OF AIR ADJUSTER (oven burner )
To do this,
- Unscrews the screw (A ) in order to rotate the metal ring at the
end of the burner (fig L ).
In this way, entrace of the air increases or descreases, obtaining
a correct flame.
Be sure that the flame does not lift or light back or present a
yellow colouration .
Air Adjuster
NG - Australia = 8 mm fully open
NG - New Zealand = fully open
U-LPG = fully open
(Once aeration has been adjusted for U-LPG , the aeration shutter
must be locked in place using a rivet).
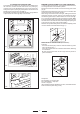
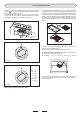
To change the oven injector, it is necessary to act as follows: open
the oven door, remove the lower side of the oven (see fig.C),
unscrew screw C and disassemble the oven burner (see fig.D).
Change the injector (see fig.E) and replace it with another one
suitable for the new gas type (see table 1).
Re-assemble everything in the opposite direction, paying attention
to place the burner in the right way on its rear slot.
C
FIG.D
TO CHANGE THE OVEN INJECTORS
FIG.C