),':% 3ODFH )XOO\ ,QWHJUDWHG 'LVKZDVKHU USER MANUAL PLEASE READ THE USER MANUAL CAREFULLY BEFORE USE www.glendimplex.com.
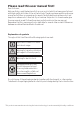
Please read this user manual first! Dear Customer, We hope that you get the best results from your product which has been manufactured with high quality and state-of-the-art technology. Therefore, please read this entire user manual and all other accompanying documents carefully before using the product and keep it as a reference for future use. If you handover the product to someone else, give the user manual as well. Follow all warnings and information in the user manual.
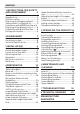
CONTENTS ,16758&7,216 )25 6$)(7< $1' (19,5210(17 General safety .......................................4 Intended use ..........................................4 Children’s safety ....................................5 Disposing of packaging material ........5 Transportation of the product ............5 Compliance with WEEE Directive and Disposing of the Waste Product .........6 Compliance with RoHS Directive ........6 Package information ............................6 ',6+:$6+(5 Overview ......
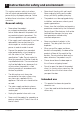
1 instructions for safety and environment 5IJT TFDUJPO DPOUBJOT TBGFUZ JOTUSVDUJPOT UIBU XJMM IFMQ UP HFU QSPUFDUFE GSPN SJTL PG QFSTPOBM JOKVSZ PS QSPQFSUZ EBNBHF 'BJMVSF UP GPMMPX UIFTF JOTUSVDUJPOT TIBMM WPJE BMM XBSSBOUJFT /FWFS UPVDI UIF QMVH XJUI XFU IBOET /FWFS VOQMVH CZ QVMMJOH PO UIF DBCMF BMXBZT QVMM PVU CZ HSBCCJOH UIF QMVH 5IF QSPEVDU NVTU CF VOQMVHHFE EVSJOH JOTUBMMBUJPO NBJOUFOBODF DMFBOJOH BOE SFQBJSJOH QSPDFEVSFT "MXBZT IBWF UIF JOTUBMMBUJPO BOE SFQBJSJOH QSPDFEVSFT DB
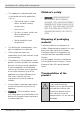
instructions for safety and environment 5IJT BQQMJBODF JT JOUFOEFE UP CF VTFE JO IPVTFIPME BOE TJNJMBS BQQMJDBUJPOT TVDI BT P 4UBGG LJUDIFO BSFBT JO TIPQT PGGJDFT BOE PUIFS XPSLJOH FOWJSPONFOUT P 'BSN IPVTFT P #Z DMJFOUT JO IPUFMT NPUFMT BOE PUIFS SFTJEFOUJBM UZQF FOWJSPONFOUT P #FE BOE CSFBLGBTU UZQF FOWJSPONFOUT 0OMZ EJTIXBTIFS TBGF EFUFSHFOUT SJOTF BJET BOE BEEJUJWFT NVTU CF VTFE 5IF NBOVGBDUVSFS XBJWFT BOZ SFTQPOTJCJMJUZ BSJTFO GSPN JODPSSFDU VTBHF PS USBOTQPSUBUJPO 5IF BQ
instructions for safety and environment 6OQMVH UIF QSPEVDU CFGPSF USBOTQPSUJOH JU 3FNPWF XBUFS ESBJOBHF BOE XBUFS TVQQMZ DPOOFDUJPOT %SBJO UIF SFNBJOJOH XBUFS JO UIF QSPEVDU DPNQMFUFMZ 1BDLBHF JOGPSNBUJPO 1BDLBHJOH NBUFSJBMT PG UIF QSPEVDU BSF NBOVGBDUVSFE GSPN SFDZDMBCMF NBUFSJBMT JO BDDPSEBODF XJUI PVS /BUJPOBM &OWJSPONFOU 3FHVMBUJPOT %P OPU EJTQPTF PG UIF QBDLBHJOH NBUFSJBMT UPHFUIFS XJUI UIF EPNFTUJD PS PUIFS XBTUFT 5BLF UIFN UP UIF QBDLBHJOH NBUFSJBM DPMMFDUJPO QPJOUT EFTJHOBUFE
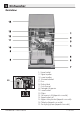
2 Dishwasher Overview 15 Dishwasher / User’s Manual 1. Upper basket 2. Upper impeller 3. Lower impeller 4. Silverware basket 5. Door 6. Rating Label 7. Control panel 8. Detergent dispenser 9. Lower basket 10. Filters 11. Salt reservoir lid (depends on model) 12. Upper basket rail 13. Upper cutlery basket (depends on model) 14. Tabletop (depends on model) 15.
Dishwasher Technical specifications &RPSOLDQFH WR VWDQGDUGV DQG WHVW GDWD (& GHFODUDWLRQ RI FRQIRUPLW\ This product complies with the following EU directives; Development, production and sales stages of this product comply with the safety rules included in all pertaining European Community regulations.
3 Installation Refer to the nearest Authorised Service Agent for installation of your product. To make the product ready for use, make sure that the electricity, tap water supply and water drainage systems are appropriate before calling the Authorised Service Agent. If they are not, call a qualified technician and plumber to have any necessary arrangements carried out.
Installation C min 120 min 300 C min 500 The dishwasher should be connected to cold water inlet. Do not use old or used water inlet hose on the new product. Use the new water inlet hose supplied with the product. Connect the water inlet hose directly to the water tap. Pressure coming from the tap should be minimum 0.3 and maximum 10 bars. If the water pressure exceeds 10 bars, a pressure relief valve should be installed in between.
Installation Aquasafe+ (depends on model) The Aquasafe+ system protects against water leaks that may occur at the hose inlet. Water contact with the valve box of the system must be avoided to prevent damage to the electrical system. If the Aquasafe+ system is damaged, unplug the product and call the Authorised Service Agent. As the hose set contains electrical connections and assemblies, never shorten or lengthen the hose with extension hoses.
4 Preparation Tips for energy saving Following information will help you use the product in an ecological and energy-efficient manner. Wipe away any coarse food remnants on the dishes before putting them in the product. Operate the product after filling it completely. When selecting a programme, consider the table of "Programme data and average consumption values". Do not put more detergent than suggested on the detergent package.
Preparation C C C Use powder or liquid/gel detergent in short programmes without prewash since the solubility of the tablet detergent changes depending on the temperature and time. Tablet detergents In addition to the conventional tablet detergents, there are also commercially available detergent tablets that show water softening salt and/or rinse aid effect. Some types of these detergents contain specialpurpose components such as glass and stainless steel protectors.
Preparation Rinse aid C 1. The rinse aid used in dishwashers is a special combination that aims to increase drying efficiency and prevent water or lime stains on the washed items. For this reason, care must be paid to have rinse aid in the rinse aid reservoir and to use rinse aids produced specially for dishwashers only. 4. If there are stains on tableware items after washing, level must be increased and if there is a blue trace after wiping them by hand, it must be decreased.
Preparation Placing the dishes into the dishwasher You can use your dishwasher in the optimum way with respect to energy consumption and washing and drying performance only if you place the dishes in an orderly way. Wipe away any coarse food remnants (bones, seeds, etc.) on the dishes before placing them in the dishwasher. Place thin, narrow pieces in the middle sections of baskets if possible.
Preparation Suggestions for loading the dishwasher Improper Loading Of Dishware Lower basket Upper basket Improper Loading Of Dishware 16 /48 EN Dishwasher / User’s Manual
Preparation Cutlery basket (depends on model) Cutlery basket is designed to wash your dishes such as knife, fork, spoon, etc. in an efficient manner. Since the cutlery basket can be moved (A, B), you can create more space while placing your dishes in the lower basket and free up space for your dishes of different sizes.
Preparation Collapsible lower basket tines (depends on model) There are foldable tines (A) located at the lower basket of the machine are designed for an easier placement of large pieces such as pans, bowls, etc. You can create larger spaces by folding each tines individually or all of them at once. C Bringing the tines to the horizontal position by holding them from the tips may cause them to bend.
Preparation SoftTouch Accessory (depends on model) The SoftTouch Accessory found in the lower basket of your machine enables a safe washing for your fragile glasses. C Bringing the tines to the horizontal position by holding them from the tips may cause them to bend. Therefore, it will be appropriate to bring the tines in the middle to horizontal or vertical position by holding them from their stems and pushing in the direction of arrow.
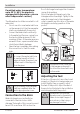
Preparation Lower basket multipurpose / height adjustable service rack (depends on model) This accessory located at the lower basket of your machine allows you to easily wash pieces such as extra glasses, long ladles and bread knives. A Make sure that the impeller does not touch the dishes you placed on the racks. To close the racks: 1. Fold the rack (A). 2. Slide the rack up (B). 3. Put the rack in vertical position (C). 4. Slide the rack down and lock it by the tabs (D).
Preparation Lower basket bottle wire (depends on model) The bottle wire is designed for easier washing of long pieces with wide mouths. You may take out the bottle wire from the basket when not in use by pulling it out from both sides (H). Upper basket height adjustable rack (depends on model) Use the lower and upper parts of the height adjustable racks in the upper basket of the machine by sliding them down or up according to the heights of the glasses, cups or etc. (A, B, C).
Preparation Adjusting the height of the upper basket (depends on model) The upper basket height adjustment mechanism has been designed for you to create large spaces in the lower or upper sections of your machine depending on your needs by adjusting the height in the upper or lower direction while your basket is empty or loaded. Thanks to this mechanism, you can use your basket in three different positions, namely lower, middle and upper positions (1, 2, 3). 1.
Preparation Collapsible upper basket wires (depends on model) You can use collapsible wires when you need a larger space for your dishes in the upper basket of your machine. To bring the collapsible wires into horizontal position, grab the wire from the middle position and push them in the direction of arrow in the figure. Place your larger dishes into the area created. To bring the wires back to vertical position, just lift them up.
Preparation Ceiling cutlery basket (depends on model) Ceiling cutlery basket is designed to wash your cutlery items such as forks, spoons and etc. by placing them between the bars on the basket. When the central tray is in the lower position, you can load long/high items such as coffee cups, ladles, etc. on the tray. When the side trays lean on two side walls, the handle can be pulled to allow the central tray to rise and the system to be locked.
Preparation Silverware basket piece (depends on model) You can place your forks, spoons and etc. to upper basket with the additional piece in the figure.. It is recommended that you should place the silverware basket piece on front left corner of the upper basket by detaching the Upper basket height adjustable rack.
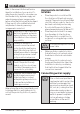
5 Operating the product 1. On/Off key 2. Programme Selection / Programme Cancel (3 seconds) key 3. Function keys F1 Half Load function F2 Fast+ Function F3 Extra Drying Function F4 TurboWash Function 4. Programme indicator 5. Salt indicator ( Depends on model) 6. Not in use 7. Start / Cancel indicator 8. Time Delay / Programme Time indicator 9. Time Delay key 10. Time Delay indicator 11. End of Programme indicator 12. Not in use 13.
Operating the product Keys Programme selection On/Off key When you press On / Off key, indicator lights illuminate on the display for ON position. The lights turn off in OFF position. Programme Selection / Programme Cancel key Press this key until the desired programme appears in the programme indicator. 1. To cancel the running programme open the door of the product. Press and hold the Programme Selection / Programme Cancel keys for 3 seconds.
/48 EN - MixWash+ 3 + + + 110-173 9,4-12,4 0,85-1,40 + + + 196 14,3 0,70 Wash Dry Duration (min) Water (I) Energy (kWh) 1,53 19 197 + + + Medium 1,51 16,8 158 + + + High 1,18 10,6 58 + + - Medium 60 ºC Daily washing programme at which the medium soiled dishes that are kept waiting are cleaned in the fastest way. 70 ºC Quick 5 Suitable for heavily soiled dishes, pots and pans.
Operating the product Auxiliary functions Washing programmes of your dishwasher are designed to obtain the best cleaning effect, considering the type of the soiling, soiling degree and properties of the dishes to be washed. Auxiliary functions allow you save from time, water and power. Auxiliary functions may cause changes in the programme duration. C C Auxiliary functions are not suitable for all washing programs.
Operating the product Floor illumination Warning to show that machine is in washing phase (depends on the model) Your machine reflects a light to the floor during the washing process. This light turns off after the washing process is complete. Floor illumination is activated automatically when the washing programme starts and remains lit until the end of the programme. C C Floor illumination cannot be cancelled by the user.
Operating the product Changing the settings while Time Delay function is active While the Time Delay function is activated, you cannot make changes in the washing programme, auxiliary functions or the duration of delay time. Programme and auxiliary functions cannot be set/ changed after the programme has started. C To cancel the Time Delay function Open the door of the product Press and hold the Programme Selection / Programme Cancel keys for 3 seconds.
Operating the product Rinse Aid indicator ( ) Please check the rinse aid indicator on the display to see whether there is adequate amount of rinse aid in the dishwasher or not. You need to refill the rinse aid reservoir with rinse aid whenever rinse aid indicator appears on the display of your machine. Adjusting the amount of rinse aid 1. After turning on the machine, press Time Delay and P+ keys simultaneously. After the countdown (3, 2, 1) is displayed keep the keys pressed for a while. 2.
6 Maintenance and cleaning Service life of the product extends and frequently faced problems decrease if it is cleaned at regular intervals. Unplug the product and turn off the tap before attempting any cleaning procedures. A C C Do not use abrasive substances for cleaning. Cleaning the filters Clean the filters at least once a week in order for the machine operates efficiently. Check if food residues are left on the filters.
Maintenance and cleaning Cleaning the hose filter 4. Clean all three filters under tap water by means of a brush. 5. Place the metal/plastic filter. 6. Place the coarse filter into the micro filter. Make sure that it is properly seated. Turn the coarse filter clockwise until a "click" sound is heard. C C 34 /48 EN Damages on the machine that may be caused by impurities coming from the urban supply water or your own water installation (such as sand, dirt, rust, etc.
Maintenance and cleaning Cleaning the impellers Upper impeller Clean the impellers at least once a week in order for the machine operates efficiently. Check if the holes on the upper impeller (1) are clogged. If they are clogged, remove and clean the impeller. Turn its nut to left to remove the upper impeller. Make sure that the nut is tightened well when installing the upper impeller. Lower impeller Check if the holes on the lower impeller (1) are clogged.
7 Troubleshooting 0DFKLQH GRHV QRW VWDUW • Power cable is unplugged. >>> Check if the power cable is plugged in. • Fuse is blown. >>> Check the fuses in your house. • Water is cut. >>> Make sure that the water inlet tap is open. • Door of the machine is open. >>> Make sure that you have closed the door of the machine. • On / Off button is not pressed. >>> Make sure that you have turned on the machine by pressing the On / Off button.
Troubleshooting • Rinse aid is not sufficient. >>> Check the rinse aid indicator and add rinse aid if necessary. Increase the rinse aid setting if there is enough amount of rinse aid in the machine. • Machine is unloaded right after the programme is over. >>> Do not unload your machine right after washing process is completed. Slightly open the door and wait for evacuation of the steam inside for a while. Unload the dishes after the pieces cool down to a touchable level.
Troubleshooting 7KHUH LV D GLIIHUHQW RGRXU LQ WKH PDFKLQH • • C A new machine has a peculiar odour. It will fade out after a couple of washes. Filters are clogged. >>> Check if the filter system is clean. Clean the filter system regularly as illustrated in section “Cleaning and Care”. Dirty dishes are kept in dishwasher for 2-3 days.
Troubleshooting • • • • Detergent is added long before the washing process. >>> Pay attention to add detergent shortly before start-up of the washing. Opening of the detergent dispenser lid is prevented during washing. >>> Place the dishes in a way that will not prevent the detergent dispenser lid from opening and the water going into the machine from impellers. Detergent is stored under unsuitable conditions. >>> If you are using powder detergent, do not store the detergent package in humid places.
Troubleshooting )RDP IRUPV LQ WKH PDFKLQH • Dishes are washed with hand-wash detergent by hand but not rinsed before placing them into the machine. >>> Hand-wash detergents do not contain antifoam. There is no need to hand-wash the dishes before placing them into the machine. Removing the coarse soil on the dishes under tap water, with a tissue paper or fork will be sufficient. • Rinse aid has spilled into the machine when adding rinse aid.
5FDIOJDBM %SBXJOH 4 /48 EN min m 18m 820 - 920 590 min min 60 0 max 500mm kg PLQ PD[ NJ NJ min 59 2 598 818 (+100) max 717 550 Dishwasher / User’s Manual
.BOVGBDUVSF (VBSBOUFF 7KLV ZDUUDQW\ LV SURYLGHG LQ $XVWUDOLD E\ *OHQ 'LPSOH[ $XVWUDOLD 3W\ /LPLWHG $%1 3KRQH QXPEHU DQG LQ 1HZ =HDODQG E\ *OHQ 'LPSOH[ 1HZ =HDODQG /LPLWHG 1=%1 3KRQH QXPEHU LQ UHVSHFW RI WKH *OHQ 'LPSOH[ SURGXFW *OHQ 'LPSOH[ ([SUHVV :DUUDQW\ 6XEMHFW WR WKH H[FOXVLRQV EHORZ ZH ZDUUDQW WKDW WKH SURGXFW ZLOO QRW KDYH DQ\ HOHFWULFDO RU PHFKDQLFDO EUHDNGRZQV ZLWKLQ D ,Q WKH FDVH RI *OHQ 'LPSOH[ SURGXFWV XVHG IRU SHUVRQDO GRPH
.BOVGBDUVSF (VBSBOUFF c) The repair relates to the replacement of consumable parts such as fuses and bulbs or any other parts of the product which require routine replacement; d) You are unable to provide us with reasonable proof of purchase for the product; e) the breakdown occurs after the expiry of the express warranty period set out in section 1 or &RQVXPHU JXDUDQWHHV Our goods come with guarantees that cannot be excluded under the Australian / New Zealand Consumer Law.
.BOVGBDUVSF (VBSBOUFF :DUUDQW\ FODLPV If you make a valid claim under this warranty and none of the exclusions set out in section 2 apply, we will, at our election, either repair the product or replace the product with a product of identical specification (or where the product is superseded or no longer in stock, with a product of as close a specification as possible). Goods presented for repair may be replaced by refurbished goods of the same type rather than being repaired.
/PUFT ___________________________________________________________________________________ ___________________________________________________________________________________ ___________________________________________________________________________________ ___________________________________________________________________________________ ___________________________________________________________________________________ ___________________________________________________________________________________ __
/PUFT ___________________________________________________________________________________ ___________________________________________________________________________________ ___________________________________________________________________________________ ___________________________________________________________________________________ ___________________________________________________________________________________ ___________________________________________________________________________________ __
/PUFT ___________________________________________________________________________________ ___________________________________________________________________________________ ___________________________________________________________________________________ ___________________________________________________________________________________ ___________________________________________________________________________________ ___________________________________________________________________________________ __
5($' 7+( ,16758&7,21 %22./(7 %()25( ,167$//,1* $1' 86,1* 7+( $33/,$1&( The manufacturer will not be responsible for any damage to property or to persons caused by incorrect installation or improper use of the appliance. The manufacturer is not responsible for any inaccuracies, due to printing or transcription errors, contained in this manual. In addition, the appearance of the figures reported is also purely indicative.