
User manual

11
Before rigging make sure that the installation area can hold a minimum point load of 10 times the projector's
weight.
DANGER OF FIRE!
When installing the device, make sure there is no highly-inflammable
material (decoration articles, etc.) within a distance of min. 0.5 m.
Mount the projector with the mounting-bracket to your trussing system using an appropriate clamp. The hole
in the mounting bracket has a diameter of 10 mm.
For overhead use, always install a safety-rope that can hold at least 12 times the weight of the fixture. You
must only use safety-ropes with screw-on carabines. Pull the safety-rope through the hole and over the
trussing system or a safe fixation spot. Insert the end in the carabine and tighten the safety screw.
Adjust the desired inclination-angle via the mounting-bracket and tighten the fixation screws.
Connection with the mains
Connect the device to the mains with the power-plug.
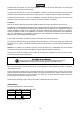
The occupation of the connection-cables is as follows:
Cable Pin International
Brown Live L
Blue Neutral N
Yellow/Green Earth
The earth has to be connected!
DANGER TO LIFE!
Before taking into operation for the first time, the installation has to be approved by an expert!
Analog controller connection / connection between fixtures
The SUPERSTROBE features two ¼“-jacks for connecting up to 5 strobes and a one-channel controller by
using instrument leads and mono jack plugs.
Remote control of the SUPERSTROBE is possible via analogue 10V-signals. Every impulse is followed by a
flash. We recommend to use the Eurolite Strobe Controller.
The occupation of the stereo jacks is as follows:
Tip +10 V
Ring Free
Sleeve Ground
OPERATION
Caution: Before connecting the strobe with the mains, the Speed-control have to be set to minimum
position.
After you connected the effect to the mains, the ACTION STROBE 300 starts running.
On the rear panel ot the SUPERSTROBE there is a rotary control to adjust the flash frequency (1-12 flashes
per second).