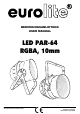
BEDIENUNGSANLEITUNG USER MANUAL LED PAR-64 RGBA, 10mm Für weiteren Gebrauch aufbewahren! Keep this manual for future needs! © Copyright Nachdruck verboten! Reproduction prohibited!
MULTI-LANGUAGE-INSTRUCTIONS Inhaltsverzeichnis Table of contents EINFÜHRUNG ................................................................................................................................................... 4 SICHERHEITSHINWEISE................................................................................................................................. 4 BESTIMMUNGSGEMÄßE VERWENDUNG.....................................................................................................
Control Board ............................................................................................................................................... 23 DMX-Mode ................................................................................................................................................... 24 DMX-Protocol............................................................................................................................................... 24 Addressing .....................
BEDIENUNGSANLEITUNG LED PAR-64 RGBA, 10mm Lesen Sie vor der ersten Inbetriebnahme zur eigenen Sicherheit diese Bedienungsanleitung sorgfältig durch! Alle Personen, die mit der Aufstellung, Inbetriebnahme, Bedienung, Wartung und Instandhaltung dieses Gerätes zu tun haben, müssen - entsprechend qualifiziert sein - diese Bedienungsanleitung genau beachten - die Bedienungsanleitung als Teil des Produkts betrachten - die Bedienungsanleitung während der Lebensdauer des Produkts behalten - die Bedienungsanleitun
Das Gerät darf nicht in Betrieb genommen werden, nachdem es von einem kalten in einen warmen Raum gebracht wurde. Das dabei entstehende Kondenswasser kann unter Umständen Ihr Gerät zerstören. Lassen Sie das Gerät solange uneingeschaltet, bis es Zimmertemperatur erreicht hat! Bitte überprüfen Sie vor der ersten Inbetriebnahme, ob kein offensichtlicher Transportschaden vorliegt.
Kinder und Laien vom Gerät fern halten! Das Gerät darf niemals unbeaufsichtigt betrieben werden! BESTIMMUNGSGEMÄßE VERWENDUNG Bei diesem Gerät handelt es sich um einen Effektstrahler, mit dem sich dekorative Lichteffekte erzeugen lassen. Dieses Produkt ist nur für den Anschluss an 230 V, 50 Hz Wechselspannung zugelassen und wurde ausschließlich zur Verwendung in Innenräumen konzipiert. Dieses Gerät ist für professionelle Anwendungen, z. B. auf Bühnen, in Diskotheken, Theatern etc. vorgesehen.
Soll das Gerät transportiert werden, verwenden Sie bitte die Originalverpackung, um Transportschäden zu vermeiden. Achten Sie bitte unbedingt darauf, dass das Gerät im Lieferzustand verpackt wird. Beachten Sie bitte, dass eigenmächtige Veränderungen an dem Gerät aus Sicherheitsgründen verboten sind. Der Serienbarcode darf niemals vom Gerät entfernt werden, da ansonsten der Garantieanspruch erlischt.
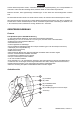
(6) Mode-Taste (7) Display (8) Down-Taste (9) Up-Taste (10) DMX-Ausgangsbuchse (11) DMX-Eingangsbuchse (12) Sicherungshalter (13) Netzanschluss INSTALLATION Montage Die Floorspot-Version kann sowohl hängend als auch stehend installiert werden.
material und regelmäßige Sicherheitsinspektionen des verwendeten Materials und des Gerätes. Versuchen Sie niemals, die Installation selbst vorzunehmen, wenn Sie nicht über eine solche Qualifikation verfügen, sondern beauftragen Sie einen professionellen Installateur. Unsachgemäße Installationen können zu Verletzungen und/oder zur Beschädigung von Eigentum führen. Das Gerät muss außerhalb des Handbereichs von Personen installiert werden. Wenn das Gerät von der Decke oder hochliegenden Trägern etc.
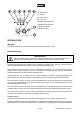
Anschluss an den DMX-512 Controller / Verbindung Gerät – Gerät Achten Sie darauf, dass die Adern der Datenleitung an keiner Stelle miteinander in Kontakt treten. Die Geräte werden ansonsten nicht bzw. nicht korrekt funktionieren. Beachten Sie, dass die Startadresse abhängig vom verwendeten Controller ist. Unbedingt Bedienungsanleitung des verwendeten Controllers beachten.
Anschluss ans Netz Schließen Sie das Gerät über den Netzstecker ans Netz an. Die Belegung der Anschlussleitungen ist wie folgt: Leitung Braun Blau Gelb/Grün Pin Außenleiter Neutralleiter Schutzleiter International L N Der Schutzleiter muss unbedingt angeschlossen werden! Wenn das Gerät direkt an das örtliche Stromnetz angeschlossen wird, muss eine Trennvorrichtung mit mindestens 3 mm Kontaktöffnung an jedem Pol in die festverlegte elektrische Installation eingebaut werden.
Einstellung des DMX-Modus Modus: Wert: 6ch (Vorgabewert) 4ch Einstellung der festen Farben Wenn das Display einen C anzeigt, können Sie die gewünschte feste Farbe auswählen.
DMX-Mode Über das Control Board können Sie die DMX Startadresse definieren. Die Startadresse ist der erste Kanal, auf den das Gerät auf Signale vom Controller reagiert. Adressierung des Geräts Um die Startadresse einzustellen drücken Sie die MODE Taste bis das Display Add anzeigt. Sie können nun die gewünschte Adresse über die UP oder DOWN Tasten auswählen. Ansteuerung: Nachdem Sie die Startadresse definiert haben, können Sie den LED PAR-64 RGBA, 10mm über Ihren Controller ansteuern.
Adressierung des Geräts Jedes Gerät belegt, wie bereits beschrieben, je nach Wahl des DMX-Modus 4 oder 6 DMX-Kanäle. Über das Control Board können Sie die DMX-Startadresse definieren. Die Startadresse ist der erste Kanal, auf den der Projektor auf Signale vom Controller reagiert. Bitte vergewissern Sie sich, dass sich die Steuerkanäle nicht mit anderen Geräten überlappen, damit der LED PAR-64 RGBA, 10mm korrekt und unabhängig von anderen Geräten in der DMX-Verbindung funktioniert.
TECHNISCHE DATEN Artikel Spannungsversorgung: Gesamtanschlusswert: Anzahl der DMX Steuerkanäle: DMX 512-Anschluss: Musiksteuerung: Anzahl der 10mm LEDs: Abstrahlwinkel: Maße: Gewicht: Maximale Umgebungstemperatur Ta: Maximale Leuchtentemperatur im Beharrungszustand TB: Mindestabstand zu entflammbaren Oberflächen: Mindestabstand zum angestrahlten Objekt: Sicherung: 51916400, 51916450 230 V AC, 50 Hz ~ 27 W 4/6 3-pol.
USER MANUAL LED PAR-64 RGBA, 10mm CAUTION! Keep this device away from rain and moisture! Unplug mains lead before opening the housing! For your own safety, please read this user manual carefully before you initially start-up.
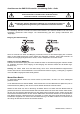
Please make sure that there are no obvious transport damages. Should you notice any damages on the A/C connection cable or on the casing, do not take the device into operation and immediately consult your local dealer. This device falls under protection-class I. The power plug must only be plugged into a protection class I outlet. The voltage and frequency must exactly be the same as stated on the device.
OPERATING DETERMINATIONS This device is a lighting effect for creating decorative effects. This product is only allowed to be operated with an alternating voltage of 230 V, 50 Hz and was designed for indoor use only. This device is designed for professional use, e.g. on stages, in discotheques, theatres etc. Lighting effects are not designed for permanent operation. Consistent operation breaks will ensure that the device will serve you for a long time without defects. Do not shake the device.
DESCRIPTION OF THE DEVICE Features Professional spot/floor spot as LED DMX model • 4 or 6 DMX channels selectable for numerous applications • Equipped with 177 x 10 mm LEDs: 30 x red, 48 x green, 54 x blue and 45 x amber • Sound-control via built-in microphone • Beam angle approximately 36° • Locking possibility at the mounting bracket • Ideal as floor spot via additional bracket (only valid for the floor spot version) • LED display with 3-button operation • Preset (internal programs) • RGBA-color change •
INSTALLATION Rigging The floor spot version can be installed on the ground or on the wall or ceiling. Overhead rigging DANGER TO LIFE! Please consider the EN 60598-2-17and the respective national standards during the installation! The installation must only be carried out by an authorized dealer! The installation of the device has to be built and constructed in a way that it can hold 10 times the weight for 1 hour without any harming deformation.
For overhead use, always install an appropriate safety bond. You must only use safety bonds complying with DIN 56927, quick links complying with DIN 56927, shackles complying with DIN EN 1677-1 and BGV C1 carbines. The safety bonds, quick links, shackles and the carbines must be sufficiently dimensioned and used correctly in accordance with the latest industrial safety regulations (e. g. BGV C1, BGI 810-3).
Caution: At the last fixture, the DMX-cable has to be terminated with a terminator. Solder a 120 resistor between Signal (–) and Signal (+) into a 3-pin XLR-plug and plug it in the DMX-output of the last fixture. Master/Slave-Operation The master/slave-operation enables that several devices can be synchronized and controlled by one masterdevice. On the rear panel of the EUROLITE LED PAR-64 RGBA, 10mm you can find an XLR-jack and an XLR-plug, which can be used for connecting several devices.
Control Board The Control Board offers several features: you can simply set the starting address or run the internal programs. Browse through the menu by pressing Mode. You can change the selection by pressing Up or Down. The functions provided are described in the following sections. Setting the DMX Start Address: Mode: Value: Add 1 - 512 Setting DMX Mode Mode: Value: 6ch (default setting) 4ch Setting solid colors: When the display shows C, you can select the desired solid color.
DMX-Mode The Control Board allows you to assign the DMX fixture address, which is defined as the first channel from which the LED PAR-64 RGBA, 10mm will respond to the controller. Addressing Press the MODE button until the display shows Add. You can now set the desired address via the UP or DOWN buttons. Controlling: After having addressed the LED PAR-64 RGBA, 10mm, you may now start operating it via your lighting controller.
Addressing Depending on the DMX-mode, each device of the LED PAR-64 RGBA, 10mm occupies 4 or 6 DMXchannels. The Control Board allows you to assign the DMX starting address, which is defined as the first channel from which the LED PAR-64 RGBA, 10mm will respond to the controller. Please, be sure that you don’t have any overlapping channels in order to control each LED PAR-64 RGBA, 10mm correctly and independently from any other fixture on the DMX-chain.
TECHNICAL SPECIFICATIONS Items Power supply: Power consumption: Number of DMX channels: DMX-512 connection: Sound-control: Number of 10mm LEDs: Beam angle: Dimensions: Weight: Maximum ambient temperature Ta: Maximum housing temperature TB: Min. distance from flammable surfaces: Min. distance to lighted object: Fuse: 51916400, 51916450 230 V AC, 50 Hz ~ 27 W 4/6 3-pin XLR via built-in microphone 177 36° 260 x 270 x 390 mm 2.4 kg 45° C 50° C 0.5 m 0.1 m F 0.