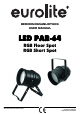
BEDIENUNGSANLEITUNG USER MANUAL LED PARPAR-64 RGB Floor Spot RGB Short Spot Für weiteren Gebrauch aufbewahren! Keep this manual for future needs! © Copyright Nachdruck verboten! Reproduction prohibited!
Inhaltsverzeichnis / Table of contents EINFÜHRUNG ................................................................................................................................................... 3 SICHERHEITSHINWEISE ................................................................................................................................. 3 BESTIMMUNGSGEMÄßE VERWENDUNG ..................................................................................................... 5 GERÄTEBESCHREIBUNG........
BEDIENUNGSANLEITUNG PAR-64 RGB Floor Spot ~ RGB Short Spot ACHTUNG! Gerät vor Feuchtigkeit und Nässe schützen! Niemals das Gerät öffnen! Lesen Sie vor der ersten Inbetriebnahme zur eigenen Sicherheit diese Bedienungsanleitung sorgfältig durch! Alle Personen, die mit der Aufstellung, Inbetriebnahme, Bedienung, Wartung und Instandhaltung dieses Gerätes zu tun haben, müssen - entsprechend qualifiziert sein - diese Bedienungsanleitung genau beachten - die Bedienungsanleitung als Teil des Produkts betrachten -
Das Gerät darf nicht in Betrieb genommen werden, nachdem es von einem kalten in einen warmen Raum gebracht wurde. Das dabei entstehende Kondenswasser kann unter Umständen Ihr Gerät zerstören. Lassen Sie das Gerät solange uneingeschaltet, bis es Zimmertemperatur erreicht hat! Bitte überprüfen Sie vor der ersten Inbetriebnahme, ob kein offensichtlicher Transportschaden vorliegt.
GESUNDHEITSRISIKO! Blicken Sie niemals direkt in die Lichtquelle, da bei empfindlichen Menschen u. U. epileptische Anfälle ausgelöst werden können (gilt besonders für Epileptiker)! Kinder und Laien vom Gerät fern halten! Das Gerät darf niemals unbeaufsichtigt betrieben werden! BESTIMMUNGSGEMÄßE VERWENDUNG Bei diesem Gerät handelt es sich um einen Effektstrahler, mit dem sich dekorative Lichteffekte erzeugen lassen.
Nehmen Sie das Gerät erst in Betrieb, nachdem Sie sich mit seinen Funktionen vertraut gemacht haben. Lassen Sie das Gerät nicht von Personen bedienen, die sich nicht mit dem Gerät auskennen. Wenn Geräte nicht mehr korrekt funktionieren, ist das meist das Ergebnis von unsachgemäßer Bedienung! Reinigen Sie das Gerät niemals mit Lösungsmitteln oder scharfen Reinigungsmitteln, sondern verwenden Sie ein weiches und angefeuchtetes Tuch.
Der Unternehmer hat dafür zu sorgen, dass sicherheitstechnische und maschinentechnische Einrichtungen mindestens alle vier Jahre durch einen Sachverständigen im Umfang der Abnahmeprüfung geprüft werden. Der Unternehmer hat dafür zu sorgen, dass sicherheitstechnische und maschinentechnische Einrichtungen mindestens einmal jährlich durch einen Sachkundigen geprüft werden. Vorgehensweise: Der Projektor sollte idealerweise außerhalb des Aufenthaltsbereiches von Personen installiert werden.
LEBENSGEFAHR! Vor der ersten Inbetriebnahme muss die Einrichtung durch einen Sachverständigen geprüft werden! DMX512-Ansteuerung Achten Sie darauf, dass die Adern der Datenleitung an keiner Stelle miteinander in Kontakt treten. Die Geräte werden ansonsten nicht bzw. nicht korrekt funktionieren. Beachten Sie, dass die Startadresse abhängig vom verwendeten Controller ist. Unbedingt Bedienungsanleitung des verwendeten Controllers beachten.
Stellen Sie nun am Mastergerät eines von den Standalone-Modi ("C---" oder "P---") ein. Stellen Sie an jedem Slavegerät dieselbe DMX Adresse ein: "001". Anschluss ans Netz Schließen Sie das Gerät über den Netzstecker ans Netz an.
STAND ALONE-MODUS Der LED PAR-64 RGB Floor/Short lässt sich im Stand Alone-Betrieb ohne Controller einsetzen. Trennen Sie dazu den EUROLITE LED PAR-64 RGB Floor/Short vom Controller. Einstellung der festen Farben Drücken Sie die MODE Taste um die Einstellungen der festen Farben zu wählen. Wenn das Display einen C anzeigt, können Sie die gewünschte feste Farbe auswählen. (Siehe folgende Tabelle). Über die UP oder DOWN Tasten können Sie die gewünschten Farbe eingeben.
DMX MODUS Über die LED Anzeige können Sie die DMX Startadresse definieren. Die Startadresse ist der erste Kanal, auf den das Gerät auf Signale vom Controller reagiert. Adressierung des Geräts Um die Startadresse einzustellen drücken Sie die MODE Taste bis das Display ADD anzeigt. Sie können nun die gewünschte Adresse über die UP oder DOWN Tasten auswählen.
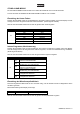
DMX-Protokoll 5-Kanal-Modus Kanal: CH1 Wert: 000 – 255 Funktion: Rot (0 – 100%) Kanal: CH2 Wert: 000 – 255 Funktion: Grün (0 – 100%) Kanal: CH3 Wert: 000 – 255 Funktion: Blau (0 – 100%) Kanal: CH4 Wert: 000 – 255 Funktion: Dimmer (0 – 100%) Kanal: Wert: 000 – 000 001 – 005 006 – 010 011 – 255 Funktion: AN Musikgesteuert (7 Farben) AN Strobe (zunehmend) Kanal: CH1 Wert: 000 – 255 Funktion: Rot (0 – 100%) Kanal: CH2 Wert: 000 – 255 Funktion: Grün (0 – 100%) Kanal: CH3 Wert: 000 – 255 Fu
Vor dem Sicherungswechsel ist das Gerät allpolig von der Netzspannung zu trennen (Netzstecker ziehen). Vorgehensweise: Schritt 1: Drehen Sie den Sicherungshalter mit einem passenden Schraubendreher aus dem Gehäuse (gegen den Uhrzeigersinn). Schritt 2: Entfernen Sie die defekte Sicherung aus dem Sicherungshalter. Schritt 3: Setzen Sie die neue Sicherung in den Sicherungshalter ein. Schritt 4: Setzen Sie den Sicherungshalter wieder im Gehäuse ein und drehen Sie ihn fest.
USER MANUAL PAR-64 RGB Floor Spot ~ RGB Short Spot CAUTION! Keep this device away from rain and moisture! Never open the housing! For your own safety, please read this user manual carefully before you initially start-up.
Please make sure that there are no obvious transport damages. Should you notice any damages on the A/C connection cable or on the casing, do not take the device into operation and immediately consult your local dealer. This device falls under protection-class I. The power plug must only be plugged into a protection class I outlet. The voltage and frequency must exactly be the same as stated on the device.
OPERATING DETERMINATIONS This device is a lighting effect for creating decorative effects. This product is only allowed to be operated with an alternating voltage of 230 V, 50 Hz and was designed for indoor use only. This device is designed for professional use, e.g. on stages, in discotheques, theatres etc. Lighting effects are not designed for permanent operation. Consistent operation breaks will ensure that the device will serve you for a long time without defects. Do not shake the device.
DESCRIPTION Features Professional spot as LED RGB DMX model! Operable in stand-alone mode or via DMX • DMX512 control possible via any commercial DMX controller (occupies 5 channels) • 3 or 5 DMX channels selectable for numerous applications • Sound-control via builtin microphone • Comfortable addressing and setting via control panel with LED display and four operating buttons • Functions: Static colors, RGB color blend, 6 internal programs, dimmer and strobe settings via DMX, Master/Slave • Equipped with 1
Caution: Devices may cause severe injuries when crashing down! If you have doubts concerning the safety of a possible installation, do NOT install the device! Before rigging make sure that the installation area can hold a minimum point load of 10 times the device's weight. DANGER OF FIRE! When installing the device, make sure there is no highly-inflammable material (decoration articles, etc.) within a distance of min. 0.5 m.
Occupation of the XLR connection: If you are using controllers with this occupation, you can connect the DMX output of the controller directly with the DMX input of the first device in the DMX chain. If you wish to connect DMX controllers with other XLR outputs, you need to use adapter cables. Building a serial DMX chain: Connect the DMX output of the first device in the DMX chain with the DMX input of the next device.
OPERATION After you connected the spot to the mains, the EUROLITE LED PAR-64 RGB Floor/Short starts running. The LED display lights up and you can choose the desired settings. This unit has two operating modes: it can be run as a stand-alone unit without external control via LED display with operating buttons or alternately in DMX-controlled mode via lighting controller. Control Board The Control Board offers several features: you can run the internal programs or set the starting address.
Setting the Sound Sensitivity: You can do without a controller as the device features a built-in microphone, which provides automatic sound control. Manual adjustements via display as follows: Mode: S Value: S00-S99 Sensitivity: Decreasing sensitivity You can select the desired sensitivity via the UP or DOWN buttons. DMX MODE The Control Board allows you to assign the DMX fixture address, which is defined as the first channel from which the LED PAR-64 RGB Floor/Short will respond to the controller.
DMX-protocol 5 Channel Mode Channel: CH1 Value: 000 – 255 Function: Red (0 – 100%) Channel: CH2 Value: 000 – 255 Function: Green (0 – 100%) Channel: CH3 Value: 000 – 255 Function: Blue (0 – 100%) Channel: CH4 Value: 000 – 255 Function: Dimmer (0 – 100%) Channel: Value: 000 – 000 001 – 005 006 – 010 011 – 255 Function: ON Sound Control (7 colors) ON Strobe (increasing) CH5 3 Channel Mode Channel: CH1 Value: 000 – 255 Function: Red (0 – 100%) Channel: CH2 Value: 000 – 255 Function: Green
Should you need any spare parts, please use genuine parts. If the power supply cable of this device becomes damaged, it has to be replaced by authorized dealers only in order to avoid hazards. Should you have further questions, please contact your dealer. TECHNICAL SPECIFICATIONS Power supply: Power consumption: Number of channels: DMX512 connection: Sound-control: Maximum ambient temperature Ta: Maximum housing temperature TC: Min. distance from flammable surfaces: Min.