BEDIENUNGSANLEITUNG USER MANUAL LED TMH-6 Moving-Head Spot Für weiteren Gebrauch aufbewahren! Keep this manual for future needs! © Copyright Nachdruck verboten! Reproduction prohibited!
MULTI-LANGUAGE INSTRUCTIONS Inhaltsverzeichnis Table of contents EINFÜHRUNG ................................................................................................................................................... 3 SICHERHEITSHINWEISE................................................................................................................................. 3 BESTIMMUNGSGEMÄSSE VERWENDUNG ..................................................................................................
BEDIENUNGSANLEITUNG LED TMH-6 Moving-Head Spot ACHTUNG! Gerät vor Feuchtigkeit und Nässe schützen! Vor Öffnen des Gerätes vom Netz trennen! Lesen Sie vor der ersten Inbetriebnahme zur eigenen Sicherheit diese Bedienungsanleitung sorgfältig durch! Alle Personen, die mit der Aufstellung, Inbetriebnahme, Bedienung, Wartung und Instandhaltung dieses Gerätes zu tun haben, müssen - entsprechend qualifiziert sein - diese Bedienungsanleitung genau beachten - die Bedienungsanleitung als Teil des Produkts betracht
Das Gerät darf nicht in Betrieb genommen werden, nachdem es von einem kalten in einen warmen Raum gebracht wurde. Das dabei entstehende Kondenswasser kann unter Umständen Ihr Gerät zerstören. Lassen Sie das Gerät solange uneingeschaltet, bis es Zimmertemperatur erreicht hat! Bitte überprüfen Sie vor der ersten Inbetriebnahme, ob kein offensichtlicher Transportschaden vorliegt.
Kinder und Laien vom Gerät fern halten! Das Gerät darf niemals unbeaufsichtigt betrieben werden! BESTIMMUNGSGEMÄSSE VERWENDUNG Bei diesem Gerät handelt es sich um einen kopfbewegten LED-Effektstrahler, mit dem sich dekorative Lichteffekte erzeugen lassen. Dieses Produkt ist nur für den Anschluss an 230 V, 50 Hz Wechselspannung zugelassen und wurde ausschließlich zur Verwendung in Innenräumen konzipiert. Dieses Gerät ist für professionelle Anwendungen, z. B. auf Bühnen, in Diskotheken, Theatern etc.
Die maximale Umgebungstemperatur Ta = 45° C darf niemals überschritten werden. Nehmen Sie das Gerät erst in Betrieb, nachdem Sie sich mit seinen Funktionen vertraut gemacht haben. Lassen Sie das Gerät nicht von Personen bedienen, die sich nicht mit dem Gerät auskennen. Wenn Geräte nicht mehr korrekt funktionieren, ist das meist das Ergebnis von unfachmännischer Bedienung! Soll das Gerät transportiert werden, verwenden Sie bitte die Originalverpackung, um Transportschäden zu vermeiden.
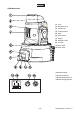
Geräteübersicht (1) Linse (2) Manueller Focus (3) Projektorarm (4) Lüftungsschlitze (5) Base (6) Steuereinheit (7) Display (8) Mode/Esc-Taste (9) Up-Taste (10) Down-Taste (11) Enter-Taste (12) Netzanschluss (13) Sicherungshalter (14) DMX-Eingangsbuchse (15) DMX-Ausgangsbuchse 7/34 00057930.DOC, Version 1.
INSTALLATION Projektormontage Die Aufhängevorrichtungen des Projektors muss so gebaut und bemessen sein, dass sie 1 Stunde lang ohne dauernde schädliche Deformierung das 10-fache der Nutzlast aushalten kann. Die Installation muss immer mit einer zweiten, unabhängigen Aufhängung, z. B. einem geeigneten Fangnetz, erfolgen. Diese zweite Aufhängung muss so beschaffen und angebracht sein, dass im Fehlerfall der Hauptaufhängung kein Teil der Installation herabfallen kann.
ACHTUNG! Montieren Sie den Projektor ausschließlich über einen geeigneten Haken. Bitte beachten Sie auch die Installationshinweise auf der Unterseite der Base. Achten Sie darauf, dass das Gerät sicher befestigt wird. Vergewissern Sie sich, dass die Verankerung stabil ist. Das Gerät kann direkt auf den Boden gestellt werden oder in jeder möglichen Position im Trussing installiert werden, ohne seine funktionellen Eigenschaften zu verändern. Die Projektorbase lässt sich auf zwei verschiedene Arten montieren.
Beachten Sie, dass die Startadresse abhängig vom verwendeten Controller ist. Unbedingt Bedienungsanleitung des verwendeten Controllers beachten. Die Verbindung zwischen Controller und Gerät sowie zwischen den einzelnen Geräten sollte mit einem DMX-Kabel erfolgen. Die Steckverbindung geht über 3-polige XLR-Stecker und -Kupplungen.
BEDIENUNG Wenn Sie das Gerät an die Spannungsversorgung angeschlossen haben, nimmt der LED TMH-6 den Betrieb auf. Während des Reset justieren sich die Motoren aus und das Gerät ist danach betriebsbereit. Stellen Sie den Fokus durch Betätigen des Schiebereglers unterhalb der Objektivlinse ein, um die Projektion scharf zu stellen. Stand Alone-Betrieb Der LED TMH-6 lässt sich im Stand Alone-Betrieb ohne Controller einsetzen.
Schalten Sie das Gerät ein. Das Gerät prüft, ob DMX-512 Daten empfangen werden oder nicht. Wenn Daten empfangen werden, erscheint „d001.“ mit der definierten Startadresse auf dem Display. Werden keine Daten empfangen, erscheint „d001“ mit der definierten Startadresse. Die Meldung erscheint -wenn kein 3-poliges XLR-Kabel (DMX Signalkabel vom Controller) in die DMX-Eingangsbuchse des Gerätes gesteckt wurde. -wenn der Controller ausgeschaltet oder defekt ist.
Steuerkanal 5 - Gobos, Gobo Shake Decimal 07 8 15 16 23 24 31 32 39 40 47 48 55 56 63 64 71 72 79 80 94 95 109 110 124 125 139 140 154 155 169 170 184 185 199 200 214 215 235 236 255 Hexad.
Steuerkanal 7 - Rot Decimal Hexad. Percentage S/F Eigenschaft 0 255 00 FF 0% 100% S Rot (0=aus, 255=100% rot) Steuerkanal 8 - Grün Decimal Hexad. Percentage S/F Eigenschaft 0 255 00 FF 0% 100% S Grün (0=aus, 255=100% grün) Steuerkanal 9 - Blau Decimal Hexad. Percentage S/F Eigenschaft 221 255 DD FF 87% 100% S Blau (0=aus, 255=100% blau) Steuerkanal 10 - Farbmakros Decimal 07 8 21 22 35 36 49 50 63 64 77 78 91 92 105 106 119 120 133 134 147 148 161 162 175 176 189 190 203 204 217 218 231 232 255 Hexad.
8 173 188 203 218 233 172 187 202 217 232 255 9E AC AD BB BC CA CB D9 DA E8 E9 FF 62% 68% 74% 80% 85% 91% 67% 73% 79% 85% 91% 100% S S S S S S Musikgetaktetes Bewegungsmakro 3 Musikgetaktetes Bewegungsmakro 4 Musikgetaktetes Bewegungsmakro 5 Musikgetaktetes Bewegungsmakro 6 Musikgetaktetes Bewegungsmakro 7 Musikgetaktetes Bewegungsmakro 8 Steuerkanal 13 - Gobos, Gobo Shake Decimal 07 8 15 16 23 24 31 32 39 40 47 48 55 56 63 64 71 72 79 80 94 95 109 110 124 125 139 140 154 155 169 170 184 185 199 20
/34 00057930.DOC, Version 1.
REINIGUNG UND WARTUNG Der Unternehmer hat dafür zu sorgen, dass sicherheitstechnische und maschinentechnische Einrichtungen mindestens alle vier Jahre durch einen Sachverständigen im Umfang der Abnahmeprüfung geprüft werden. Der Unternehmer hat dafür zu sorgen, dass sicherheitstechnische und maschinentechnische Einrichtungen mindestens einmal jährlich durch einen Sachkundigen geprüft werden.
TECHNISCHE DATEN Spannungsversorgung: Gesamtanschlusswert: DMX-Steuerkanäle: DMX512-Anschluss: Blitzrate: Musiksteuerung: LED-Typ: Anzahl der LEDs: Abstrahlwinkel: Statisches Goborad: Max. Schwenkbewegung (PAN): Max.
USER MANUAL LED TMH-6 Moving-Head Spot CAUTION! Keep this device away from rain and moisture! Unplug mains lead before opening the housing! For your own safety, please read this user manual carefully before you initially start-up.
If the device has been exposed to drastic temperature fluctuation (e.g. after transportation), do not switch it on immediately. The arising condensation water might damage your device. Leave the device switched off until it has reached room temperature. Please make sure that there are no obvious transport damages. Should you notice any damages on the A/C connection cable or on the casing, do not take the device into operation and immediately consult your local dealer.
OPERATING DETERMINATIONS This device is a LED moving-head lighting effect for creating decorative effects. This product is only allowed to be operated with an alternating current of 230 V, 50 Hz and was designed for indoor use only. This device is designed for professional use, e.g. on stages, in discotheques, theatres etc. Lighting effects are not designed for permanent operation. Consistent operation breaks will ensure that the device will serve you for a long time without defects.
If this device will be operated in any way different to the one described in this manual, the product may suffer damages and the guarantee becomes void. Furthermore, any other operation may lead to dangers like shortcircuit, burns, electric shock, crash etc.
Overview (1) Lens (2) Manual focus (3) Yoke (4) Venting slots (5) Base (6) Control Board (7) Display (8) Mode/Esc-button (9) Up-button (10) Down-button (11) Enter-button (12) Power supply (13) Fuseholder (14) DMX-In socket (15) DMX-Out socket 23/34 00057930.DOC, Version 1.
INSTALLATION Rigging The installation of the projector has to be built and constructed in a way that it can hold 10 times the weight for 1 hour without any harming deformation. The installation must always be secured with a secondary safety attachment, e.g. an appropriate catch net. This secondary safety attachment must be constructed in a way that no part of the installation can fall down if the main attachment fails.
CAUTION! Use a appropriate clamp to rig the fixture on the truss. Follow the instructions mentioned at the bottom of the base. Make sure that the device is fixed properly! Ensure that the structure (truss) to which you are attaching the fixtures is secure. The Moving-Head can be placed directly on the stage floor or rigged in any orientation on a truss without altering its operation characteristics (see the drawing). The fixture’s base enables to be mounted in two ways.
Only use a DMX-cable and 3-pin XLR-plugs and connectors in order to connect the controller with the fixture or one fixture with another. Occupation of the XLR-connection: If you are using controllers with this occupation, you can connect the DMX-output of the controller directly with the DMX-input of the first fixture in the DMX-chain. If you wish to connect DMX-controllers with other XLR-outputs, you need to use adapter-cables.
Stand Alone operation In the Stand Alone mode, the LED TMH-6 can be used without controller. Disconnect the LED TMH-6 from the controller and call the internal program. Please refer to the instructions under Control Board. Master/Slave-operation The master/slave-operation enables that several devices can be synchronized and controlled by one masterdevice. On the rear panel of the LED TMH-6 you can find an XLR-jack (DMX Out) and an XLR-plug (DMX In), which can be used for connecting several devices.
DMX-protocol 5 DMX channel mode Control-channel 1- Horizontal movement (Pan) (within 540°) Push slider up in order to move the head horizontally (PAN). Gradual head adjustment from one end of the slider to the other (0-255, 128-center). The head can be stopped at any position you wish. Control-channel 2 - Vertical movement (Tilt) (within 270°) Push slider up in order to move the head vertically (TILT). Gradual head adjustment from one end of the slider to the other (0-255, 128-center).
Control-channel 5 - gobos, gobo shake Decimal 07 8 15 16 23 24 31 32 39 40 47 48 55 56 63 64 71 72 79 80 94 95 109 110 124 125 139 140 154 155 169 170 184 185 199 200 214 215 235 236 255 Hexad.
Control-channel 7 - Red Decimal Hexad. 0 255 00 FF Percentage S/F 0% 100% S Red (0=off, 255=100% red) Feature Control-channel 8 - Green Decimal Hexad. 0 255 00 FF Percentage S/F Feature 0% 100% S Green (0=off, 255=100% green) Control-channel 9 - Blue Decimal Hexad.
143 157 158 172 173 187 188 202 203 217 218 232 233 255 8F 9D 9E AC AD BB BC CA CB D9 DA E8 E9 FF 56% 62% 68% 74% 80% 85% 91% 62% 67% 73% 79% 85% 91% 100% S S S S S S S Sound-controlled Motion macro 2 Sound-controlled Motion macro 3 Sound-controlled Motion macro 4 Sound-controlled Motion macro 5 Sound-controlled Motion macro 6 Sound-controlled Motion macro 7 Sound-controlled Motion macro 8 Control-channel 13 - gobos, gobo shake Decimal 07 8 15 16 23 24 31 32 39 40 47 48 55 56 63 64 71 72 79 80 94 95 1
/34 00057930.DOC, Version 1.
CLEANING AND MAINTENANCE The operator has to make sure that safety-relating and machine-technical installations are inspected by an expert after every four years in the course of an acceptance test. The operator has to make sure that safety-relating and machine-technical installations are inspected by a skilled person once a year.
TECHNICAL SPECIFICATIONS Power supply: Power consumption: DMX control channels: DMX512 connection: Flash-rate: Sound-control: Type of LED: Number of LEDs: Beam angle: Static gobo-wheel: Maximum PAN-movement: Maximum TILT-movement: Length of base: Width of yoke: Height (head horizontal): Weight (net): Maximum ambient temperature Ta: Maximum housing temperature TB (steady state): Min. distance from flammable surfaces: Min.