M6 COMPACT STEAM CLEANER Floor and Surface Ultra Dry Steam INSTRUCTION MANUAL Before using this product, please read the instructions and keep it for future references.
SAVE THESE INSTRUCTIONS I M PO R TAN T SAF E T 2 When using an electrical appliance, basic safety precautions should always be observed, including the following: Read all instructions before using this appliance. WARNING: To reduce the risk of fire, electrical shock, or injury: 1. This appliance is authorized for household/domestic use only. Commercial use will void the warranty. 2. Do not immerse the Steam Cleaner in water or other liquids. Always turn off and unplug appliance when filling with water.
E T Y I N S TR U C T I O N S ATTENTION: This appliance is equipped with a 3-prong grounded power cord. Insert only into a 3-prong grounded electrical outlet. Do not try to remove the contacts of the grounded connection. 19. Do not use extension cords or outlets with inadequate voltage. Use a 10-ampere extension cord. Lower amperage cords may overheat. 20. Store appliance indoors in a cool, dry place, and out of reach of children when not in use. 21.
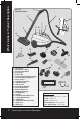
What’s Inside & Product Description 1 One (1) Steam Cleaner 9 2 10 7 5 3 6 8 4 11 12 14 13 15 16 18 17 19 1 - Steam Gun 2 - (2) Extension Tubes 3 - Floor Brush Adapter 4 - Floor Brush 5 - Boiler Cap 6 - Power Indicator Light (orange) 7 - Steam Ready Light (green) 8 - Power Switch 9 - Flexible Steam Hose 10 - Shoulder Strap 11 - Filler Funnel 12 - Small Brush Adapter 13 - Nylon Detail Brush 14 - Brass Detail Brush 15 - Window Squeegee 16 - Detail Nozzle 17 - Scraper 18 - Floor Brush Microfib
The Compact Steam Cleaner Features 1. No need for detergents or chemicals. Just add water. 2. Lightweight and compact. Features 1 3. Ergonomic, lightweight Steam Gun. 4. Steam Gun locks in as carry handle. 5. Versatile, quick-change accessories. 6. On/Off steam control. 7. Stainless Steel Boiler – non-corroding, reduces calcium buildup. 8. Multiple uses – clean bathrooms, kitchens, living areas, pet areas, appliances and much more. Accessories - Attachment & Descriptions A.
Cleaner Accessories 2 Accessories (continued) B. Attach Extension Tube to Window Squeegee The Window Squeegee is very useful for cleaning large windows and glass. Press button To use: Connect Window Squeegee to Steam Gun or Extension Tube(s) for hard to reach surfaces. Apply steam liberally, rub with soft spongy edge, then remove excess water and dirt with squeegee edge. Wipe dirt from Squeegee blade.
Filling Steam Cleaner with Water WARNINGS • Carefully read all instructions before removing Boiler Cap. • Always switch off the appliance and be sure it has cooled before filling the Boiler. Before Use 3 *IMPORTANT* Use ordinary tap water. Use distilled or demineralized water if tap water is too hard. DO NOT add detergents, perfumes, oils or other chemical substances. Follow these instructions to avoid overfilling the Boiler. NOTE: Do not turn on Steam Cleaner if Boiler is empty.
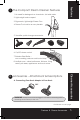
Using Your Steam Cleaner 5 Attaching Floor Brush to Extension Tube A. Attach Brush Adapter to Floor Brush 180° B. Attach Floor Brush & Adapter to Extension Tube Attach Extension Tube to Brush Adapter by pressing the locking button while sliding Tube into Brush Adapter. Be sure button and hole line up and button locks in place. To disconnect, press the locking button and pull the two pieces apart. 6 Attaching Microfibre Pads to Brushes A.
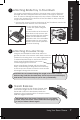
Attaching Bristle Tray to Floor Brush For rough or textured floor surfaces, the steam may not be sufficient to dislodge dirt that is trapped within the surface of a rough or textured floor. In order to dislodge dirt trapped in the surface, the Bristle Tray will need to be attached to the bottom of the Floor Brush to help scrub the rough or textured surface. 1. Unscrew the screws found on the bottom of the Floor Brush, remove the smooth tray at the bottom of the Floor Brush. 8 2.
Using Your Steam Cleaner 10 Refilling the Boiler During Use When water in the boiler runs out, steam will stop emitting from the Steam Cleaner. To refill the Boiler with water, follow the steps below: • Switch off the Steam Cleaner by depressing the Power Switch and unplug the appliance from the power outlet. • Carefully and slowly turn the Boiler Cap counter-clockwise. If a hissing sound is heard, residual steam and pressure remain in the Boiler.
• We recommend using distilled or demineralized water as the best way to care for and utilize your Steam Cleaner. • If tap water is too hard, use distilled or demineralized water to avoid the risk of staining pale colored fabrics. • Do not add detergents, perfumes, oils or other chemical substances. 12 Cleaning Steam Cleaner We recommend you periodically clean the Steam Cleaner to prevent the accumulation of calcium, mineral deposits and other sediment caused by the use of tap water.
Tips & Reminders 14 Steam Cleaner Tips & Reminders This steam cleaning appliance has many practical uses that have not been mentioned in this manual. Please refer to the Cleaning Reference Guild included with this manual for tips and suggestions of where and how to use the Steam Cleaner. Alternatively visit the website at www. euroflex.com.au for additional information or contact our Customer Support Line for assistance.
A. Tool Caddy – Installation The Tool Caddy allows you to store a variety of accessories/ attachments right on the Steam Cleaner, keeping them handy and ready for use. Select which tools you will place in the Caddy according to the cleaning tasks you are going to perform. Tool Caddy Installation: • Hook the top front of the Tool Caddy over the two hooks on the back of the Steam Cleaner.
Tool Caddy & Wall Bracket B. Wall Bracket – Installation *IMPORTANT* The Tool Caddy MUST be installed on the Steam Cleaner before the Wall Bracket can be used. WARNING! When storing the Steam Cleaner on the Wall Bracket, ensure that any tools on the Tool Caddy are not in a dangerous position. Example: Extension Tubes could be a hazard if the rack is mounted at eye level. The Wall Bracket can be permanently mounted to a wall or inside a cupboard or closet.
• Lift the Steam Cleaner above the Wall Bracket and line up the slots on the Tool Caddy with the hooks on the Bracket. • Lower the Steam Cleaner until the slots fit over the hooks. • Slowly slide the Steam Cleaner in place on the Wall Bracket. Tool Caddy & Wall Bracket C. Wall Bracket – Placing Unit on Bracket D. Wall Bracket – Removing Unit from Bracket Slide Steam Cleaner up and off of Wall Bracket.
Customer Support Customers needing assistance with their steam cleaner can call the Customer Support Line on the phone numbers listed below. Customers should also call the Customer Support Line if they require product warranty repair or post-warranty product servicing.Our friendly Customer Service Team can assist you with getting the best cleaning results from your steam cleaner, they are full of helpful steam cleaning tips, too.