M4S HYBRID FLOOR STEAMER All in One Steam Cleaner INSTRUCTION MANUAL Before using this product, please read the instructions and keep it for future references.
I M P O R TA N T SAF Whe n using a n e le c tric a l a pplia nc e , b a sic sa fe ty pre c a utio ns sho uld a lwa ys b e o b se rve d, inc luding the fo llo wing : Re a d a ll instruc tio ns b e fo re using this a pplia nc e . WARNING ! To re d uc e the risk o f fire , e le c tric a l sho c k, o r injury: 1. This a p p lia nc e is a utho rize d fo r ho use ho ld / d o me stic use o nly. 2. Do no t c ha rg e o r use o utd o o rs o r o n we t surfa c e s.
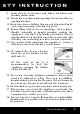
ETY INSTRUCTION . 9. Lo o k c lo se ly a t ste a me r a nd fo llo w a ll la b e ls a nd ma rking instruc tio ns. 10. Do no t put a ny o b je c ts into o pe ning s. Do no t use with a ny o pe ning b lo c ke d. 11. Ke e p ha ir, lo o se c lo thing , fing e rs a nd a ll p a rts o f b o d y a wa y fro m o p e ning s a nd mo ving p a rts. 12.
I M P O R TA N T SAF 19. The Ste a me r is no t inte nd e d fo r sp a c e he a ting p urp o se s. 20. To re d uc e the like liho o d o f c irc uit o ve rlo a d , d o no t o p e ra te a no the r hig h wa tta g e a p p lia nc e o n the sa me c irc uit. Plug in to a sta nd a rd (220-240V, 50/ 60Hz) e le c tric a l o utle t. ATTENTIO N! This a pplia nc e is e q uippe d with a 3- pro ng g ro unde d po we r c o rd. Inse rt o nly into a 3- pro ng g ro unde d e le c tric a l o utle t.
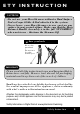
ETY INSTRUCTION . C AUTIO NS •Do no t use y o ur Flo o r Ste am e r witho ut a Hard Surfac e Pad o r C arpe t G lide & Pad attac he d to the sy ste m . •Ne ve r le ave y o ur Flo o r Ste am e r in o ne spo t o n any surfac e fo r any pe rio d o f tim e . Make sure that the Flo o r Ste am e r Handle Asse m b ly is in the full “UP PO SITIO N” whe n no t in use - this turns the Ste am e r O ff.
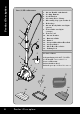
Pro duc t De sc riptio n O ne (1) Flo o r Ste a m e r 1 2 3 4 5 6 7 1 - 8- 3 4 9 2 11 5 3 910 11 12 13 14 15 16 Ste a m Ha ndle with Switc h Lo c king Butto ns C o rd Winde rs C le a ning Ho se C la m p Me a suring C up (pre - m a rke d) Bo ile r C a p Ste a m Re a dy Indic a to r Lig ht (g re e n) Po we r Indic a to r Lig ht (o ra ng e ) Po we r C o rd - Ste a m No zzle s - Exte nsio n Tub e - Funne l - C a rpe t Slide r Mic ro fib e r Pa d - C a rpe t G lide r - Mic ro fib e r Flo o r Pa ds - Pa
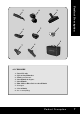
3 6 5 4 Pro duc t De sc riptio n 2 1 9 7 8 AC C ESSO RIES 1 2 3 4 5 6 7 8 9 - De ta il No zzle Nylo n Sm a ll Brushe s Windo w C le a ne r Sm a ll Brush Ada pte r Sm a ll Brush Fitte d Mic ro fib e r Pa d fo r Sm a ll Brush Sc ra pe r G ro ut Brush Ac c e sso ry Ba g Pro d uc t De sc rip tio n 7
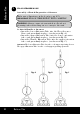
Be fo re Use 1 FLO O R STEAMER MO DE Asse m b ly o f Pa rts & Pre pa ra tio n o f Ste a m e r Ma ke sure a ll p a rts a re in the b o x (se e p g 6-7). IMPO RTANT! FO LLO W THESE INSTRUC TIO NS C AREFULLY. WARNING ! Alwa ys e nsure ste a m switc h is o ff a nd no t ste a ming whe n a tta c hing a n a c c e sso ry to the unit. A. Atta c h Ha ndle to Ste a m e r • Inse rt the lo we r Exte nsio n Tub e into the Flo o r Ste a me r Ba se a nd p re ss firmly in p la c e (a s sho wn in Fig . A).
WARNING ! To p re ve nt flo o r d a ma g e , ALWAYS a tta c h e ithe r the Mic ro fib e r Flo o r Pa d o r the C a rp e t G lid e Ac c e sso ry with C a rp e t Pa d whe n using yo ur Flo o r Ste a me r. NEVER USE WITHO UT EITHER O F THESE ATTAC HMENTS AFFIXED TO THE MAC HINE. Be fo re Use B.
Be fo re Use C . Filling Bo ile r with Wa te r WARNING S: • C a re fully re a d a ll instruc tio ns b e fo re re mo ving Bo ile r C a p . • Alwa ys unp lug a p p lia nc e b e fo re filling the Bo ile r. * IMPO RTANT* Use o rdina ry ta p wa te r. Distille d o r de m ine ra lize d wa te r is re c o m m e nde d if ta p wa te r is to o ha rd. DO NO T a d d d e te rg e nts, p e rfume s, o ils, o r o the r c he mic a l sub sta nc e s to the Bo ile r.
Using Yo ur Flo o r Ste a m e r A. Using the Pa rking Pa d Yo u c a n use the Pa rking Pa d if the Ste a me r is wa rm o r ho t. C AUTIO NS PA RK IN G PA D The Parking Pad is pro vide d to pre ve nt flo o r dam ag e that c an re sult fro m le aving a ho t ste am e r re sting o n the sam e spo t fo r to o lo ng . ALWAYS plac e Flo o r Ste am e r o n the Parking Pad whe n no t in use , o r while it is c o o ling b e fo re sto rag e . B.
Using Yo ur Flo o r Ste a m e r D. Using Ste a m (c o ntinue d ) • To e mit ste a m fro m the fro nt no zzle s a nd the ma ximum ste a m fro m the unde rside o f the ste a me r, pre ss the REAR b utto n o n the ha nd le . • IMPORTANT: a t the e nd o f the c le a ning ta sk, pre ss the b utto n o n the le ft side to lo c k the a pplia nc e in sa fe ty mo de . * IMPO RTANT* The Ste a m No zzle s a re me a nt to b e use d in ste a m “ b ursts” a nd sho uld ne ve r b e use d o n a susta ine d b a sis.
c a re whe n o p e ning Bo ile r C a p a s it ma y still b e ho t a nd ste a m ma y e sc a p e , c a using b urns. If Bo ile r is still ho t, wa te r ma y sp urt o ut d uring re filling whic h c a n a lso c a use b urns. • Unplug the a pplia nc e fro m the e le c tric a l po we r o utle t. This will sto p the Ste a m e r fro m c o ntinuing to he a t up. • Slo wly turn the Bo ile r C a p c o unte rc lo c kwise , e nsuring tha t no ste a m is p re se nt.
C le a ne r Ac c e sso rie s 3 PO RTABLE STEAM C LEANER MO DE Multipurpo se Po rta b le Ste a m C le a ne r The Hyb rid Flo o r Ste a me r is a 2 in 1 mo d e l tha t c o nve rts into a multip urp o se p o rta b le ste a m c le a ne r with just o ne c lic k. The p o rta b le ste a m c le a ne r fe a ture s inc lud e : 1. 2. 3. 4. Lig htwe ig ht a nd p o rta b le unit. Erg o no mic ste a m ha nd le fo r e a sy o f use . Ve rsa tile a nd q uic k c ha ng e a c c e sso rie s. O n/ o ff c o ntro l. 5.
O nc e the d e sire d Brush is a tta c he d to the Brush Ad a p te r, p re ss the lo c king b utto n o n the Exte nsio n Tub e while slid ing the Tub e in the Brush Ad a p te r. Ensure the lo c king b utto n a nd the ho le o n the Brush Ad a p te r line up . D. Atta c h Exte nsion Tube or Ste a m Ha ndle to De ta il Nozzle The De ta il No zzle p ro vid e s a p o we rful ste a m je t ve ry use ful fo r c le a ning ha rd to re a c h a re a s.
C le a ne r Ac c e sso rie s G . Atta c h Nylo n De ta il Brush to De ta il No zzle The Nylo n Brush is use d to he lp sc rub p a rtic ula rly to ug h d irt. To use : Push the Nylo n Brush o n the *C LIC K e nd o f the De ta il No zzle . (De ta il No zzle sho uld b e c o nne c te d to the Ste a m Ha nd le o r Exte nsio n Tub e s. H .
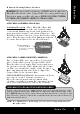
A fitte d Mic ro fib e r Pa d sho uld b e p la c e d o ve r the b ristle s o f the Sma ll Brush to c le a n smo o th surfa c e s suc h a s kitc he n c up b o a rd s, sp la sh b a c ks, c o unte rto p s, e tc . Fit the Sma ll Mic ro fib e r Pa d o ve r the Sma ll Brush a s sho wn b e lo w. 4 Ste a m Re le a se C le a ne r Ac c e sso rie s J. Atta c hing Mic ro fib e r Pa d to Sm a ll Brush FRON T To re le a se ste a m fro m the Ste a m Ha nd le , p re ss the b utto n o n FRO NT.
Using Yo ur Flo o r Ste a m e r Ma inte na nc e & C le a ning 5 Turning Ste a m C le a ne r O ff • To turn Ste a m C le a ne r o ff, p re ss the Po we r Switc h a nd unp lug the e le c tric a l c o rd fro m the p o we r o utle t. • Any re ma ining wa te r c a n b e le ft in the unit. REMINDERS • We re c o mme nd d istille d o r d e mine ra lise d wa te r a s the b e st wa y to c a re fo r a nd utilize yo ur Ste a m C le a ne r.
If the Ste a m C le a ne r a nd Bo ile r is no t c le a ne d a c c o rd ing to the instruc tio ns a b o ve a nd the p ro d uc t fa ils a nd / o r the ste a m p a thwa ys a re b lo c ke d , the a p p lia nc e o wne r sho uld se nd the p ro d uc t fo r se rvic ing b y c o nta c ting the C usto me r Sup p o rt Line . The Ste a m C le a ne r is inte nd e d fo r d o me stic ho use ho ld use o nly. It is no t inte nd e d fo r c o mme rc ia l use .
Tips & Re m inde rs 8 Ste a m C le a ne r Tips & Re m inde rs Ste a m c le a ning a llo ws the use r to c le a n c he mic a l-fre e b y using the p o we r o f ste a m, in p la c e o f ha rsh c he mic a l-b a se d c le a ne rs. The he a t fro m the ste a m so fte ns a nd lo o se ns d irt o n surfa c e s, while the ste a m p re ssure lifts the d irt a wa y. All tha t is le ft to d o is to wip e the surfa c e to re mo ve the d irt a nd mo isture using a c lo th (p re fe ra b ly with a mic ro fib e r c lo th).
Use o rd ina ry ta p wa te r fo r a ll c le a ning . In ha rd wa te r a re a s, we re c o mme nd d istille d o r d e mine ra lise d wa te r to re d uc e the fo rma tio n o f c a lc ium a nd o the r mine ra l d e p o sits in the Ste a m C le a ne r. Use d istille d o r d e mine ra lise d wa te r whe n ste a ming lig ht c o lo ure d fa b ric s to e limina te the p o ssib ility o f ha rd wa te r sta ins.
Ma inte na nc e & C le a ning 22 9 Mic ro fib e r Pa d C a re & C le a ning Yo ur Mic ro fib e r Pa d s a re d e sig ne d fo r hund re d s o f use s. C le a n Pa d s re g ula rly, e ithe r b y ha nd wa shing (using mild so a p a nd wa rm wa te r) o r in yo ur c lo the s wa she r o n a d e lic a te c yc le , c o o l wa te r. Ne ve r use fa b ric so fte ne r o r b le a c h. We re c o mme nd le tting Pa d s a ir d ry to ma inta in ma ximum lo ng te rm e ffe c tive ne ss.
Tro ub le sho o ting ISSUES POSSIBLE CAUSES SOLUTIONS Steam is not coming out of the Steam Nozzles Improper Handle Assembly Call Customer Service to receive instruc ons to correct the problem The Hard Surface Floor Pad is not adhering to Steamer Not enough pressure was applied when a aching Pad Posi on Steamer about 2” above Pad and FIRMLY press it down onto the Pad Floor Pad requires replacing due to age of the Floor Pad Replacement Floor Pads can be purchased at most electrical appliance retail
Customer Support Customers needing assistance with their Floor Steamer can call the Customer Support Line on the phone numbers listed below. Customers should also call the Customer Support Line if they require product arranty repair or post-warranty product servicing.Our friendly Customer Service Team can assist you with getting the best cleaning results from your Floor Steamer, they are full of helpful steam cleaning tips, too.