M3 FLOOR STEAM CLEANER WITH ULTRA DRY STEAM BooSteam st e r Floor Steam Cleaner with Frontal Steam Jet INSTRUCTION MANUAL Before using this product, please read the instructions and keep it for future references CUSTOMER SERVICE: 1800 663 866 (AUS) 0800 666 783 (NZ) Model #: SC1D1 AUS, NZ
SAVE THESE INSTRUCTIONS I M PO R TAN T SAF E 2 When using an electrical appliance, basic safety precautions should always be observed, including the following: Read all instructions before using this appliance. WARNING: To reduce the risk of fire, electrical shock, or injury: 1. This appliance is authorized for household/domestic use only. 2. Do not charge or use outdoors or on wet surfaces. Do not immerse the floor steamer in water or other liquids. 3. Do not allow floor steamer to be used as a toy.
E T Y I N S TR U C T I O N S 26. Read and follow all important notices in this guide. result of improper use of the appliance, not in conformity with what’s written in this instruction manual. CAUTIONS • Do not use your Floor Steamer without a Hard Surface Pad or Carpet Glide & Pad attached to the system. • Never leave your Floor Steamer in one spot on any surface for any period of time.
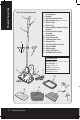
Product Feautres One (1) Floor Steamer 1 - Cord Winder 2 - Handle 3 - Metal Extension Tube 4 - Measuring Cup (pre-marked) 5 - Filler Funnel 6 - Boiler Cap 7 - Steam Ready Indicator Light (green) 8 - Power Indicator Light (orange) 9 - Power Cord 10 - Front Steam Jets 11 - Antibak Tank Cover 12 - Carpet Pad 13 - Scrubbing Floor Pad (2) 14 - Carpet Glide 15 - Parking Pad 16 - Bottle of Antibak 17 - Antibak Tank Funnel 2 1 3 4 FILL UNIT WITH 2 CUPS WATER MAX 1 Cup 1/2 Cup CLEAN BLAST (Max) 5 Technical
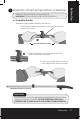
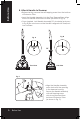
Assembly of Parts & Preparation of Steamer Make sure all parts are in the box (see pg 4). IMPORTANT: FOLLOW THESE INSTRUCTIONS CAREFULLY! A. Assemble Handle Before Use 1 After removing Handle Assembly from carton: 1. Pull Extension Tube apart until you see the lock opening (hole) on the Tube. Pull apart Extension Tube 2. Line up the peg on Locking Clamp with the hole on Extension Tube and... 3. Snap the Locking Clamp closed, to lock the Extension Tube in position.
Before Use B. Attach Handle to Steamer • Before starting, remove the self-tapping screw from the bottom of Extension Tube. • Insert the Handle Assembly into the Floor Steamer Base. Align Arrow on Handle with Arrow on Base (as shown in Fig. A). • Once inserted, twist Handle Assembly 90° clockwise (as shown in Fig. B). Be sure Arrow on the Handle is aligned with Line/Lock Icon on Base. Fig. B Fig. A 90° Front View Side View Fig.
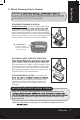
WARNING: Scrubbing Floor Pad or the Carpet Glide Accessory with Carpet Pad when using your Floor Steamer. NEVER USE WITHOUT EITHER OF THESE ATTACHMENTS AFFIXED TO THE MACHINE. Before Use C. Attach Cleaning Pads to Steamer ATTACHING SCRUBBING FLOOR PAD Scrubbing Floor Pad – Place Scrubbing Floor Pad center Scrub Strip facing down (and positioned to match metal heat plate on bottom of Base-see“A”). Hold Floor Steamer about 2” above Pad and gently place Floor Steamer on the Pad.
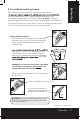
Before Use D. Filling Boiler with Water WARNINGS: • Carefully read all instructions before removing Boiler Cap. • Always unplug appliance before filling the Boiler. • The appliance must be unplugged after use and before performing user maintenance on the appliance. *IMPORTANT* Use ordinary tap water. Distilled or demineralized water is recommended if tap water is too hard. DO NOT add detergents, perfumes, oils, Antibak or other chemical substances to the Boiler.
This Superclean Floor Steamer is equipped with a unique surfaces (sealed wood, tile, marble, granite, linoleoum, etc.). Included in this package is a 200 ml bottle of “Antibak”, a special sanitizing agent that will quickly kill up to 99.9% of germs and bacteria. Before Use E. The Antibak Sanitizing System The Antibak continues to work after it’s used, by killing bacterial spores for up to 7 days following use. Be sure to use as directed.
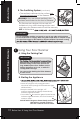
Before Use E. The Sanitizing System (continued) F • The sanitizer is delivered to the surface only through the front ports of the Steamer “F”. WARNING: Only use Antibak sanitizer in the Antibak Tank located on the front of Steamer. The Steamer was designed to be used with Antibak only. Any other cleaning solution used may harm your Steamer and will void the warranty. HINT: A little Antibak *IMPORTANT* 2 Using Your Floor Steamer A.
• To start cleaning using the bottom steam ports, simply pull the Handle downward. Always . Steamer can easily clean most steam alone. NOTE: To stop steam, simply return Handle to the upright position. Using Your Floor Steamer C. Using Floor Steamer The Floor Steamer will stop producing steam when the according to the instructions (see step 2D, During Use”). To Use the Sanitizing System The Superclean Steamer will surfaces by using a sanitizing agent called Antibak.
Using Your Floor Steamer D. Refilling Boiler During Use When the Floor Steamer has run out of water, there will be no more steam coming out of the unit. At this stage it is time to refill the Boiler. Follow the refilling instructions below. *IMPORTANT* The Floor Steamer has a Boiler that should not be overfilled. To avoid the potential for overfilling, only refill the Boiler when it is completely run out of water and only add 600ml.
• Always use ordinary tap water. • If tap water is too hard, use distilled or demineralized water to avoid the risk of mineral deposits and sediment from forming. • Do not add detergents, perfumes, oils or other chemical substances to the Boiler or Antibak Tank. This will damage the Steamer and void the warranty. • The green Steam Ready Indicator Light may turn on and off during use. This is normal and not a fault. • Only use Antibak sanitizer in the front Antibak Tank.
Maintenance & Cleaning 14 *IMPORTANT* Do not add detergents, perfumes, oils, or other chemicals to the Boiler. The product warranty will be null and void if anything other than water is added to the Boiler. regularly, either by hand (using mild soap and warm water) or in your clothes washer on a delicate cycle, cool water. Never use fabric softener or bleach. We recommend letting Pads air dry to maintain maximum long term effectiveness.
Possible Causes Solutions Steam is not coming out of the Improper Handle assembly. Steam Nozzles. Call Customer Service to receive instructions to correct the problem. The Scrubbing Floor Pad is not adhering to Steamer. Not enough pressure was applied when attaching Pad. Position Steamer about 2” above Pad and FIRMLY press it down onto the Pad. Floor Pad requires replacing due to age of the Floor Pad. Replacement Floor Pads can be purchased at most electrical appliance retail outlets.
Customer Support Customers needing assistance with their Floor Steamer can call the Customer Support Line on the phone numbers listed below. Customers should also call the Customer Support Line if they require product warranty repair or post-warranty product servicing.Our friendly Customer Service Team can assist you with getting the best cleaning results from your Floor Steamer, they are full of helpful steam cleaning tips, too.