
Operation Manual


7
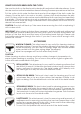
CARPET SLIDER: This attachment clips over the face of the oor brush
preventing the bristles from interacting with the carpet. To use: Clip the
carpet slider onto the oor brush, then attach the oor brush to the
extension tubes. When refreshing carpet or rugs you should vacuum
througly before steaming and then again after steaming to remove
the dirt that is loosened by the steam.
Note: Steam will only refresh carpets / rugs and to kill dust mites. Steam
will not shampoo carpets / rugs.
SMALL BRUSH: When the cotton cloth is used with the small brush, smooth
surfaces can be cleaned such as kitchen cupboards and counter tops,
range hoods and fridge areas. If the soft nylon bristles are used, shower
tiles and screens can be cleaned using the bristles to scrub hard soap
deposits. To use: make contact with the surface being cleaned allow-
ing the heat from the steam to soften and lift the dirt. Wipe the dirt and
excess moisture from the surface with a cleaning cloth.
Tip: a microbre cloth is best for wiping away soap deposits from shower areas and
for high gloss areas.
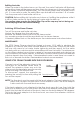
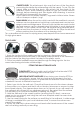
1. Hook the top front of the caddy over the two hooks on the reverse of the
appliance and push the bottom part of the caddy under the body of the cleaner so
that the holes in the xing lugs match the holes for the plastic screws.
2. Fit the two plastic headed screws provided through the xing lugs into the two
screw holes turning clockwise until hand tight.
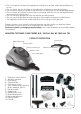
TOOL CADDY
FITTING THE TOOL CADDY
1
2 3
PLEASE NOTE The tool caddy must be tted to the Monster SC35
before the wall storage rack can be used.
IMPORTANT SAFETY MESSAGE When storing your Monster SC35 on
the wall rack, ensure that any tools and accessories in the tool
caddy are not in a dangerous position. In particular the extension tubes could be
a hazard if the rack is situated at eye level.
1. Select your site for the wall rack. Check that there is room for the steam cleaner
in the position you choose and that it will not obstruct doorways or access to other
items stored near by. The cleaner drops down on to the rack so you will need to t
the wall rack with at least 6.5 cm clearance above it. Be certain that the surface
you are xing to is sound and capable of bearing the weight .
2. Hold the wall rack in the correct position (ensuring that it is level – we recom-
mend you to use a level), and using the rack as a template mark the screw hole
positions with a pencil.
3. Use the correct xing for the surface you are tting to the wall rack. A wide range
of xings is available from your local hardware store, to ensure the surface can
support the weight.
4. Screw the wall rack in place using round head or at head screws of the correct
size for the xing method you are using.
FITTING THE WALL STORAGE RACK