
Instruction manual


Installation (Continued)
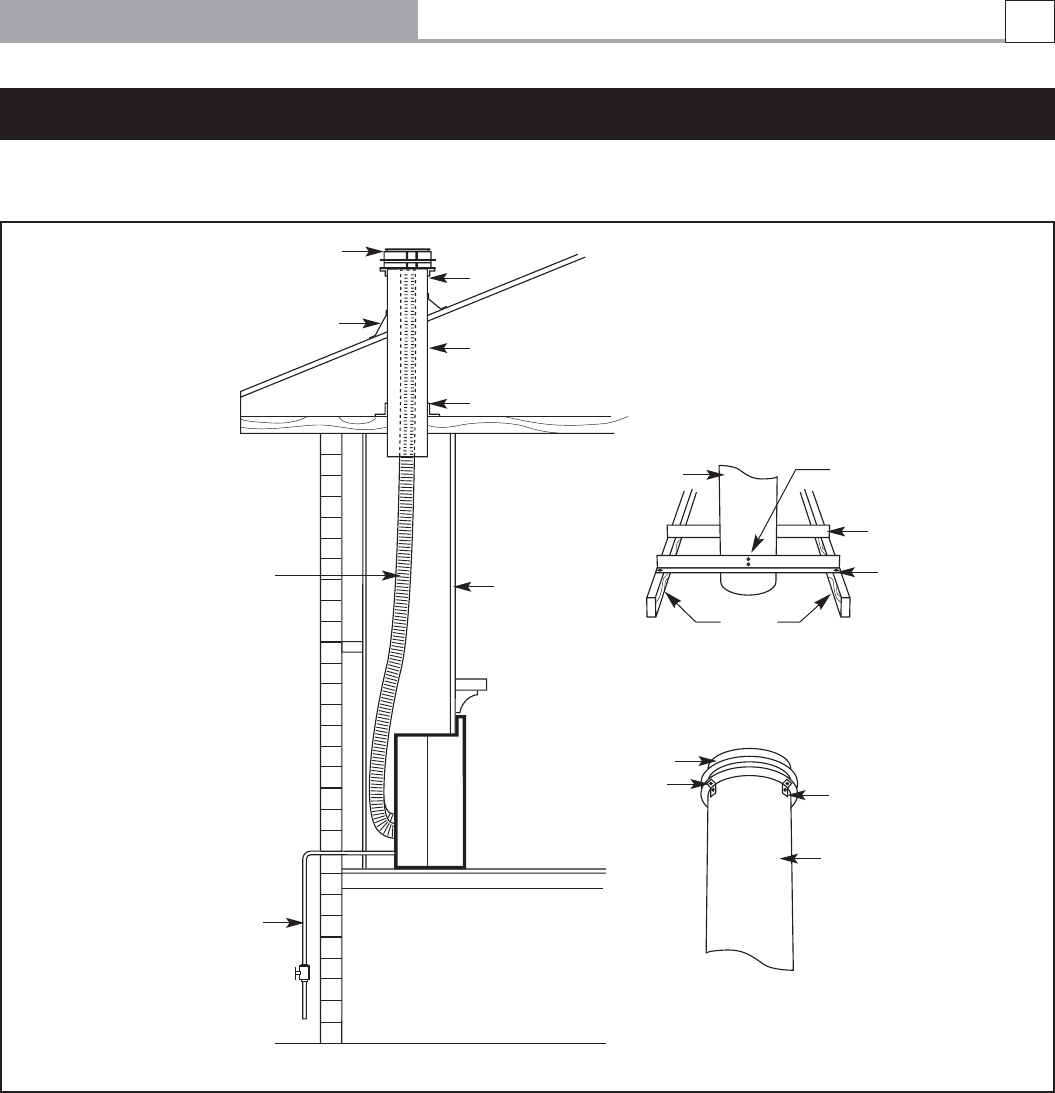
NOTE: Refer to false fireplace construction illustration on page 6.
1. Determine the exact location for the flue pipe. Note: Flue support brackets must be attached to ceiling trusses.
(Refer detail A above.)
2. Cut 165mm dia. hole in roof and ceiling. Insert flue pipe to desired height and affix flue support brackets
(supplied) to roof truss bottom beams and flue pipe.
3. Connect flue gas cowl to flexible tubes. 50mm dia. flexible exhaust tube and exhaust port at flue gas cowl are
colour-coded red. Using hose clamps provided, clamp 50mm dia. flexible exhaust tube and the 60mm dia.
flexible tube to the gas cowl. Note: Before installing the flue gas cowl into flue pipe, a suitable weathershield
should be attached to exterior of flue pipe and roof. Note: Expand both ends of both flexitubes to allow clamps
to firmly secure tubes to outlets.
4. Insert flue gas cowl with attached flexible tubes into 6 inch flue pipe and secure flue gas cowl to flue pipe
using brackets (x3) and rivets (x6) supplied. (Refer detail B above.)
5. Connect 50mm dia. exhaust flexible tube to exhaust terminal on heater body (colour-coded red) and clamp
using hose clamp - smaller diameter (supplied). Clamp 60mm dia. flexible tube to remaining heater body
terminal using larger diameter hose clamp.
INSTALLATION INTO A FALSE FIREPLACE
False fireplace (Thru roof flue kit)
Detail A
Detail B
Jindara AGA
Approved gas cowl
(Supplied by Jindara)
Weather seal flashing (Not supplied)
Flue Pipe (Supplied)
See detail A
See
detail B
Flue pipe support
brackets
1/8˝ pop rivet (x4)
Suitable nail
or screw (x4)
Bottom of
roof truss
False fireplace
1/2˝ copper pipe
Flexi tubes
(Supplied by
Jindara)
Flue gas cowl
Flue cowl bracket (x3)
Flue pipe
Flue pipe
1/8˝ pop rivet (x6)
Derwent High Efficiency Gas Log Fire
11