
Data Sheet


4
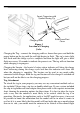
Charging the Tag – connect the charging cable as shown then press and hold the
power button on the tag until the red light begins to flash. The tag’s status light
will flash until the charge cycle is complete and then the light will give a brief
flash once every 10 seconds to indicate the power is on. The tag will not function
while charging is in progress.
Charging the Locator - the locator’s battery status indicator will show the charge
level increasing during the charge cycle and then the indicator will show full
when the charging is complete. The locator can be used in any mode while
connected to the charger. Both the tag and locator will also charge if switched off
but you will not be able to see the charging progress.
Tag Attachment
To attach the tag to your property you may use any convenient method such as
the included Velcro strips, zip ties or double-sided tape. If your system included
the clip-in tag holder and strut adapter then please refer to the separate instruction
sheet showing the mounting options for those items. It is best to place the tag in
such a way that the antenna is most likely to be vertical when the tag is in
operation. Obviously, for applications such as lost RC model recovery, it may not
be possible to know the orientation that the model will be in when it comes to
rest but if it is more likely that the model will land right-side up or upside-down
than on its side, you would want the antenna to be vertical in the normal flight
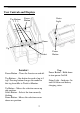
Charging Jacks
Figure 3
Location of Charging
Jacks
Insert Connector with
Symbol Facing Up
Fold Down Dust
Cover