
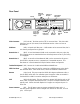
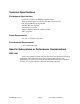
Specifications


©1999 Euphonix, Inc. Page 9 Pilot Computer Manual
User Reference
Installing New Versions of R-1 Software
Follow this procedure to ensure proper installation of R-1 software upgrades:
1) Power on the R-1 Pilot computer.
2) Insert the CD ROM or diskettes that contain the R-1 software into the CD ROM
or floppy drive.
3) Find the SETUP.EXE file and double click on it. This will install the new
version of R-1 software. DO NOT START THE R-1 SOFTWARE
4) Exit Windows and power down the R-1 Pilot.
5) Disconnect at the Pilot the 1394 cable (green) that runs from the Pilot to the
Studio Hub. There should be no 1394 connection from the Pilot to the Studio
Hub.
6) Disconnect at the Studio Hub the 1394 cable (green) that runs from the
Studio Hub to the first Audio Deck. There should be no 1394 connection from
the Audio Deck or the Pilot to the Studio Hub.
7) Reconnect the 1394 cable (green) that runs from the first Audio Deck back to
the Pilot.
8) Power on the Pilot and Audio Deck.
9) Start the R-1 software by double clicking on the R-1 Multitrack Recorder icon.
Choose Cancel when you get the message that a Studio Hub cannot be found.
10) The software will load new code to the Audio Deck(s) and the R-1 Application
will show on the screen.
11) Close the R-1 Application, exit Windows and power down the Pilot and Audio
Deck.
12) Disconnect at the Pilot the 1394 cable (green) that runs from the first Audio
Deck to the Pilot, and reconnect this cable to the Studio Hub.
13) Reconnect the 1394 cable (green) that runs from the Studio Hub back to the
Pilot.
14) Power on the Pilot, Audio Deck, and Studio Hub.
15) Start the R-1 software by double clicking on the R-1 Multitrack Recorder icon.
16) The software will boot the Audio Deck and load new code to the Studio Hub
and the R-1 application will show on screen.
17) Exit Windows and power down the Pilot, Audio Deck and Studio Hub. The
software upgrade is now complete.