
Specifications
©1999 Euphonix, Inc. Page 18 Pilot Computer Manual
8) Settings tab – under Advanced Dialog, Adjustment tab – for Display Device choose
CML150X.
9) Settings tab - under Advanced Dialog choose OK at the bottom.
10) Background tab – for Wallpaper HTML or Picture select R-1 Desktop.
11) Background tab – for Wallpaper Display select Center.
12) Screen Saver tab – for Screen Saver select (None)
13) Screen Saver tab – under Energy Saving Features, click on the Settings button.
14) Screen Saver tab – under Power Management Properties dialog, for Power schemes
choose Always On.
15) Screen Saver tab – under Power Management Properties dialog, for Turn Off Monitor
choose Never.
16) Screen Saver tab – under Power Management Properties dialog, for Turn Off Hard
Drives choose Never.
17) Screen Saver tab – under Power Management Properties dialog, click on Apply (this
is required).
18) Screen Saver tab – under Power Management Properties dialog, click on OK.
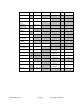
19) Appearance tab - for Scheme select R1. If there is no R1 Scheme, then you will
have to edit each Item of the Appearance separately. See the next page for a
complete table of settings for the R1 color scheme. The R-1 is dependent on this
system color scheme for certain user interface elements that it presents. Without
the correct color scheme the R-1 may not be as easy or intuitive to use.
20) Click on APPLY to save these settings (without re-starting).
21) Also under Settings, Advanced, select the Adjustment tab, click on the Refresh
Rate button, and select 60 Hz.
22) Click on APPLY and OK to save these settings.
23) With a Hitachi TFT connected, Windows 98SE should automatically detect the
display type, Hitachi CML150X. If any brand of Extender is installed, the display
type may come up as “Unknown Monitor.” In that case the above settings may
have to be restored manually.