
User`s guide

Preliminary Manual RELAY BOX - RB132/GP132 USER’S GUIDE
EUPHONIX INC - RB132/GP132 p17 Wednesday, August 26
th
, 2000
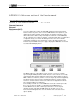
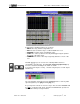
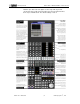
Configure GPI Relays
Single GPI Relay/Mul-
tiple Fader
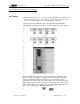
Initial State Options
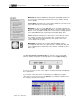
Follow the steps below to configure any relays between 1 and 16 :
1. From the GPI screen, use the SpinKnob to select the relay to configure.
The designated relay is displayed above F1;
2. Using the [F2] and [F4] SmartDisplay function keys, set the Initial and On
States of the designated relay;
3. Press the attention key of the fader that you want to control the relay.
The fader assignment will be displayed in the SmartDisplay above F3.
Press [F3] to toggle the fader assignment on or off;
4. Use the SpinKnob to select another relay to configure;
5. Repeat steps 2 - 4.
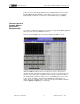
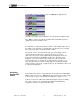
It is also possible to trigger a single GPI relay from many faders. The following
steps allow you to configure this arrangement:
1. Make sure you are in the GPI screen in the Graphics Display;
2. Select the desired relay using the SpinKnob;
3. Press the [Enter] key to create as many relays duplicates as desired.
Alternately, you can press the [Del] key to delete selected duplicates;
4. Select a relay duplicates and assigns a fader by pressing that fader’s
Attention key;
5. Repeat step 4 as desired for all relay duplicates.
To reset the entire GPI assignment display to default settings, press the [Clr]
key and then the [*/ST] key.
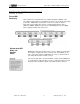
There are three relay initialization options available from the SmartDisplay
menu. From the GPI SmartDisplay menu, press [F1].
The three allow you to:
1. F2 sets the relay to its initial state regardless of the fader position.
2. F3 sets all relays to their initial state.
3. F4 determines weather the relays will initialize when a Title is loaded or
not. In the SmartDisplay if the light next to “Load” is on, the relays will