
User`s guide

Preliminary Manual RELAY BOX - RB132/GP132 USER’S GUIDE
EUPHONIX INC - RB132/GP132 p15 Wednesday, August 26
th
, 2000
Assigning
Custom GPI
names
As with MIDI and Fader -Linking screens, the [Enter] key duplicates the
currently selected GPI object allowing it to be controlled from multiple faders.
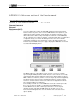
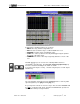
Press [F2] to sequence through the available INIT and STATE parameter
settings and observe the DSC screen:
It is advisable to set the INIT field first and then set the STATE field as the for
mer always resets the latter to a default when subsequently accessed again.
Press [ F4] if you wish to modify the STATE column.
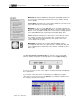
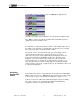
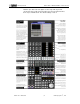
The last two screens show the pulsed relay icons and settings. Pulsed
operation means that the relay or speaker mute enters its “active”
state only for the period of time stipulated by the timing figure. Notice the
double-ended arrow in the TRIGGER column next to the fader object
designator . This means that the relay operation is active in both fader
movement directions. To change this to single direction operation, press
[ F3]. The pulse timing can only be changed by first selecting the ST ATE
column using the [ left arrow] or [ right arrow] keys. The SpinKnob is then used
to change the timing figure.
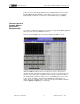
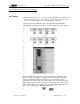
Custom GPI names may be assigned by first selecting the desired GPI COM-
MENT column. The console’ s QWERTY keyboard can then be used to assign
a custom name in place of the default name (RELA Y 1, RELA Y 2, etc.).
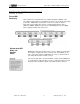
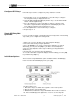
A “Clear” key has been added to the DSC Mon Cnfg/Pg 3 upper left display .
This can be used to reset everything in the MX464, including Monitor
assignments, with the exception of the GPI relays.