
Installation manual


Section 4: The Audio Cube
Euphonix CS3000/2000 MixView 3.0 Software Supplement 4 - 27
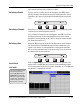
For this exercise, we will start with unconfigured Cube Buses. If the Bus
Configure page is not clear, press the DSC [Clr] key and then [F3] (Yes) to the
“Remove All?” prompt.
We will configure the system to have 6 Aux and 6 Pan type buses.
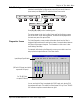
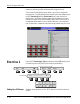
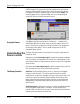
While in the Bus Configuration menu and screen, press [F1] to select the type
of bus you need. The choices are: AUX, PAN, or NONE. You will see “none” in
brackets next to the bus type. This indicates no buses have been defined as
Aux type yet.
F3F1 F2 F4
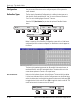
Press the DSC [+] key to begin configuring buses as Aux type. Configuration
will automatically begin with bus #1.
Press the [+] key 6 times then use [F1] to select Pan. Now press [+] again 6
times to configure buses 7-12 as Pan type.
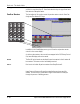
The Bus Configuration screen now has 6 aux sends, 6 pan buses and looks like
this:
AUX [none] 01:Lnk – –
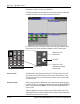
Buses can be configured in any order, Pans first or Aux first. However bus
types must be consecutive. The system will not allow nonconsecutive bus
types (buses 1-3 as auxes, 4-7 as pans, then 8-12 as auxes for example).
The NONE selection allows gaps in the configuration. Systems in which the
first QBC card start in slot 7 requires this selection. In these systems the first
active bus is 25. You would configure 1 thru 24 as NONE (since there are no
active buses in these slots).
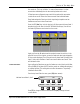
Press [Esc] and observe the “Resetting Bus Switches...” prompt in the Smart-
Display briefly. At this point, the aux sends are ready to use.
Exercise 1
Defining Buses
-
DIR
+
Bus