Euphonix Media Application Controller Multiple Workstation Installation Guide Document Revision: C Software Version: 1.4.1 Part Number: 840-10050-04 Release Date: April 2009 Euphonix, Inc. 220 Portage Ave. Palo Alto, California 94306 Phone: 650-855-0400 Fax: 650-855-0410 Web: http://www.euphonix.com e-mail: info@euphonix.
Media Application Controller Multiple Workstation Install Guide Table of Contents Chapter 1: Hardware Connections and MC Client Setup .............................5 1.1 Connect the MC.........................................................................................5 1.2 Network Configuration..............................................................................6 1.2.1 1.2.2 MC Standalone............................................................................6 System 5-MC .............
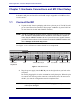
Media Application Controller Multiple DAW Install Guide Chapter 1: Hardware Connections and MC Client Setup Schematics and parts are listed for each DAW setup in Appendix A: DAW Parts List and Schematics. 1.1 Connect the MC 1. Unpack the MC from its packaging and select a place to put it. The MC should go on a hard flat surface inorder to allow proper ventilation. (System 5-MC has its own frame for the MC and CM408T modules).
Media Application Controller Multiple DAW Install Guide 1.2 Network Configuration 1.2.1 MC Standalone Hardware Connections and MC Client Setup Using the RJ-45 Ethernet (included) cables, connect your workstations to the LAN ports on the Netgear RP614 router. Then connect the MC to one of the otherLAN ports on the Netgear router. Because the Netgear has four LAN ports, you must use an additional Ethernet switch if you have more than three workstations.
Media Application Controller Multiple DAW Install Guide Hardware Connections and MC Client Setup a. Minimize all programs. b. Double-click My Computer on the desktop to display the drives on your computer. c. Double-click the CD/DVD drive. d. Double-click the EuConWS executable file. The Setup Wizard begins running. 4. Click Next and choose a directory to install the software. The default Windows directory is C:\Program Files\Euphonix\EuCon.
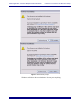
Media Application Controller Multiple DAW Install Guide Hardware Connections and MC Client Setup Figure 1-2 New Driver prompt Windows will detect the new hardware. Do not press anything.
Media Application Controller Multiple DAW Install Guide Hardware Connections and MC Client Setup Figure 1-3 Found New Hardware dialog 11. Click Finish to exit the Wizard. 12. Repeat these steps for each workstation. NOTE: When first running the MC Client, the Windows Firewall may ask whether to block or unblock MC Client and EuCon Discovery from accessing the Internet or local area network.
Media Application Controller Multiple DAW Install Guide 1.4 Hardware Connections and MC Client Setup Workstation Connection and Control 1. To connect the MC to your workstations, make sure the MC Client is running on all workstations, and thenpress the Strip Control Setup key on the right side of the MC.
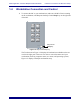
Media Application Controller Multiple DAW Install Guide Hardware Connections and MC Client Setup Figure 1-5 Workstation Touchscreen 2. Touch the desired Workstation key on the left of the Touchscreen. These buttons map to the physical Workstation keys on the upper right of the MC. Workstation 1 2 3 4 Figure 1-6 Workstation keys 3. Touch your workstation in the list to assign it to the selected number. 4. Repeat Steps 2 and 3 for eachworkstation to assign them toWorkstation keys. 5.
Media Application Controller Multiple DAW Install Guide 1.5 Hardware Connections and MC Client Setup Display Switching The MC uses the Ontrack ADU-200 relay device to control a KVM (keyboard/video/ mouse) switch with an RJ-45 port, such as the Gefen eX-Tend-It series. To implement this functionality: 1. Connect the video outputs of your workstations to the KVM inputs. 2. Connect the KVM video output to your main display. 3.
Media Application Controller Multiple Workstation Install Guide Chapter 2: Nuendo–PC and Mac To enable Nuendo to work with the MC, you must obtain a Nuendo EuCon Adapter license from Euphonix and download it to yourNuendo USB protection device (dongle): 1. Close all open applications. Make sureyour Syncrosoft USB dongle is plugged into your Nuendo workstation. 2. Start the Syncrosoft License Control Center by choosing Start Menu->Steinberg Nuendo 4->License Control Center.
Media Application Controller Multiple Workstation Install Guide 3. Nuendo–PC and Mac Select EuCon from the drop-down list. The EuCon device is added and the MC surface immediately updates with the Nuendo default Application Set to reflect the open Nuendo project. For the System 5-MC, the MC auto-assigns the Nuendo channels to the CM408T strips, beginning with channel 1 on the first CM408T’s leftmost strip.
Media Application Controller Multiple Workstation Install Guide Chapter 3: Logic Pro Logic Pro 8.02 has EuCon support and connectivity built into the application. With the MC Client running on your Macintosh, load Logic Pro, and the MC automatically connects to the application and displays the Logic Pro application set. Versions of Logic prior to 8.02 do not have EuCon support.
Media Application Controller Multiple Workstation Install Guide 16 Logic Pro
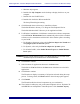
Media Application Controller Multiple Workstation Install Guide Chapter 4: Pro Tools 4.1 Workstation Configuration After installing the EuCon software and restarting your Mac, the MC Client launches automatically upon startup of OS X and EuCon applications can now function. To configure your HUI or Mackie Control applications to work with the MC: 1. Click Apple Menu-> System Preferences. The System Preferences dialog opens. 2. Click on EuPrefsPane. The Euphonix Preferences pane opens.
Media Application Controller Multiple Workstation Install Guide Pro Tools NOTE: You must drag the actual application icon into the preferences pane, not a shortcut or alias! 5. For each application, select HUI or Mackie Control from the drop-down menu under Protocol, and select the MIDI ports for the application to use. NOTE: The EuCon software sets up a virtual MIDI driver with 32 ports, and each application can use up to four (the limit with HUI applications).
Media Application Controller Multiple Workstation Install Guide Pro Tools Pro Tools has configuration boxes for the four possible controllers. MC standalone users need to configure only one controller. System 5-MC users need to configure one controller for each CM408T module because the MC mirrors one CM408T and does not require an extra HUI controller. 4. For each controller you use, select HUI from the Type drop-down menu. 5.
Media Application Controller Multiple Workstation Install Guide 20 Pro Tools
Media Application Controller Multiple Workstation Install Guide Chapter 5: Pyramix (v6.1.3) To enable the use of the MC with Pyramix, the EuCon adapter for Pyramix checkbox must be selected during the MC Client software installation (see page 7). Then add the MC as an installed controller in Pyramix: 1. Launch the Pyramix Virtual Studio software. 2. Press the Pref key on the top bank of the MC Soft Keys.
Media Application Controller Multiple Workstation Install Guide Pyramix Figure 5-1 Pyramix Settings 4. Click Controller. The right pane shows any installed controllers. However, at this point the pane is empty unless other interface controllers have been installed previously.
Media Application Controller Multiple Workstation Install Guide 5. Pyramix Click the Add button. The Controller Properties dialog opens. Figure 5-2 Controller Properties dialog 6. Type the desired name for the MC in the Name field (i.e., MC in Studio 2). 7. Select the Enable checkbox. 8. Choose OASIS from the Driver drop-down selection box. 9. Click the Properties button next to the Driver selection box. The OASIS Configuration Properties dialog opens.
Media Application Controller Multiple Workstation Install Guide Pyramix Leave the Station ID at its default setting of 1 unless you have multiple controllers, in which case simply increment the setting (i.e., if two controllers are installed, set the Station ID = 3 for the MC). 11. Press OK to exit that dialog, press OK on the Controller Properties dialog and press OK on the General Settings dialog. 12. Close Pyramix, reboot the workstation, and then open Pyramix Virtual Studio.
Chapter 6: MOTU Digital Performer 6.02 6.1 Configuration 1. In DP 6, goto: Setup > Control Surfaces 2. Press + 3. Select EuCon from the dropdown menu Figure 11-16 DP6 - Add Control Surface NOTE: “Listen to Control Surfaces in Background” should be Enabled at all times when using EuCon Control Surface Driver.
Media Application Controller Multiple Workstation Install Guide Chapter 7: Support and Troubleshooting The MC is a professional control surface engineered with industrial-grade components, and it should operate reliably in your studiosetup. It is, however, a complex device and issues can arise due to environmental or other factors. Euphonix provides a one year warranty on the MC and CM408T modules.
Media Application Controller Multiple Workstation Install Guide Support and Troubleshooting Common Issues and Solutions My MC does not turn on. Make sure the MC’s power connector is securely connected. Push on it lightly to seat it, twist the outer ring to lock it onto the MC, and make sure the transformer is plugged into the wall. The MC cannot connect to a workstation; the workstation does not appear in the MC's Workstation Setup screen.
Media Application Controller Multiple Workstation Install Guide Appendix A: DAW Parts List and Schematics The following diagrams illustrate how to use the supplied parts to interconnect the MC with the supported DAWs.
Media Application Controller Multiple Workstation Install Guide H G GEFEN 4 x 2 DVI SW USB USB OUT DVI OUT APPLE CINEMA DISPLAY DVI IN USB IN DVI IN DVI IN DVI IN DVI IN 1 USB IN RJ45 EUPHONIX SYSTEM 5MC FADERS 1-8 USB EUPHONIX SYSTEM 5MC FADERS 9-16 EUPHONIX MC CONTROLLER USB DVI OUT NET GEFEN DVI DETECTIVE EUPHONIX SYSTEM 5MC FADERS 17-24 EUPHONIX SYSTEM 5MC FADERS 25-32 DVI IN NET GEFEN DVI DETECTIVE DVI OUT 1 16 15 14 13 SONIC WALL 1260 ROUTER/SWITCH 2 24 24 23 22 21 20