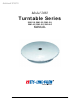
Archived 3/18/10 Model 2081 Turntable Series 2081-2.0, 2081-2.5, 2081-3.0, 2081-4.0, 2081-5.0, 2081-6.0 MANUAL © ETS-LINDGREN L.P.
Archived 3/18/10 MODEL 2081 TURNTABLE SERIES ETS-Lindgren L.P. reserves the right to make changes to any products herein to improve functioning, design, or for any other reason. Nothing contained herein shall constitute ETS-Lindgren L.P. assuming any liability whatsoever arising out of the application or use of any product or circuit described herein. ETSLindgren L.P. does not convey any license under its patent rights or the rights of others. © Copyright 2003 by ETS-Lindgren L.P. All Rights Reserved.
Archived 3/18/10 MODEL 2081 TURNTABLE SERIES Table of Contents INTRODUCTION ........................................................................................................................................ 1 STANDARD CONFIGURATION .............................................................................................................. 2 OPTIONS ......................................................................................................................................................
Archived 3/18/10 NOTICE: MODEL 2081 TURNTABLE SERIES This product and related documentation must be reviewed for familiarization with safety markings and instructions before operation. SAFETY SYMBOL DEFINITIONS ! REFER TO MANUAL When product is marked with this symbol refer to instruction manual for additional information. OR HIGH VOLTAGE Indicates presence of hazardous voltage. Unsafe practice could result in severe personal injury or death.
Archived 3/18/10 MODEL 2081 TURNTABLE SERIES Introduction INTRODUCTION The ETS-Lindgren Model 2081 is an electric powered turntable platform system designed to be used with the Model 2090 Positioning Controller for EMI compliance testing. Two meter and larger tables utilize a pinion and gear drive with a gear reducer and electric motor. The conductive metal top is outfitted with a continuous ground brush to electrically couple the turntable to the ground plane.
Archived 3/18/10 Standard Configuration MODEL 2081 TURNTABLE SERIES STANDARD CONFIGURATION 2 • Three-phase electric motor unit (standard) • Heavy duty two-speed drive system (standard) • Conductive sectional top • Convenient rotational limit adjust switches • Limit override feature • Ten meter fiber-optic control cables (standard) • Overall height 400 mm (15.75 in) • Sectional top for easy service access • Full supporting leveling screws © ETS-LINDGREN L.P.
Archived 3/18/10 MODEL 2081 TURNTABLE SERIES Options OPTIONS Model 2090 Positioning Controller: This controller provides control for two separate devices (towers and turntables) in any combination, plus the control of four auxiliary devices via a fiber optic interface. The unit includes a GPIB connection and is compatible with most popular EMI measurement software.
Archived 3/18/10 Precautions MODEL 2081 TURNTABLE SERIES EUT Power Outlets: Receptacles are usually mounted on the base of the turntable at its center axis point. These receptacles can be custom mounted, flush with the tabletop on some turntables. Consult the factory for more details. Mounted LISNs: LISNs can be mounted to the underside of some turntables. This option is only practical on larger turntables with sufficient clearance. PRECAUTIONS Read this manual completely before starting installation.
Archived 3/18/10 MODEL 2081 TURNTABLE SERIES Precautions Regularly inspect the equipment for loose fasteners and wear. Conduct scheduled maintenance in accordance with the factory recommendations provided. Only use replacement parts and fasteners ordered directly from the factory or specified by ETS-Lindgren. The access plate(s) above the pinion gear should remain firmly attached with the screws provided at all times.
Archived 3/18/10 Turntable Installation Considerations MODEL 2081 TURNTABLE SERIES TURNTABLE INSTALLATION CONSIDERATIONS Pre-planning is essential for a successful installation. Be sure to discuss your requirements with your sales representative and request dimensional drawings prior to construction of your site. POWER AND SIGNAL LINES Conduit Power and signal line paths should be planned in advance. Conduit should be in place before pouring concrete or installing the ground plane.
Archived 3/18/10 MODEL 2081 TURNTABLE SERIES Installation INSTALLATION The installation of turntables 2 meters and larger will be performed by a factory installation specialist or by individuals who have been authorized by ETS-Lindgren to do such work. Proper installation of the turntable directly affects performance. The following installation information is provided to familiarize the user of the turntable with the installation process. 1. Uncrate all parts.
Archived 3/18/10 Installation MODEL 2081 TURNTABLE SERIES 7. After the turntable is level the installation specialist will tighten all lock-nuts accompanying the leveling screws to lock the height of the turntable into place. 8. Anchor the turntable through the anchor holes with the appropriate bolts (provided). 9. With the electrical breaker still in the OFF position, re-install the drive pinion.
Archived 3/18/10 MODEL 2081 TURNTABLE SERIES Installation GROUND RING INSTALLATION The ground ring assembly includes a floor flange which interfaces with the brush ring located on the perimeter of the turntable. The floor flange provides constant electrical contact with the user’s ground plane and is usually installed with the turntable. Mounting methods vary according to user specifications.
Archived 3/18/10 Electrical Installation MODEL 2081 TURNTABLE SERIES ELECTRICAL INSTALLATION CAUTION It is important that this procedure be performed by a qualified electrician prior to energizing the unit. The Model 2081 is designed to operate using either 208-230 VAC three–phase 60 Hz or 400 VAC three phase 50 Hz power. The appropriate power requirements are determined when the order is placed. Other power ratings are available on a special order basis. 1.
Archived 3/18/10 MODEL 2081 TURNTABLE SERIES Electrical Installation CONNECTING THE MODEL 2090 POSITIONING CONTROLLER Any combination of primary devices (towers, turntables, reverberation paddles, MAPS, etc.) can be connected to the two Device Interface ports located on the rear panel of the Model 2090 controller. For easy set up of an EMC facility, it is recommended that the turntable be connected to the Device 2 interface port.
Archived 3/18/10 Operation MODEL 2081 TURNTABLE SERIES OPERATION Please refer to the Model 2090 Positioning Controller manual if you are unfamiliar with the operation of the unit. A manual is included with each 2090 shipment and is also available for download from our website. With the assembly complete, the Model 2090 controller will need to be connected to the unit and power applied to both the motor base and controller in order to continue.
Archived 3/18/10 MODEL 2081 TURNTABLE SERIES Operation RECOMMENDED PARAMETERS FOR THE MODEL 2090 POSITIONING CONTROLLER Parameter P1 P2 P3 P5 P8 P9 b1 c S0 S1 S2 S3 S4 S5 S6 S7 S8 Oc © ETS-LINDGREN L.P. – JANUARY 2003 REV D – PN 399212 Value 0 2 000 1 2.5 9 000 3608 -1 31 63 95 127 159 191 223 255 On DEVICE 2 Description Turntable Standard Turntable Infinite Scan Count Non-continuous rotation 2.
Archived 3/18/10 Operation MODEL 2081 TURNTABLE SERIES EDITING MODEL 2090 POSITIONING CONTROLLER CONFIGURATION PARAMETERS To edit a configuration parameter, press the PARAM key to display the current parameter. Pressing the PARAM key repeatedly will scroll down through the parameter list, showing each parameter in turn. While viewing a parameter, the STEP keys (INC/DEC) may be used to scroll up or down the parameter list.
Archived 3/18/10 MODEL 2081 TURNTABLE SERIES Operation 2. Insure that the turntable is positioned to allow more than a full revolution of travel in the clockwise direction and use the STEP keys to run the turntable clockwise a few degrees to remove any play in the table. 3. Mark the current location of the turntable against the ground ring (masking tape works well), and set the current position reading to 000.0. 4.
Archived 3/18/10 Operation MODEL 2081 TURNTABLE SERIES degrees around. The display on the 2090 now reads 356.3 degrees which is recorded. The table is rotated CCW back to 0. The parameter button is set on the “C” setting. The “C” digits display 3430. A new “C” setting is now calculated: New “C” = (356.3 divided into 360) times 3430 = 3395 (rounded off) Decrement the C parameter to 3395 and “ENTER” is pressed. Then the “current position” button is pressed to get back to operation mode.
Archived 3/18/10 MODEL 2081 TURNTABLE SERIES Operation SETTING CURRENT POSITION ON 2090 The total travel between the mechanical limits is typically set between 370 and 400 degrees at the factory. Set the 0 degree position on the 2090 so that the 2090 moves the table between the mechanical limits without engaging them in normal operation. EXAMPLE (CW - clockwise, CCW - counterclockwise) The table is rotated CCW until it stops at the mechanical limit. The table current position is then set at 0.
Archived 3/18/10 Operation MODEL 2081 TURNTABLE SERIES CHANGING ROTATION SPEED The ETS-Lindgren two-speed turntable is designed to shift speeds at a standstill or during rotation. To change rotational speed, simply depress the POLAR/SPEED button on the front panel of the Model 2090 Controller. (Refer to the controller manual for more information). Changing speed on the turntable is also available through the IEEE-488 GPIB interface.
Archived 3/18/10 MODEL 2081 TURNTABLE SERIES Operation SETTING TRAVEL LIMITS The mechanical limits of the Model 2081 turntable have been changed from previous models for user convenience, ease of operation and safety. These limit adjustments are located outside the center section of the turntable adjacent to the gearbox. In some installations, it will be necessary to remove several of the top sections of the turntable to access the limit switch adjustments.
Archived 3/18/10 Operation MODEL 2081 TURNTABLE SERIES ALTIVAR MOTOR BASE CONFIGURATION The following settings are the defaults for the Altivar motor base set by ETS-Lindgren: Altivar Setting bFr ACC dEC LSP HSP UnS FrS tFr 208/230 VAC 60 Hz 400 VAC 50 Hz 60 0.1 0.1 0 75 230 60 90 50 0.1 0.1 0 75 400 60 90 Should you need to change the configuration on the Altivar motor base supplied with your turntable the Altivar manual is available at www.SquareD.com. 20 © ETS-LINDGREN L.P.
Archived 3/18/10 MODEL 2081 TURNTABLE SERIES Hand Control Unit HAND CONTROL UNIT To connect the Hand Control Unit (HCU), remove the connector cap on the motor base. Plug the cable receptacle from the hand control unit into the electrical enclosure and screw connectors completely together. The HCU is now ready to operate. Be sure to coordinate use of the unit with the operator of the Model 2090 Positioning Controller. To allow the HCU to operate, push the control switch from MAIN to HAND.
Archived 3/18/10 Recommended Maintenance MODEL 2081 TURNTABLE SERIES RECOMMENDED MAINTENANCE CAUTION Do not perform maintenance while turntable is operating. Regular maintenance will prolong the serviceable life of your turntable. Follow this recommended schedule. EVERY SIX MONTHS Adjust the encoder chain. The chain should have no more than 20 mm (1/8”) looseness when flexed to a point halfway between the two sprockets. Adjust the chain by loosening the two screws holding the encoder assembly.
Archived 3/18/10 MODEL 2081 TURNTABLE SERIES Recommended Maintenance replacement brushes have hole spacing that is machined exactly the same as the original. EVERY TWELVE MONTHS Lubricate the main bearing race. Use a grease gun with a good quality bearing grease. The grease fittings are located inside the race, 90 degrees apart, underneath the top. Three discharges from the grease gun in each fitting are adequate. Grease the gear teeth with a good quality grease. © ETS-LINDGREN L.P.
Archived 3/18/10 Specifications MODEL 2081 TURNTABLE SERIES SPECIFICATIONS ELECTRICAL Model 2081-2.0 Series 2081-3.0 Series 2081-4.0 Series 2081-5.0 Series 2081-6.0 Series Drive Speeds RPM Voltage Dual Dual Variable Variable Dual Dual Variable Variable Variable Dual Dual Variable Variable Variable Dual Dual Variable Variable Dual Dual Variable Variable .5/2.0 .5/2.0 .5/2.0 .5/2.0 .5/2.0 .5/2.0 .5/2.0 .5/2.0 .5/2.0 .5/2.0 .5/2.0 .5/2.0 .5/2.0 .5/2.0 .5/2.0 .5/2.0 .5/2.0 .5/2.0 .5/2.0 .5/2.0 .5/2.
Archived 3/18/10 MODEL 2081 TURNTABLE SERIES Warranty Statement WARRANTY STATEMENT ETS-Lindgren L.P., hereinafter referred to as the Seller, warrants that standard EMCO products are free from defect in materials and workmanship for a period of two (2) years from date of shipment.
Archived 3/18/10 Illustrations MODEL 2081 TURNTABLE SERIES ILLUSTRATIONS 26 © ETS-LINDGREN L.P.
Archived 3/18/10 MODEL 2081 TURNTABLE SERIES © ETS-LINDGREN L.P.
Archived 3/18/10 Illustrations 28 MODEL 2081 TURNTABLE SERIES © ETS-LINDGREN L.P.
Archived 3/18/10 MODEL 2081 TURNTABLE SERIES © ETS-LINDGREN L.P.
Archived 3/18/10 Illustrations 30 MODEL 2081 TURNTABLE SERIES © ETS-LINDGREN L.P.
Archived 3/18/10 MODEL 2081 TURNTABLE SERIES © ETS-LINDGREN L.P.
Archived 3/18/10 Illustrations 32 MODEL 2081 TURNTABLE SERIES © ETS-LINDGREN L.P.
Archived 3/18/10 MODEL 2081 TURNTABLE SERIES © ETS-LINDGREN L.P.
Archived 3/18/10 Illustrations 34 MODEL 2081 TURNTABLE SERIES © ETS-LINDGREN L.P.
Archived 3/18/10 MODEL 2081 TURNTABLE SERIES © ETS-LINDGREN L.P.
Archived 3/18/10 Illustrations 36 MODEL 2081 TURNTABLE SERIES © ETS-LINDGREN L.P.
Archived 3/18/10 MODEL 2081 TURNTABLE SERIES © ETS-LINDGREN L.P.
Archived 3/18/10 Illustrations 38 MODEL 2081 TURNTABLE SERIES © ETS-LINDGREN L.P.
Archived 3/18/10 MODEL 2081 TURNTABLE SERIES © ETS-LINDGREN L.P.
Archived 3/18/10 Illustrations 40 MODEL 2081 TURNTABLE SERIES © ETS-LINDGREN L.P.
Archived 3/18/10 MODEL 2081 TURNTABLE SERIES © ETS-LINDGREN L.P.
Archived 3/18/10 Illustrations 42 MODEL 2081 TURNTABLE SERIES © ETS-LINDGREN L.P.
Archived 3/18/10 MODEL 2081 TURNTABLE SERIES © ETS-LINDGREN L.P.