
User's Manual
5. Six (6) C cell batteries
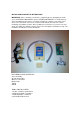
OK LET’S GET STARTED!
Under the sink you should find two shut off valves. The valve on the left will normally
control the hot water supply. Turn this valve handle clockwise to turn off the hot water.
Now turn on the hot side of the faucet to make certain the water is completely shut off. If
water is leaking out of the faucet the valve is not holding and should be replaced. Once
the water is off, place a small pan or towel below the valve to catch any water that is
trapped in the supply line.
With the adjustable wrench, loosen the supply line nut on top of the valve and
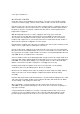
disconnect it. The line will still be attached to the faucet. NOTE: The threads on your
shut off valve must match the threads shown in the picture below. This connection is
known as 3/8 compression. If your shut-off valve does not match the threads shown, it
will need to be replaced or adapted to use this system.
Next attach the coupling end of the valve assembly to the shut-off valve, making sure the
delrin sleeve is in place prior to making this connection.
Reconnect the faucet supply line to the male threads on top of the tee. First start all the
threaded connections by hand making sure not to cross thread the connections. Once all
the connections are in place, tighten all the connections securely with adjustable wrench.
CAUTION: Do not over tighten these connections.
Select a suitable location in the drain piping with enough room for the saddle clamp to fit.
Using your drill and the drill bit supplied carefully drill a hole in one side of the drain pipe.
CAUTION: Use caution when drilling so you only penetrate one side of the drain tube.
Deburr or smooth the hole with a small piece of sandpaper if necessary.
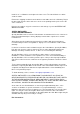
Install the drain clamp assembly in to the hole as shown below. Use the phillips
screwdriver and secure the fitting in place. Do not over tighten.
Measure the 1/2” tubing from the valve assembly to the drain clamp assembly, leaving
ample room in the loop. Cut the tubing to length and install into the drain clamp
assembly.
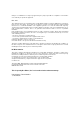
Hold the drain and push the tube until it bottoms out. Now install the tubing into the outlet
end of the valve assembly. Hold the valve and push the tube until it bottoms out. Make
sure the tubing is fully engaged on both ends.
Once everything is connected slowly open the shutoff valve and check for leaks.
CAUTION: To prevent water damage be sure to check your connections frequently for
any signs of leakage.
Using the flat blade screwdriver, loosen the screw that holds the lower cover to your
control box. Select a suitable location for the control box and attach with the screws
provided. Keep in mind you will need access to this unit at some point in the future.