
User manual

How to use the Wireless Receiver: Turn the wireless Receiver button to the ON position.
There is a Wireless Indicator that illuminates the colors in the ID Code Selector.
ID Code Selector – Red (1), Green (2), Yellow (3), Blue (4), Purple (5), Cyan (6), White (7).
To change to ID Code Selector colors, press the small clickable button next to the ID Code
Selector. Choose a color, for example Blue (4), and do the same for all your
other fixtures.
Master/Slave - Have one fixture in Master Mode and the rest of the fixtures in Slave Mode.
Turn on the Receiver button and put all fixtures on same ID Code Color. You now control
only the Master fixture and all the Slave fixtures will do what the Master is doing. The
Master fixture Wireless Indicator will start blinking RED (meaning transmitting signal) and
all the Slave fixture(s) will start blinking GREEN (meaning receiving signal).
How to use the XT-Mitter PRO 3.0 with your lights: To operate the XT-Mitter PRO, you
must connect the XT-Mitter Pro with a DMX cable to a DMX Controller.
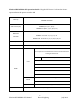
To sync the EliteParHEX RGBWA+UV to the XT-Mitter PRO 3.0 transmitter, select the same
ID Code color on all the fixture(s) and select the ID on the XT
-Mitter PRO to correspond to
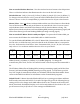
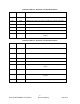
the color. Reference the chart below. Note: Transmitter ID 8, 9, A, B, C, D, E
, & F is inactive.
Only select 1-7 to coordinate with the Receiver Color on your fixture.
Transmitter
ID
1
2
3
4
5
6
7
Receiver
LED Color
RED
GREEN
YELLOW
BLUE
PURPLE
CYAN
WHITE
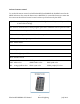
Transmission Power Level on XT-Mitter PRO: Displays current transmission power (1)
2dBm (Lowest), (2) 8dBm, (3) 14dBm, or (4) 20dBm (Highest). To change the
transmission power level, use the “PA” button located on the front panel. Recommended is
P4.
The XT-Mitter PRO will start blinking RED (meaning transmitting signal) and all the Slave
fixture(s) will start blinking GREEN (meaning receiving signal). You will have up to 300
feet, line of sight of communication with your XT-Mitter PRO and the EliteParHEX. Please
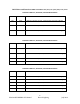
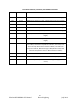
reference the DMX chart below for information on the Channel Mode programs.
Helpful Trick: To Master Reset the EliteParHEX to Factory setting, press Menu and Enter
button at the same time and hold for 5 seconds. The light will go into the following factory
settings. AUTO color change mode, DMX Address back to 001, Channel mode back to 6CH
Mode, Slave Mode, IR Disabled, Display on for 60 Seconds, Manual Colors back to 255, and
put all custom colors (A-E) back to 0 color settings on all RGBWA+UV.
6
EliteParHEX RGBWA+UV Manual Eternal Lighting July 2014