
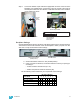
User Manual


10 CEM3 Sensor Portable Pack Retrofit Manual
Attach New Power Harness
The upgrade kit contains an edge connector (straight thru PCB) and a power wire harness
adapter to transition power to the new power connector.
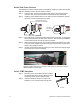
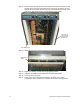
Step 1: Insert the edge connector (straight thru PCB) into the old backplane power
connector. The connector is the same on both sides and top and bottom.
Step 2: Install the power adapter harness to the edge connector (straight thru PCB) to
old power connector (match the wire colors)
.
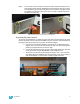
Step 3: Secure the power connectors together with provided 4"-wire-ties. Try to align the
wire tie stub behind the flat edge of the connector. This will ease the installation
of the heat shrink. Clip the wire tie ends for neatness.
Step 4: Slide the large heat shrink tube onto the power harness and slide it back until it
covers the newly completed connector and edge card assembly. A spare heat
shrink is also provided in the kit.
Step 5: Carefully heat the shrink tube with a heat gun or other heat source until it protects
and secures the connector assembly.
Leave the green ground wire running out of the pack; you will connect it to the
CEM3 backplane in a later step.
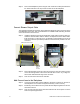
Install CEM3 Backplane
Step 1: Bend one arm of the backplane metal in towards
the opposite arm (about 30 deg). Bend the metal
as little as possible to get it inside the pack.
Step 2: Insert the backplane metal at an angle. Then
straighten it once it is past the face of the pack.
Oh,
I
w
i
sh
I
wer
e
an
O
s
c
ar
Meyer
®
wi
ener
.
..
Wire-tie the
connectors
together
The PCB is the same on
both sides, top and bottom.
Match the
wire colors
Top View