
Use and Care Guide


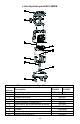
Table Of Contents
- General Safety Instructions
- READ BEFORE USING YOUR HUMIDIFIER
- DANGER: means if the safety information is not followed someone will be seriously injured or killed.
- WARNING: means if the safety information is not followed someone could be seriously injured or killed.
- CAUTION: means if the safety information is not followed someone may be injured.
- 1. To reduce the risk of fire or shock hazard, this humidifier has a polarized plug (one blade is wider than the other.) Plug humidifier directly into a 120V, A.C. electrical outlet. Do not use extension cords. If the plug does not fully fit into the...
- 2. Keep the electric cord out of traffic areas. To reduce the risk of fire hazard, never put the electric cord under rugs, near heat registers, radiators, stoves or heaters.
- 3. Always unplug the unit before moving, cleaning or removing the fan assembly section from the humidifier, or whenever it is not in service.
- 4. Keep the humidifier clean.
- 5. Do not put foreign objects inside the humidifier.
- 6. Do not allow unit to be used as a toy. Close attention is necessary when used by or near children.
- 7. To reduce the risk of electrical hazard or damage to humidifier, do not tilt, jolt or tip humidifier while unit is running.
- 8. To reduce the risk of accidental electrical shock, do not touch the cord or controls with wet hands.
- 9. To reduce the risk of fire, do not use near an open flame such as a candle or other flame source.
- WARNING: To reduce risk of fire, electric shock, or injury always unplug before servicing or cleaning.
- Due to the release of cool, moist air from the humidifier, it is best to direct air away from thermostat and hot air registers. Position humidifier next to an inside wall on a level surface at least 4 inches away from the wall or curtains.
- ASSEMBLY
- CASTERS
- *or higher
- As a convenience, a nighttime setting switch (Crescent moon) extinguishes all lights on the control panel but leaves all settings in their current state. Touch any of the switches to reset the panel to the normal lighting.
- 2. Lift off chassis to reveal wick frame assembly.
- 3. One set of three (3) HDC311 wick filters (provided) fit into the wick frame.
- 4. To replace wicks separate the wick frame top from the wick frame base and slide wicks into each of the three sections. Secure wick frame top to the base by positioning the slots on the top onto the tabs on the base.
- 5. Ensure the float is in position, place the chassis onto the base and the unit is ready for filling.
- INSTRUCTIONS GÉNÉRALES DE SÉCURITÉ
- À LIRE AVANT D’UTILISER VOTRE HUMIDIFICATEUR
- AVERTISSEMENT : Pour réduire les risques d'incendie, de choc électrique ou de blessure, débranchez toujours avant de réparer ou de nettoyer.
- Du fait que de l'air humide et frais est libéré de l'humidificateur, il est préférable de ne pas diriger l'air vers un thermostat ou des bouches d'air chaud. Placez l'humidificateur à côté d'un mur intérieur sur une surface plane à au moins 4 pouces (...
- ASSEMBLAGE
- VITESSE DU VENTILATEUR
- COMMANDE D'HUMIDITÉ
- AUTRES INDICATIONS
- SOINS ET ENTRETIEN
- DÉTARTRAGE
- DÉSINFECTION DE L'APPAREIL
- ENTREPOSAGE PENDANT L'ÉTÉ
- PAUTAS IMPORTANTES DE SEGURIDAD
- LEA ESTO ANTES DE USAR SU HUMIDIFICADOR
- Instrucciones generales de seguridad
- LEER ANTES DE USAR SU HUMIDIFICADOR
- PRECAUCIÓN: Nunca utilice su humidificador cuando le falte una parte o una parte esté dañada en alguna forma.
- PRECAUCIÓN Para reducir el riesgo de incendio, descarga eléctrica o daños, siempre desconecte la unidad antes de realizar el mantenimiento o la limpieza.
- Debido a que el humidificador emite aire frío y húmedo, se recomienda orientar la dirección del aire lejos del termostato y de las rejillas de aire caliente. Coloque el humidificador cerca de una pared interna en un lugar nivelado a 10 centímetros de ...
- MONTAJE
- RUEDAS

NOTAS SOBRE LA UBICACIÓN:
Con el fin de conseguir un uso más efectivo del humidificador, es importante
colocar la unidad donde se requiera la mayor cantidad de humedad o en el
lugar de la casa donde circulará la mayor cantidad de aire; por ejemplo, cerca
de un retorno de aire frío. Si la unidad se coloca cerca de una ventana, puede
formarse condensación en el cristal de la ventana. Si esto sucede, se debe
colocar la unidad en otro lugar.
NO sitúe la unidad directamente delante de un conducto de aire caliente o
radiador. NO coloque la unidad sobre una alfombra mullida.
Debido a que el humidificador emite aire frío y húmedo, se recomienda orientar
la dirección del aire lejos del termostato y de las rejillas de aire caliente.
Coloque el humidificador cerca de una pared interna en un lugar nivelado a
10 centímetros de distancia, como mínimo, de la pared o de las cortinas.
MONTAJE
1. Abra la caja y retire el humidificador.
2. Retire el armazón del humidificador (parte superior) de la base para colocar
el kit de accesorios en el interior, que incluye:
♦ Kit de ruedas
♦ Mechas de evaporación (un
conjunto de 3)
♦ Muestra de tratamiento
bacteriano
♦ Manual
LLENADO DE AGUA
ADVERTENCIA: Antes de realizar el
llenado, asegúrese de que la unidad
esté APAGADA. Siempre mantener la
rejilla seca.
ADVERTENCIA: Para reducir el riesgo
de peligro de incendio o descargas
eléctricas, no eche ni derrame agua en
el área de los controles o del motor. Si
los controles se mojan, deje que se
sequen completamente y haga que la unidad
sea revisada por personal de servicio autorizado antesde enchufarla.
ARMAZÓN
MONTAJE DE LA
ESTRUCTURA DE
LA MECHA
FLOTADOR
RUEDAS
3.
Retire la estructura de la mecha y el
conjunto del flotador de la base.
4.
Coloque la base boca abajo.
Introduzca el eje de cada rueda en
los orificios que se encuentran en
los ángulos de la base del
humidificador. Las ruedas deben
encajar perfectamente e insertarse
hasta que el tope del eje alcance la
superficie del gabinete.
5.
Coloque la base boca arriba.
6.
Vuelva a colocar el flotador y
montaje de la estructura de la
mecha en su lugar.
PUERTA DEL
DEPÓSITO DE
LLENADO
24