
User's Manual


!
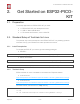
4. Configure
5. Configure
Being in terminal window, go to directory of hello_world application by typing cd~/esp/
hello_world. Then start project configuration utility menuconfig:
cd~/esp/hello_world
makemenuconfig
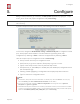
If previous steps have been done correctly, the following menu will be displayed:
!
In the menu, navigate to Serial flasher config > Default serial port to configure the serial
port, where project will be loaded to. Confirm selection by pressing enter, save
configuration by selecting < Save > and then exit application by selecting < Exit >.
Here are couple of tips on navigation and use of menuconfig:
• Use up & down arrow keys to navigate the menu.
•
Use Enter key to go into a submenu, Escape key to go out or to exit.
• Type ? to see a help screen. Enter key exits the help screen.
• Use Space key, or Y and N keys to enable (Yes) and disable (No) configuration items
with checkboxes “[*]“.
• Pressing ? while highlighting a configuration item displays help about that item.
• Type / to search the configuration items.
📖 Notes:
• On Windows, serial ports have names like COM1. On MacOS, they start with /dev/cu.. On Linux, they
start with /dev/tty. (See :doc:`establish-serial-connection` for full details.)
•
If you are Arch Linux user, navigate to SDK tool configuration and change the name of Python 2
interpreter from python to python2.
• Most ESP32 development boards have a 40 MHz crystal installed. However, some boards use a 26 MHz
crystal. If your board uses a 26MHz crystal, or you get garbage output from serial port after code upload,
adjust the :ref:`CONFIG_ESP32_XTAL_FREQ_SEL` option in menuconfig.
Espressif
! /127
2017.11