D00942621B X- 01 D2 Super Audio CD/CD Player Owner’s Manual . . . . . . . . . . . . . . . . . . . . 2 Manuel du Propriétaire . . . . . . . . . . . 27 Bedienungsanleitung . . . . . . . . . . . . . .
CAUTION: TO REDUCE THE RISK OF ELECTRIC SHOCK, DO NOT REMOVE COVER (OR BACK). NO USERSERVICEABLE PARTS INSIDE. REFER SERVICING TO QUALIFIED SERVICE PERSONNEL. The lightning flash with arrowhead symbol, within an equilateral triangle, is intended to alert the user to the presence of uninsulated “dangerous voltage” within the product’s enclosure that may be of sufficient magnitude to constitute a risk of electric shock to persons.
This product has been designed and manufactured according to FDA regulations “title 21, CFR, chapter 1, subchapter J, based on the Radiation Control for Health and Safety Act of 1968”, and is classified as class 1 laser product. There is not hazardous invisible laser radiation during operation because invisible laser radiation emitted inside of this product is completely confined in the protective housings. The label required in this regulation is shown ①. ① For U.S.A.
Features The latest VRDS mechanism for Super Audio CD (Specially developed ball bearings for the optimum VRDS mechanism.) The VRDS mechanism securely clamps the disc to the turntable whose diameter is exactly the same as that of the disc. This system completely eliminates vibration inherent to removable media and unwanted vibrations generated by the mechanical systems.
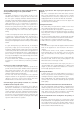
Before Use What’s in the box Please confirm that the following accessories are in the box when you open it. Remote control unit x 1 Batteries (AA, R6, SUM-3) x 2 Felt sheet x 3 Power cord x 1 Owner’s manual x 1 Warranty card x 1 Conventions about This Manual Read this before operation < As the unit may become warm during operation, always leave sufficient space around the unit for ventilation. < The voltage supplied to the unit should match the voltage as printed on the rear panel.
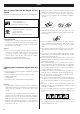
Discs Type of Discs That Can be Played on This System This player can playback discs bearing any of the following logos: < Always place the disc on the disc tray with the label side up. (Compact discs can be played or recorded only on one side.) < To remove a disc from its storage case, press down on the center of the case and lift the disc out, holding it carefully by the edges. Audio CD: • 12cm or 8cm discs • Linear PCM digital audio Audio CDs are divided into tracks.
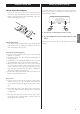
Remote Control Unit How to insert the batteries Remove the end cover of the remote control unit with a screwdriver. After checking the polarity (+/_) of two AA batteries, insert the batteries observing polarity, replace the end cover and replace the screws. Restoring factory settings If you have made a lot of changes to the setup, and want to restart from a known set of options, restore the unit to the factory settings as follows: 1. Turn the unit off and wait 30 seconds or longer.
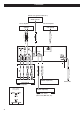
Connection Master clock generator (G-0s etc.) WORD SYNC OUT Surround amplifier Stereo amplifier AUDIO IN L i.LINK (AUDIO) R i.LINK cable BNC coaxial cable XLR cable A D C F B E DIGITAL IN (COAXIAL) Wall socket 5.1CH AUDIO IN Surround amplifier Balanced XLR pin assignment D/A Converter DIGITAL IN (OPTICAL) Digital audio device (CD recorder, MD deck, etc.
CAUTION: < Switch off the power to all equipment before making connection. < Read the instructions of each component you intend to use with this unit. < Be sure to insert each plug securely. To prevent hum and noise, avoid bundling the signal interconnection cables together with the AC power cord or speaker cables. A Analog audio output terminals 5.1 channel For surround (5.
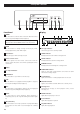
Front panel features A B C D E Front Panel A POWER Use this button to turn the unit on and off. When the unit is on, the ring surrounding the button lights up. F GH I J K c d Display a b e f The equipment draws nominal non-operating power from the AC outlet with its POWER switch in the off position. k j i h g B MODE Use this button to change settings of Word sync, DAC, priority playback area, and i.LINK output. C DAC indicator Shows the type of DAC currently selected.
Understanding the remote control unit A Number buttons Use these buttons for selecting tracks by number, etc. B 2CH/MULTI Use this button to switch between two-channel (stereo) and multi-channel surround audio output. C PLAY AREA Use this button to select the playback area of Super Audio CDs. D SCAN (m/,) Use these buttons for fast scanning during playback. E STOP ENGLISH I Use this button to stop playback. F PLAY A Use this button to start playback.
Playback 3 2 4 1 5 Press the PLAY button to start playback. 5 1 Turn the unit on. Pausing playback Each press of the POWER button turns the unit on and off. The ring surrounding the POWER button and the display light up when the unit is turned on. 2 Press the OPEN/CLOSE button. The shutter opens and the disc tray slides out. Press the PAUSE button to pause playback (the ring surrounding the PAUSE button on the main unit lights). Press PLAY or PAUSE to restart playback.
Skipping playback Press the MUSIC SKIP button (. or /) repeatedly until the desired track is found. The selected track will be played from the beginning. < If tracks are skipped while playback is paused or stopped, playback is paused or stopped at the start of the selected track. Selecting a track Use the number button to select tracks for playback. Use the +10 button to enter the first digit of numbers greater than 9 (repeated presses show 1-, 2-, 3- etc.
Programmed playback Programmed playback allows up to 30 tracks to be played back in the order you decide. Clearing the last track from the list Press the CLEAR button to clear the last track from the list. 1 Press the PROGRAM button (either when playing back or stopped). If a track is currently playing back, this track is added as the first item in the programmed playback list. Adding tracks to the list Use the number buttons to add tracks to the list.
Repeat mode Use the REPEAT button to select the repeat mode for playback. Repeated presses of the REPEAT button cycle between the following options: REPEAT DSC (whole disc repeat) REPEAT OFF (no repeat) The display on the main unit can be dimmed to suit the environment in which you listen to music. There are three levels and an “off” setting. Use the FL DIMMER button to cycle between these settings. Note that the OFF setting is not memorized when the power is turned off.
Changing the display mode MODE During playback, it is possible to change the display as shown here. 1 Repeatedly press the MODE button to select the menu item to be changed. < The DISPLAY button doesn’t work during programmed playback. WORD DAC LAYER (normal display) Currently playing track Elapsed time of current track < If you leave the unit idle for 10 seconds, the setting mode will be cancelled. Time remaining for current track 2 Use the SKIP buttons (.
Setting the Word sync, DAC, priority playback area, and i.LINK output (1) Available menu item and options DAC (D/A converter) This unit is equipped with the following DA converters: WORD (Word sync) Use this feature to lock your entire system to a single sync signal (clock) by connecting this unit to the Esoteric G-0s or similar device that outputs a sync signal. “ON” or “OFF” are available. < This unit is ready for the clocks up to 176.4 kHz and switches itself depending on an incoming signal.
Setting the Word sync, DAC, priority playback area, and i.LINK output (2) LAYER (priority playback area) i.LINK There are two types of Super Audio CDs, regular ones that contain 2-channel stereo and multi-channel stereo, and hybrid discs (two-layer discs) that contain Super Audio CD and regular CD data. Used to select an i.LINK output setting. When using the i.LINK terminal, select “60958” or “PCM”, and set the Digital Out to “ON”.
Settings (introduction) 1 Turn on the main unit. 4 When a option marked with “>” is displayed, use the up or down cursor buttons to change the setting, and press the ENTER button to confirm the entry. 2 Press the SETUP button to enter the setup menu. < Individual menu functions are described on pages 21-23. < Repeat steps 3 and 4 as required. “AudioSetup” appears on the front panel display. 5 Exit the setup menu by pressing SETUP once more.
Settings (Setup Menu Chart ) AudioSetup GeneralSet Analog Out options DigitalOut CD Direct SP Setup SP Size L/R Size options options C Size options options SR/SL Size options SW ON/OFF options L/R *.*m options C *.*m options SR/SL *.*m options LR ***.*dB options C ***.*dB options SR ***.*-dB options SL ***.*dB options SW ***.
Settings (Audio Setup) Analog output (Analog Out) Digital output (DigitalOut) When a option marked with “>” is displayed, use the up or down cursor buttons to change the setting, and press the ENTER button to confirm the entry. When a option marked with “>” is displayed, use the up or down cursor buttons to change the setting, and press the ENTER button to confirm the entry. 2ch Outputs 2-channel audio from the the i.LINK (AUDIO) and the 2ch analog audio output terminals (FRONT L and R).
Settings (Speaker Setup for the i.LINK and the 5.1ch analog audio output terminal) Use these speaker setup menus when the i.LINK (AUDIO) terminal or the 5.1ch analog audio output terminals are connected to a surround sound amplifier, and when you don’t use the speaker menus of the amplifier. There is no need for this setup when not using the i.LINK (AUDIO) terminal or the 5.1ch analog audio output terminals, or when you use the speaker menus of the amplifier.
Speaker distance (Distance) This setup is effective in the following case only: Set the DAC mode to “M.bit” or “1bit”, play Super Audio CDs, and output sound from the 5.1ch analog output terminals. Speaker levels (SP Level) Use this to set the relative levels of the speakers. You can set the L/R pair together, and the center, and surround rear pair independently, as well as the subwoofer. The maximum value you can set here is 0dB and the minimum is –12dB, with settings made in 0.5dB increments.
i.LINK (IEEE 1394) The i.LINK is also known as IEEE 1394, an international specification. This unit is i.LINK (AUDIO) ready. By connecting an i.LINK (AUDIO)-capable device to the i.LINK (AUDIO) terminal on this unit using an i.
Troubleshooting In case you experience any problem with this unit, please take the time to look through this chart and see if you can solve the problem yourself before you call your dealer. No power e Check the connection to the AC power supply. Check and make sure the AC source is not a switched outlet and that, if it is, the switch is turned on. Make sure there is power to the AC outlet by plugging another item such as a lamp or fan. e Press the POWER button of the main unit to turn it on.
Specifications General System . . . . . . . . . . . . . . . . . . . . . . . . . . . . . . . . . . . . . . . . . . . . . . . . . . . . Super Audio CD and CD Power supply Europe model . . . . . . . . . . . . . . . . . . . . . . . . . . . . . . . . . . . . . . . . . . . . . . . . . . AC 230 V, 50 Hz U.S.A./Canada model . . . . . . . . . . . . . . . . . . . . . . . . . . . . . . . . . . . . . . . . . . . . AC 120 V, 60 Hz Korea model . . . . . . . . . . . . . . . . . . . . . . . . . . . . . . . . . . . . . . .
TEAC ESOTERIC COMPANY 3-7-3, Nakacho, Musashino-shi, Tokyo 180-8550, Japan Phone: (0422) 52-5132 e-mail: eso-os@tec.teac.co.jp TEAC AMERICA, INC. 7733 Telegraph Road, Montebello, California 90640 Phone: (323) 726-0303 TEAC CANADA LTD. 5939 Wallace Street, Mississauga, Ontario L4Z 1Z8, Canada Phone: (905) 890-8008 TEAC MEXICO, S.A. De C.