D01145620A A-02 Power Amplifier OWNER’S MANUAL
CAUTION: TO REDUCE THE RISK OF ELECTRIC SHOCK, DO NOT REMOVE COVER (OR BACK). NO USER-SERVICEABLE PARTS INSIDE. REFER SERVICING TO QUALIFIED SERVICE PERSONNEL. The lightning flash with arrowhead symbol, within an equilateral triangle, is intended to alert the user to the presence of uninsulated “dangerous voltage” within the product’s enclosure that may be of sufficient magnitude to constitute a risk of electric shock to persons.
China RoHS o The information in the following table is only applicable to products for sale in the People’s Republic of China. o The products sold in the European area are manufactured in accordance with the European RoHS Directive. o Les informations contenues dans le tableau suivant sont applicables uniquement aux produits en vente en République populaire de Chine. o Les produits vendus en Europe sont fabriqués conformément avec la directive européenne RoHS.
Contents Thank you for choosing ESOTERIC. Read this manual carefully to get the best performance from this unit. What’s in the box. . . . . . . . . . . . . . . . . . . . . . . . . . . . . . . . . . . . . . . . . . . . . . . . . . . . . 4 What’s in the box What’s in the box Check to be sure the box includes all the supplied accessories shown below. Please contact the store where you purchased this unit if any of these accessories are missing or have been damaged during transportation. Before Use. . . . .
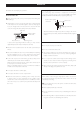
Before Use Read this before attempting any operations. Power plug support bracket The power plug support bracket is supplied for ensuring the connection of a heavy power cord such as ESOTERIC Power Cable 7N-PC7300 MEXCEL and 6N-PC5300 by supporting their plug. Placement of the unit This unit is heavy. Take care to prevent injuries when lifting and installing it. Power cord receptacle of the A-02 o High-quality tool steel is used for the spike feet, securely attached to the bottom of the unit.
Identifying the Parts Front A B Back C N D NPUT SELECTOR XLR RCA OUTPUT MODE BTL BTL STEREO BTL SPEAKER SPEAKER R L SIGNAL GND INPUTS BTL XLR R RCA XLR L R E 6 F G H RCA L F G E
A POWER button E Press this button to turn the unit on and off. See steps on page 11 for turning on and off the audio system including this unit. When you turn the unit on, the blue indicator around the button blinks and no sound comes out for a few seconds. Wait until the indicator stops blinking. SPEAKER terminals Connect these terminals to the speaker's terminals using commercially available speaker cables. See “Speaker Connections” on the next page, and “Connection examples” on pages 9 and 10.
Speaker Connections Connect the speakers to the SPEAKER terminals using commercially available speaker cables. Before making or changing connections, disconnect the power cord plug from the wall socket. o Connect 4Ω or higher impedance speakers. o Do not connect two or more amplifiers to one speaker. o The metal portions of the two separate wires should not touch or an electrical short can occur. Shorted wires can create a fire hazard or induce a failure in the unit.
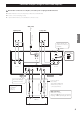
Connection Examples (Using as a Stereo Power Amplifier) After all other connections are complete, connect the power cord plug to the AC wall socket. o Read the instructions of each component you intend to use with this unit. o Be sure to connect each plug securely. o To prevent hum and noise, do not bundle the connection cords. Wall socket Left speaker Right speaker ENGLISH Power cord Set this switch to the position of connected terminals.
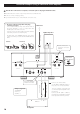
Connection Examples (Using as a Monaural Power Amplifier) After all other connections are complete, connect the power cord plug to the AC wall socket. o Read the instructions of each component you intend to use with this unit. o Be sure to connect each plug securely. o To prevent hum and noise, do not bundle the connection cords. B Be sure to connect each speaker cable plug securely (see page 8).
Turning On and Off the Audio System Follow these steps when you turns on and off the audio system including this unit. Failure to follow these steps may cause sudden loud noise and damage to speakers as well as harm hearing. Turning on the audio system Turn the volume of the preamplifier to the minimum. 2 Turn on the power of the connected input source devices. 3 Turn on the preamplifier. 4 Press the POWER button to turn on the A-02. 1 Stop the playback of the connected component.
Troubleshooting If you experience any problems with the unit, please take a moment to look through this chart and see if you can solve the problem yourself before you call your dealer or ESOTERIC customer service/ technical support. Moreover, the problem might be caused by something other than this unit. Confirm that connected devices are also being used properly. No power. e Check the connection to the AC power source.
Specifications Speaker Outputs General Rated output power STEREO. . . . . . . . . . . . . . . . . . . . . . . . . . . . . . . . . 200 W + 200 W (1 kHz, 8 Ω) 400 W + 400 W (1 kHz, 4 Ω) BTL . . . . . . . . . . . . . . . . . . . . . . . . . . . . . . . . . . . . . . . . . . . . . . 800 W (1 kHz, 8 Ω) Maximum output power STEREO. . . . . . . . . . . . . . . . . . . . . . . . . . 250 W + 250 W (1 kHz, 8 Ω) (JEITA) 500 W + 500 W (1 kHz, 4 Ω) (JEITA) BTL . . . . . . . . . . . . . . . . . . . . . . . . . . . . .
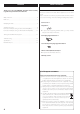
CLASS 2 WIRING XLR R RCA R NPUTS XLR L BTL RCA L CLASS 2 WIRING L STEREO SPEAKER SIGNAL GND BTL R BTL RCA OUTPUT MODE XLR INPUT SELECTOR SPEAKER BTL IN Rear Panel Layout
TEAC CORPORATION 1-47 Ochiai, Tama-shi, Tokyo 206-8530 Japan Phone: (042) 356-9156 e-mail: eso-os@tec.teac.co.jp TEAC AMERICA, INC. 7733 Telegraph Road, Montebello, California 90640 U.S.A. Phone: (323) 726-0303 e-mail: esoteric_info@teac.com TEAC CANADA LTD. 5939 Wallace Street, Mississauga, Ontario L4Z 1Z8, Canada Phone: (905) 890-8008 TEAC MEXICO, S.A. DE C.V. Río Churubusco 364, Colonia Del Carmen, Delegación Coyoacàn, CP 04100, México DF, México Phone: (5255)5010-6000 TEAC UK LTD.