
Installation Guide

Chain Suspended Installation
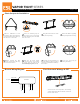
1
Attach a V-Bracket to each
mounting clip by spreading the
ends apart and inserting the legs
into the holes on each side.
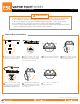
5
Without touching the LED
boards, detach the LED tray
and lens from the fixture.
2
Secure the mounting clips to
the housing recesses by firmly
pressing them into place until both
sides are secure.
3
Hang the fixture from the chain
kit (sold separately).
6
Make sure the power supply
is disconnected, and connect
the power driver as shown in the
General Wiring Diagram. (Below)
4
Release the latches by pulling
the top away from the housing.
7
Select the desired wattage and
kelvin with the switches located
on the driver. Reattach the LED Tray
to the fixture.
8
Secure lens to housing by
locking the latches.
Select desired color temperature and wattage
output combination with the switches located on
the side of the driver.
General Wiring Diagram
Field Selectable Wattage & CCT
BLACK (LINE)
WHITE (NEUTRAL)
LED DRIVER120–277V
GREEN (GRD)
PURPLE (DIM+)
PINK (DIM-)
BLUE (-)
RED (+)
CCT Switch
Wattage Switch
VAPOR TIGHT SERIES
Product Installation Guide Page 2 of 2
Copyright © 2022 ESL Vision, LLC. All rights reserved. Rev: 11/30/22