
Installation Guide

WARNING
1. To avoid the risk of fire or electric shock, disconnect power at the source prior to installation.
2. The installation should be performed by qualified electricians or lighting technicians.
3. To prevent damage, do not expose wiring to sheet metal edges or other sharp objects.
4. Do not make holes or alter the enclosure or components during kit installation.
5. If there is any problem with the fixture, turn off the power and DO NOT attempt repair unless
you are a qualified technician or the customer service member.
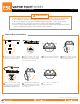
†Not All Part Numbers DLC Qualified. For a Complete Listing Please Consult the DLC Qualified Products List (QPL).
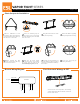
Surface Mount Installation
1
Drill holes in the mounting
surface, and use the included
hardware to mount the brackets.
2
Fix the mounting clips to the
housing recesses by firmly
pressing them into place until both
sides of the clip are secured.
5
Make sure the power supply
is disconnected, and connect
the power driver as shown in the
General Wiring Diagram. (Below)
3
Release the latches by pulling
the top away from the housing.
6
Select the desired wattage and
kelvin with the switches located
on the driver. Reattach the LED
Tray to the fixture.
4
Without touching the LED
boards, detach the LED tray
and lens from the fixture.
7
Secure lens to housing by
locking the latches.
VAPOR TIGHT SERIES
Product Installation Guide Page 1 of 2
Copyright © 2022 ESL Vision, LLC. All rights reserved. Rev: 11/30/22