ESET MAIL SECURITY FOR MICROSOFT EXCHANGE SERVER Installation Manual and User Guide Microsoft® Windows® Server 2000 / 2003 / 2008 / 2008 R2 / 2012 Click here to download the most recent version of this document
ESET MAIL SECURITY Copyright ©2013 by ESET, spol. s r.o. ESET Mail Security was developed by ESET, spol. s r.o. For more information visit www.eset.com. All rights reserved. No part of this documentation may be reproduced, stored in a retrieval system or transmitted in any form or by any means, electronic, mechanical, photocopying, recording, scanning, or otherwise without permission in writing from the author. ESET, spol. s r.o.
Contents 1. Introduction ..................................................5 1.1 What's ........................................................................5 new in version 4.5 ? 1.2 System ........................................................................5 requirements 1.3 Methods ........................................................................6 used 1.3.1 1.3.2 Mailbox .........................................................................6 scanning via VSAPI Message ..............
.1.4 4.1.4.1 4.1.4.1.1 4.1.4.1.2 4.1.4.2 4.1.4.3 4.1.4.4 4.1.5 4.1.6 4.1.6.1 4.1.6.1.1 4.1.6.1.2 4.1.7 4.1.7.1 4.1.7.2 4.1.7.3 4.1.7.4 4.1.7.5 4.1.7.6 4.1.8 On-demand .........................................................................66 computer scan Type ........................................................................67 of scan Smart ..........................................................................67 scan Custom ......................................................................
1. Introduction ESET Mail Security 4 for Microsoft Exchange Server is an integrated solution that protects mailboxes from various types of malware content including email attachments infected by worms or trojans, documents containing harmful scripts, phishing and spam. ESET Mail Security provides three types of protection: Antivirus, Antispam and the application of user-defined rules.
1.3 Methods used Two independent methods are used to scan email messages: Mailbox scanning via VSAPI 6 Message filtering on the SMTP server level 6 1.3.1 Mailbox scanning via VSAPI The mailbox scanning process is triggered and controlled by the Microsoft Exchange Server. Emails in the Microsoft Exchange Server store database are scanned continuously.
1.4.3 Application of user-defined rules Protection based on user-defined rules is available for scanning with both the VSAPI and the transport agent. You can use the ESET Mail Security user interface to create individual rules that may also be combined. If one rule uses multiple conditions, the conditions will be linked using the logical operator AND. Consequently, the rule will be executed only if all its conditions are fullfilled.
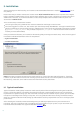
2. Installation After purchasing ESET Mail Security, the installer can be downloaded from ESET’s website (www.eset.com) as an . msi package. Please note that you need to execute the installer under Built-in Administrator account. Any other user, despite being a member of Administrators group, will not have sufficient access rights. Therefore you need to use Built-in Administrator account, as you will not be able to successfully complete the installation under any other user account than Administrator.
Enter the Username and Password, which you received after the purchase or registration of the product, into the corresponding fields. If you do not currently have your Username and Password available, it can be entered directly from the program at a later time. In the next step - License Manager - Add the license file that was delivered via email after you purchased your product. The next step is to configure the ThreatSense.Net Early Warning System. The ThreatSense.
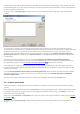
After entering your Username and Password, click Next to proceed to Configure your Internet connection. If you use a proxy server, it must be correctly configured for virus signature updates to work correctly. If you would like to have the proxy server configured automatically, select the default setting I am unsure if my Internet connection uses a proxy server. Use the same settings as Internet Explorer (Recommended) and click Next.
NOTE: After a program component update, a restart is usually required. We recommend selecting the Never restart computer option. The latest component updates will come into effect after the next server restart (whether it is scheduled 88 , manual or otherwise). You can choose Offer computer restart if necessary if you would like to be reminded to restart the server after the components were updated.
installed). To perform a manual upgrade: 1. In-place upgrade: Install the latest version over your existing version of ESET Mail Security by following the steps in the Installation 8 chapter. All existing settings (including antispam settings) will automatically be imported into the newer version during installation. 2. Clean installation: a) Export your configuration/settings to an xml file using the Import and export settings 122 feature.
2.6 Exchange Server 2013 Roles The architecture of Exchange Server 2013 is different from previous versions of Microsoft Exchange. In Exchange 2013 there are only two server roles, Client Access server and Mailbox server. If you are planning to protect Microsoft Exchange 2013 with ESET Mail Security, make sure to install ESET Mail Security on a system running Microsoft Exchange 2013 with the Mailbox server role. The Client Access server role is not supported by ESET Mail Security.
products within a cluster. You can avoid this by using a policy in ERA. A policy is very similar to a standard Configuration Task – it sends the configuration defined in the Configuration Editor to the client(s). A policy is different from a Configuration Task because it is continuously applied to the client(s). So the Policy can be defined as a configuration that is regularly forced to a client / group of clients. In ERA > Tools > Policy Manager... there is a number of options on how to use a policy.
2.8 License A very important step is to enter the license file for ESET Mail Security for Microsoft Exchange Server. Without it, email protection on the Microsoft Exchange Server will not work properly. If you do not add the license file during installation, you can do so later in the advanced settings, under Miscellaneous > Licenses. ESET Mail Security allows you to use several licenses simultaneously by merging them, as is described in the following: 1) Two or more licenses of one customer (i.e.
If the number of mailboxes in your active directory exceeds your license count a message will be entered into your Microsoft Exchange Server log reading, "Protection status changed due to exceeded number of mailboxes (count) covered by your license (count)." Your ESET Mail Security will also notify you by changing its Protection status to orange and displaying a message informing you that you have 42 days left before your protection will be disabled.
2.9 Post-Installation Configuration There are several options that have to be configured after the product installation. Antispam protection setup This section describes the settings, methods and techniques you can use to protect your network from spam. We recommend reading the following instructions carefully before choosing the most suitable combination of settings for your network.
When evaluating the message source, the method takes into account the configurations of the Approved IP addresses list, the Ignored IP addresses list, the Safe Senders and Allow IP lists on the Exchange server and the AntispamBypass settings for the recipient mailbox. Greylisting must be thoroughly configured, or else unwanted operational flaws (e.g. delays in legitimate message deliveries etc.) may occur.
3. ESET Mail Security - Microsoft Exchange Server protection ESET Mail Security provides significant protection for your Microsoft Exchange Server. There are three essential types of protection: Antivirus, Antispam and the application of user-defined rules. ESET Mail Security protects from various types of malware content, including email attachments infected by worms or trojans, documents containing harmful scripts, phishing and spam.
normalized value assigned to a message that indicates the likelihood of the message being spam (based on the characteristics of the message header, its subject, content, etc.). A rating of 0 indicates that the message is highly unlikely to be spam, while a rating of 9 indicates that the message is very likely spam. SCL values can be processed further by the Microsoft Exchange Server's Intelligent Message Filter (or Content Filter Agent).
Add... - adds a new rule Edit... - modifies an existing rule Remove - removes selected rule Clear - clears the rule counter (the Hits column) Move up - moves selected rule up in the list Move down - moves selected rule down in the list Unchecking a check box (to the left of each rule name) deactivates current rule. This allows for the rule to be reactivated again if needed. NOTE: You can also use system variables (e.g., %PATHEXT%) when configuring Rules.
Examples of entering conditions: By target mailbox: smith By email sender: smith@mail.com By email recipient: “J.Smith” or “smith@mail.com” By email subject: “” By attachment name: “.com” OR “.exe” By email body: (“free” OR “lottery”) AND (“win” OR “buy”) 3.1.2.2 Actions taken when applying rules This section allows you to select actions to take with messages and/or attachments matching conditions defined in rules.
The last step in the new rule creation wizard is to name each created rule. You can also add a Rule comment. This information will be stored in the Microsoft Exchange Server log. 3.1.3 Log files Log files settings let you choose how the log file will be assembled. More detailed protocol can contain more information, but it may slow down server's performance.
3.1.4 Message quarantine The Message quarantine is a special mailbox defined by the system administrator to store potentially infected messages and SPAM. Messages stored in quarantine can be analyzed or cleaned later using a newer virus signature database. There are two types of message quarantine systems that can be used. One option is to use the Microsoft Exchange quarantine system (this applies only to Microsoft Exchange Server 2007/2010).
Message quarantine by recipient - by using this option, you can define message quarantine mailboxes for multiple recipients. Every quarantine rule can be enabled or disabled by checking or unchecking the check box in its row. Add... - you can add a new quarantine rule by entering the desired recipient's email address and the quarantine email address to which mail will be forwarded Edit...
3.2 Antivirus and antispyware settings You can enable antivirus and antispyware mail server protection by selecting the Enable antivirus and antispyware server protection option. Note that antivirus and antispyware protection is turned on automatically after every restart of the service/computer. ThreatSense engine parameter setup is accessible by clicking on the Setup… button. 3.2.
3.2.1.1 Virus-Scanning Application Programming Interface (VSAPI) Microsoft Exchange Server provides a mechanism to make sure that every message component is scanned against the current virus signature database. If a message was not previously scanned, its corresponding components are submitted to the scanner before the message is released to the client. Every supported version of Microsoft Exchange Server (5.5/2000/2003/2007/2010) offers a different version of VSAPI. 3.2.1.1.1 Microsoft Exchange Server 5.
Server decides whether a background scan will run or not, based on various factors, such as the current system load, the number of active users, etc. Microsoft Exchange Server keeps a record of scanned messages and the virus signature database version used. If you are opening a message that has not been scanned by the most current virus signature database, Microsoft Exchange Server sends the message to ESET Mail Security to be scanned before opening the message in your email client.
3.2.1.1.3 Microsoft Exchange Server 2003 (VSAPI 2.5) This version of Microsoft Exchange Server includes VSAPI version 2.5. If you uncheck the Enable antivirus and antispyware VSAPI 2.5 protection option, the ESET Mail Security plug-in for Exchange server will not get unloaded from the Microsoft Exchange server process. It will only pass through the messages without scanning for viruses. The messages however, will still be scanned for spam 36 and the rules 20 will be applied.
You can set Attachment deletion method to: Truncate file to zero length – ESET Mail Security truncates the attachment to zero size and lets the recipient see the attachment file name and type Replace attachment with action information – ESET Mail Security replaces the infected file with a virus protocol or rule description Delete whole message – delete the entire message, including attachments; you can set what action should be performed when deleting attachments By clicking the Rescan button you will run a
Enabling the Scan RTF message bodies option activates scanning of RTF message bodies. RTF message bodies may contain macro viruses. NOTE: Plain text email bodies are not scanned by VSAPI. 3.2.1.1.4.1 Actions In this section you can specify the actions to be performed when a message and/or attachment is evaluated as infected. The Action to take if cleaning not possible field allows you to Block infected content, Delete object - infected content of the message, Delete whole message or take No action.
3.2.1.1.5 Transport Agent In this section you can enable or disable antivirus and antispyware protection by the transport agent. For Microsoft Exchange Server 2007 and higher it is only possible to install a transport agent if the server is in one of the two roles: Edge Transport or Hub Transport. If there is a message that cannot be cleaned, it will be processed according to the settings in Transport agent section. The message can be deleted, sent to the quarantine mailbox or retained.
3.2.2 Actions In this section you can choose to append a scan task ID and/or scan result information to the header of scanned messages. 3.2.3 Alerts and notifications ESET Mail Security allows you to append text to the original subject or body of infected messages.
Add to the body of scanned messages: offers three options: Do not append to messages Append to infected messages only Append to all scanned messages (this does not apply to internal messages) By enabling Add to the subject of infected messages, ESET Mail Security will append a notification tag to the email subject with the value defined in the Template added to the subject of infected messages text field (by default [virus %VIRUSNAME%]).
3.3 Antispam protection In the Antispam protection section, you can enable or disable spam protection for the installed mail server, configure antispam engine parameters and set other levels of protection. NOTE: It is necessary that the Antispam database is being updated regularly in order for the Antispam module to provide the best possible protection.
3.3.1 Microsoft Exchange Server 3.3.1.1 Transport Agent In this section you can set up options for spam protection using the transport agent. NOTE: The transport agent is not available in Microsoft Exchange Server 5.5.
that is not from a recognized sender. A legitimate server will try to resend the message after a delay. Spam servers will typically not attempt to resend the message, as they usually go through thousands of email addresses and do not waste time resending. Greylisting is an additional layer of antispam protection and does not have any effect on the spam evaluation capabilities of the antispam module.
3.3.2 Antispam engine In here, you can configure Antispam engine parameters. You can do so by clicking on Setup... button. A window will open where you can configure these Antispam engine parameters. Message categorization The ESET Mail Security Antispam engine assigns a spam score from 0 to 100 to every scanned message. By changing the limits of spam scores in this section, you can influence: 1) whether a message will be classified as SPAM or not-SPAM.
3.3.2.1.1.1 Samples Use cache memory - Enables usage of a fingerprint cache (Enabled by default). Turn on MSF - Allows for use of an alternate fingerprinting algorithm known as MSF. When enabled, you will be able to set following limits and thresholds: Number of messages designating a bulk message: - This option specifies how many similar messages are required in order to consider a message bulk.
Number of scanned messages before writing them to disk: - While training, the antispam engine will process a configurable amount of messages before writing the training database to disk. This option determines how many messages to process before writing to disk. For maximum performance, this number should be as large as possible. In an unusual case when a program is unexpectedly terminated before buffer has been written to disk, the training performed since the last disk write will be lost.
Specify Index: and Weight: values. 3.3.2.1.3.2 List of downloaded rule files Set rule file indexes which should be downloaded to disk. Use Add, Edit and Remove buttons to manage rule file indexes. 3.3.2.1.3.3 Category weight Set rule categories and their weight. Use Add..., Edit... and Remove button to manage categories and their weight. To add a category weight select a Category: from list.
3.3.2.1.4.1 Allowed senders Whitelisted senders and domains can contain an email address or a domain. Addresses are entered in the format "mailbox@domain" and domains simply in the format "domain". NOTE: Leading and trailing white space is ignored, regular expressions are not supported and asterisk "*" is ignored as well. 3.3.2.1.4.2 Blocked senders Blacklisted senders and domains can contain an email address or a domain.
3.3.2.1.4.7 Ignored domains This option allows you to specify body domains which should always be excluded from the DNSBL checks and ignored. 3.3.2.1.4.8 Blocked domains This option allows you to specify body domains and IP's which should should always be blocked. 3.3.2.1.4.9 Spoofed senders Allows blocking spammers who spoof your domain name and other domain names. For example, spammers often use the recipient's domain name as the From: domain name.
3.3.2.1.5.2 LBL (Last Blackhole List) LBL servers: - The Last Connecting IP is queried against the LBL server. You can specify a different DNS lookup for the last connecting incoming IP. For the last connecting incoming IP, the LBL list is queried instead of RBL list. Otherwise, the RBL list options such as RBL threshold are also applied to the LBL list.
3.3.2.1.7 Score Turn on score history - Enables tracking of historical scores for repeat senders. Stop analysis when SPAM score threshold has been reached - This option allows you to tell the antispam engine to stop analyzing the message once a score has been reached. This can reduce the number of rules and other checks that are performed, thus improving throughput.
engine's internal LiveFeed cache. The option is specified in seconds. For those LiveFeed responses whose TTL value is less than specified minimum TTL, the antispam engine's internal cache will use specified TTL instead of the TTL value of the LiveFeed response. Proxy server authentication type: - Specifies what type of a HTTP proxy authentication should be used. 3.3.2.1.10 Performance Maximum size of the used thread stack: - Sets the maximum thread stack size to use.
Arabic Byelorussian Bulgarian Catalan Czech Welsh Danish German Greek English Esperanto Spanish Estonian Basque Persian Finnish French Frisian Irish Gaelic Hebrew Hindi Croatian Hungarian Armenian Indonesian Icelandic Italian Japanese Georgian Korean Latin Lithuanian Latvian Marathi Malay Nepali Dutch Norwegian Polish Portuguese Quechua RhaetoRomance Romanian Russian Sanskrit Scots Slovak Slovenian Albanian Serbian Swedish Swahili Tamil Thai Tagalog Turkish Ukrainian Vietnamese Yiddish Chinese ar be bg ca
3.3.2.1.11.2 List of home countries Set countries which you consider as home countries and from which you prefer to receive messages. To add a home country, select it from the Country code: column and press Add button. This will move the country to the "Home" countries column. To remove the country from "Home" countries column, select the country code and press Remove button.
CÔTE D’IVOIRE CROATIA CUBA CYPRUS CZECH REPUBLIC DENMARK DJIBOUTI DOMINICA DOMINICAN REPUBLIC ECUADOR EGYPT EL SALVADOR EQUATORIAL GUINEA ERITREA ESTONIA ETHIOPIA FALKLAND ISLANDS (MALVINAS) FAROE ISLANDS FIJI FINLAND FRANCE FRENCH GUIANA FRENCH POLYNESIA FRENCH SOUTHERN TERRITORIES GABON GAMBIA GEORGIA GERMANY GHANA GIBRALTAR GREECE GREENLAND GRENADA GUADELOUPE GUAM GUATEMALA GUINEA GUINEA-BISSAU GUYANA HAITI HEARD ISLAND AND MCDONALD ISLANDS HOLY SEE (VATICAN CITY STATE) HONDURAS HONG KONG HUNGARY ICELAND
KUWAIT KYRGYZSTAN LAO PEOPLE’S DEMOCRATIC REPUBLIC LATVIA LEBANON LESOTHO LIBERIA LIBYAN ARAB JAMAHIRIYA LIECHTENSTEIN LITHUANIA LUXEMBOURG MACAO MACEDONIA, THE FORMER YUGOSLAV REPUBLIC OF MADAGASCAR MALAWI MALAYSIA MALDIVES MALI MALTA MARSHALL ISLANDS MARTINIQUE MAURITANIA MAURITIUS MAYOTTE MEXICO MICRONESIA, FEDERATED STATES OF MOLDOVA, REPUBLIC OF MONACO MONGOLIA MONTSERRAT MOROCCO MOZAMBIQUE MYANMAR NAMIBIA NAURU NEPAL NETHERLANDS NETHERLANDS ANTILLES NEW CALEDONIA NEW ZEALAND NICARAGUA NIGER NIGERIA NI
RÉUNION ROMANIA RUSSIAN FEDERATION RWANDA SAINT HELENA SAINT KITTS AND NEVIS SAINT LUCIA SAINT PIERRE AND MIQUELON SAINT VINCENT AND THE GRENADINES SAMOA SAN MARINO SAO TOME AND PRINCIPE SAUDI ARABIA SENEGAL SERBIA AND MONTENEGRO SEYCHELLES SIERRA LEONE SINGAPORE SLOVAKIA SLOVENIA SOLOMON ISLANDS SOMALIA SOUTH AFRICA SOUTH GEORGIA AND THE SOUTH SANDWICH ISLANDS SPAIN SRI LANKA SUDAN SURINAME SVALBARD AND JAN MAYEN SWAZILAND SWEDEN SWITZERLAND SYRIAN ARAB REPUBLIC TAIWAN, PROVINCE OF CHINA TAJIKISTAN TANZANI
VIRGIN ISLANDS, US WALLIS AND FUTUNA WESTERN SAHARA YEMEN ZAIRE (CONGO, THE DEMOCRATIC REPUBLIC OF THE) ZAMBIA ZIMBABWE VI WF EH YE CD ZM ZW 3.3.2.1.11.3 List of blocked countries Set countries which you want to block and from which you do not want to receive messages. To add a country to Blocked countries: list, select it from the Country code: column and press Add button. To remove the country from Blocked countries: list, select the country code and press Remove button.
3.3.3 Alerts and notifications Each email scanned by ESET Mail Security and marked as spam can be flagged by appending a notification tag to the email subject. By default, the tag is [SPAM], although it can be a user-defined string. NOTE: You can also use system variables when adding a template to the message subject. 3.4 FAQ Q: After installing EMSX with Antispam, emails stopped being delivered into mailboxes. A: If Greylisting is enabled, this is normal behavior.
Q: Is it possible to add a notification tag text via VSAPI to each scanned message, in the same manner as the Transport agent? A: Adding text to messages scanned by VSAPI is not supported in Microsoft Exchange Server. Q: Sometimes I cannot open a particular email in Microsoft Outlook. Why is that? A: The Action to take if cleaning not possible option in your VSAPI settings in the Actions section is most likely set to Block or you have created a rule that includes the Block action.
- deselect the check box Write spam score to the header of scanned messages - navigate to Alerts and notifications under Antispam protection - define a text tag that will be added to the subject field of unwanted messages, e.g. "[SPAM]", in the Template added to the subject of spam messages field 2) In Microsoft Outlook: - setup a rule to ensure messages with a specific text in the subject ("[SPAM]") will be moved into the desired folder. For more detailed instructions see this Knowledgebase article.
4. ESET Mail Security - Server protection While providing Microsoft Exchange Server protection, ESET Mail Security has all of the necessary tools to ensure protection of the server itself (resident shield, web-access protection, email client protection and antispam). 4.1 Antivirus and antispyware protection Antivirus protection guards against malicious system attacks by controlling file, email and Internet communication.
4.1.1.1.1 Media to scan By default, all types of media are scanned for potential threats. Local drives – Controls all system hard drives Removable media – Diskettes, USB storage devices, etc. Network drives – Scans all mapped drives We recommend that you keep the default settings and only modify them in specific cases, such as when scanning certain media significantly slows data transfers. 4.1.1.1.2 Scan on (Event-triggered scanning) By default, all files are scanned upon opening, creation or execution.
4.1.1.3 When to modify real-time protection configuration Real-time protection is the most essential component of maintaining a secure system. Therefore, please be careful when modifying its parameters. We recommend that you only modify its parameters in specific cases. For example, if there is a conflict with a certain application or real-time scanner of another antivirus program.
If Real-time protection does not detect and clean infiltrations Make sure that no other antivirus programs are installed on your computer. If two real-time protection shields are enabled at the same time, they may conflict with each other. We recommend that you uninstall any other antivirus programs on your system.
4.1.2.1.1 Compatibility Certain email programs may experience problems with POP3 filtering (e.g., if receiving messages with a slow Internet connection, timeouts may occur due to checking). If this is the case, try modifying the way control is performed. Decreasing the control level may improve the speed of the cleaning process. To adjust the control level of POP3 filtering, from the Advanced Setup tree, navigate to Antivirus and antispyware > Email protection > POP3, POP3s > Compatibility.
4.1.2.2 Integration with email clients Integration of ESET Mail Security with email clients increases the level of active protection against malicious code in email messages. If your email client is supported, this integration can be enabled in ESET Mail Security. If integration is activated, the ESET Mail Security toolbar is inserted directly into the email client, allowing for more efficient email protection.
4.1.2.2.1 Appending tag messages to email body Each email scanned by ESET Mail Security can be marked by appending a tag message to the subject or email body. This feature increases the level of credibility for the recipient and if an infiltration is detected, it provides valuable information about the threat level of a given email or sender. The options for this functionality are available through Advanced setup > Antivirus and antispyware > Email client protection.
4.1.3 Web access protection Internet connectivity is a standard feature in a personal computer. Unfortunately, it has also become the main medium for transferring malicious code. Because of this, it is essential that you carefully consider your Web access protection. We strongly recommend that the Enable web access antivirus and antispyware protection option is selected. This option is located in Advanced Setup (F5) > Antivirus and antispyware > Web access protection. 4.1.3.
4.1.3.1.1 Address management This section enables you to specify HTTP addresses to block, allow or exclude from checking. The buttons Add..., Edit..., Remove and Export... are used to manage the lists of addresses. Websites in the list of blocked addresses will not be accessible. Websites in the list of excluded addresses are accessed without being scanned for malicious code.
4.1.3.1.2 Active mode ESET Mail Security also contains the Web browsers feature, which allows you to define whether the given application is a browser or not. If an application is marked as a browser, all communication from this application is monitored regardless of the port numbers involved. The Web browsers feature complements the HTTP checking feature, as HTTP checking only takes place on predefined ports. However, many Internet services utilize changing or unknown port numbers.
Active mode is useful because it examines transferred data as a whole. If it is not enabled, communication of applications is monitored gradually in batches. This decreases the effectiveness of the data verification process, but also provides higher compatibility for listed applications. If no problems occur while using it, we recommend that you enable active checking mode by selecting the checkbox next to the desired application. 4.1.
4.1.4.1 Type of scan Two types of On-demand computer scan are available. Smart scan quickly scans the system with no need for further configuration of the scan parameters. Custom scan… allows you to select any of the predefined scan profiles, as well as choose specific scan targets. 4.1.4.1.1 Smart scan Smart scan allows you to quickly launch a computer scan and clean infected files with no need for user intervention. Its main advantages are easy operation with no detailed scanning configuration.
4.1.4.2 Scan targets The Scan targets drop-down menu allows you to select files, folders and devices (disks) to be scanned for viruses.
4.1.4.4 Command Line ESET Mail Security’s antivirus module can be launched via the command line – manually (with the “ecls” command) or with a batch (“bat”) file.
Methods: – adware scan for Adware/Spyware/Riskware – no-adware do not scan for Adware/Spyware/Riskware – unsafe scan for potentially unsafe applications – no-unsafe do not scan for potentially unsafe applications – unwanted scan for potentially unwanted applications – no-unwanted do not scan for potentially unwanted applications – pattern use signatures – no-pattern do not use signatures – heur enable heuristics – no-heur disable heuristics – adv-heur enable advanced heuristics – no-ad
4.1.5 Performance In this section, you can set the number of ThreatSense scan engines that will be used for virus scanning. More ThreatSense scan engines on multiprocessor machines can increase the scanning rate. Acceptable value is 1-20.
Block communication that uses the certificate – Terminates connection to the site that uses the certificate. 4.1.6.1.1 Trusted certificates In addition to the integrated Trusted Root Certification Authorities store where ESET Mail Security stores trusted certificates, you can create a custom list of trusted certificates that can be viewed in Advanced Setup (F5) > Protocol filtering > SSL > Certificates > Trusted certificates. 4.1.6.1.
4.1.7.1 Objects setup The Objects section allows you to define which computer components and files will be scanned for infiltrations. Operating memory – Scans for threats that attack the operating memory of the system. Boot sectors – Scans boot sectors for the presence of viruses in the master boot record. Files – Provides scanning for all common file types (programs, pictures, audio, video files, database files, etc.). Email files – Scans special files where email messages are contained.
consent for installation. If they are present on your computer, your system behaves differently (compared to the state before their installation). The most significant changes include unwanted pop-up windows, activation and running of hidden processes, increased usage of system resources, changes in search results, and applications communicating with remote servers. Potentially unsafe applications – Potentially unsafe applications is the classification used for commercial, legitimate software.
to select the correct action automatically, the program will offer a choice of follow up actions. The choice of follow-up actions will also be displayed if a predefined action could not be completed. Strict cleaning – The program will clean or delete all infected files (including archives). The only exceptions are system files. If it is not possible to clean them, you will be offered an action to take in a warning window.
4.1.7.5 Limits The Limits section allows you to specify the maximum size of objects and levels of nested archives to be scanned: Maximum object size: – Defines the maximum size of objects to be scanned. The given antivirus module will then scan only objects smaller than the size specified. We do not recommend changing the default value, as there is usually no reason to modify it. This option should only be changed by advanced users who have specific reasons for excluding larger objects from scanning.
4.1.8 An infiltration is detected Infiltrations can reach the system from various entry points; webpages, shared folders, via email or from removable computer devices (USB, external disks, CDs, DVDs, diskettes, etc.). If your computer is showing signs of malware infection, e.g., it is slower, often freezes, etc.
4.2 Updating the program Regular updating of ESET Mail Security is the basic premise for obtaining the maximum level of security. The Update module ensures that the program is always up to date in two ways – by updating the virus signature database and by updating system components. By clicking Update from the main menu, you can find the current update status, including the date and time of the last successful update and if an update is needed.
4.2.1 Update setup The update setup section specifies update source information such as the update servers and authentication data for these servers. By default, the Update server drop-down menu is set to Choose automatically to ensure that update files will automatically download from the ESET server with the least network traffic. The update setup options are available from the Advanced Setup tree (F5 key), under Update.
4.2.1.1 Update profiles Update profiles can be created for various update configurations and tasks. Creating update profiles is especially useful for mobile users, who can create an alternative profile for Internet connection properties that regularly change. The Selected profile drop-down menu displays the currently selected profile, set to My profile by default. To create a new profile, click the Profiles... button and then click the Add... button and enter your own Profile name.
4.2.1.2.1 Update mode The Update mode tab contains options related to the program component update. In the Program component update section, three options are available: Never update program components: New program component updates will not be downloaded. Always update program components: New program component updates will occur automatically. Ask before downloading program components: The default option. You will be prompted to confirm or refuse program component updates when they are available.
4.2.1.2.2 Proxy server In ESET Mail Security, proxy server setup is available in two different sections within the Advanced Setup tree. First, proxy server settings can be configured under Miscellaneous > Proxy server. Specifying the proxy server at this level defines global proxy server settings for all of ESET Mail Security. Parameters here will be used by all modules requiring connection to the Internet.
Select the Do not use proxy server option to specify that no proxy server will be used to update ESET Mail Security. The Connection through a proxy server option should be selected if a proxy server should be used to update ESET Mail Security and is different from the proxy server specified in the global settings (Miscellaneous > Proxy server). If so, the settings should be specified here: Proxy server address, communication Port, plus Username and Password for the proxy server, if required.
4.2.1.2.3 Connecting to the LAN When updating from a local server with an NT-based operating system, authentication for each network connection is required by default. In most cases, a local system account does not have sufficient rights to access the Mirror folder (the Mirror folder contains copies of update files). If this is the case, enter the username and password in the update setup section, or specify an existing account under which the program will access the update server (Mirror).
4.2.1.2.4 Creating update copies - Mirror ESET Mail Security allows you to create copies of update files which can be used to update other workstations located in the network. Updating client workstations from a Mirror optimizes network load balance and saves Internet connection bandwidth. Configuration options for the local Mirror server are accessible (after adding a valid license key in the license manager, located in the ESET Mail Security Advanced Setup section) in the Advanced update setup: section.
4.2.1.2.4.1 Updating from the Mirror There are two basic methods of configuring the Mirror – the folder with update files can be presented as a shared network folder or as an HTTP server. Accessing the Mirror using an internal HTTP server This configuration is the default, specified in the predefined program configuration. In order to allow access to the Mirror using the HTTP server, navigate to Advance update setup (the Mirror tab) and select the Create update mirror option.
the other computer. To specify authentication data, open ESET Mail Security Advanced Setup (F5) and click the Update branch. Click the Setup... button and then click the LAN tab. This setting is the same as for updating, as described in section Connecting to LAN 84 . After the Mirror configuration is complete, proceed to the workstations and set \\UNC\PATH as the update server. This operation can be completed using the following steps: Open ESET Mail Security Advanced Setup and click Update Click Edit...
4.3 Scheduler Scheduler is available if Advanced mode in ESET Mail Security is activated. Scheduler can be found in the ESET Mail Security main menu under Tools. Scheduler contains a list of all scheduled tasks and configuration properties such as the predefined date, time, and scanning profile used.
4.3.2 Creating new tasks To create a new task in Scheduler, click the Add... button or right-click and select Add... from the context menu. Five types of scheduled tasks are available: Run external application System startup file check Create a computer status snapshot On-demand computer scan Update Since Update is one of the most frequently used scheduled tasks, we will explain how to add a new update task. From the Scheduled task: drop-down menu, select Update.
4.4 Quarantine The main task of quarantine is to safely store infected files. Files should be quarantined if they cannot be cleaned, if it is not safe or advisable to delete them, or if they are being falsely detected by ESET Mail Security. You can choose to quarantine any file. This is advisable if a file behaves suspiciously but is not detected by the antivirus scanner. Quarantined files can be submitted for analysis to ESET’s Threat Lab.
4.4.3 Submitting file from Quarantine If you have quarantined a suspicious file that was not detected by the program, or if a file was incorrectly evaluated as infected (e.g., by heuristic analysis of the code) and subsequently quarantined, please send the file to ESET‘s Threat Lab. To submit a file from quarantine, right-click the file and select Submit for analysis from the context menu.
4.5 Log files Logs store information about important events: detected infiltrations, logs from the on-demand scanner, logs from the resident scanners and system information. Antispam and greylisting protection logs (found under other logs under Tools > Log files) contain detailed information about messages that were subject to scanning and the consequent actions performed on those messages. Logs can be very useful when looking for undelivered email, trying to figure why a message was marked as spam, etc.
Antispam All messages categorized by the ESET Mail Security as spam or probable spam are recorded here. Columns description: Time – time of entry into the antispam log Sender – sender's address Recipient – recipient's address Subject – message subject Score – spam score assigned to the message (in range from 0 to 100) Reason – is an indicator which caused the message to be classified as spam. The displayed indicator is the strongest. If you want to see the other indicators, double-click the entry.
Phish Message contains text that is typical to phishing messages. Replica Message contains text that is typical for a category of spam oriented at offering replicas. Generic spam indicator Message containing words/characters that is typical for spam, as e.g. "Dear friend", "hello winner", "!!!" etc. Ham indicator This is an indicator that has the opposite function as the other listed indicators. It analyzes elements characteristic for regular solicited mail. It lowers the overall spam score.
Greylisting All messages that have been evaluated using the greylisting method are recorded in this log.
On-demand computer scan The scanner log stores information about manual or planned scan results. Each line corresponds to a single computer control. It lists the following information: scan date and time, total number of scanned, infected, and cleaned files and the current scan status. In On-demand scanner logs, double-click the log entry to display its detailed content in a separate window. Use the context menu (right click) to copy one or more marked entries (in all types of logs). 4.5.
Record types: - Lets you choose what type of records to show. You can choose one particular record type, multiple types at the same time, or have all of the record types shown (by default): Diagnostic Information Warning Error Critical Time period: - Use this option to have records filtered by time period.
records will be omitted. Look in columns: - Select what columns will be taken into account when searching. You can check one or more columns to be used for searching. By default, all columns are checked: Time Module Event User Record types: - Lets you choose what type of records to find.
4.6 ESET SysInspector 4.6.1 Introduction to ESET SysInspector ESET SysInspector is an application that thoroughly inspects your computer and displays gathered data in a comprehensive way. Information like installed drivers and applications, network connections or important registry entries can help you to investigate suspicious system behavior be it due to software or hardware incompatibility or malware infection.
4.6.2 User Interface and application usage For clarity the Main window is divided into four major sections – Program Controls located on the top of the Main window, the Navigation window on the left, the Description window on the right in the middle and the Details window on the right at the bottom of the Main window. The Log Status section lists the basic parameters of a log (filter used, filter type, is the log a result of a comparison etc.). 4.6.2.
Detail This setting influences the information displayed in the Main window to make the information easier to work with. In "Basic" mode, you have access to information used to find solutions for common problems in your system. In the "Medium" mode, the program displays less used details. In "Full" mode, ESET SysInspector displays all the information needed to solve very specific problems. Item filtering Item filtering is best used to find suspicious files or registry entries in your system.
Network connections The Description window contains a list of processes and applications communicating over the network using the protocol selected in the Navigation window (TCP or UDP) along with the remote address where to which the application is connected to. You can also check the IP addresses of DNS servers. The Detail window contains additional information for items selected in the Description window such as the file size or its hash.
6 7, B 8 9 + Ctrl+9 Ctrl+0 unknown, risk level 6-9 items are displayed risky, risk level 7-9 items are displayed risky, risk level 8-9 items are displayed risky, risk level 9 items are displayed decreases risk level increases risk level filtering mode, equal level or higher filtering mode, equal level only View Ctrl+5 Ctrl+6 Ctrl+7 Ctrl+3 Ctrl+2 Ctrl+1 BackSpace Space Ctrl+W Ctrl+Q view by vendor, all vendors view by vendor, only Microsoft view by vendor, all other vendors displays full detail displays m
4.6.2.3 Compare The Compare feature allows the user to compare two existing logs. The outcome of this feature is a set of items not common to both logs. It is suitable if you want to keep track of changes in the system, a helpful tool for detecting activity of malicious code. After it is launched, the application creates a new log which is displayed in a new window. Navigate to File > Save log to save a log to a file. Log files can be opened and viewed at a later time.
4.6.
4.6.4.2 Structure of the Service script In the first line of the script’s header, you can find information about the Engine version (ev), GUI version (gv) and the Log version (lv). You can use this data to track possible changes in the .xml file that generates the script and prevent any inconsistencies during execution. This part of the script should not be altered. The remainder of the file is divided into sections in which items can be edited (denote those that will be processed by the script).
05) DNS server entries This section contains information about the current DNS server configuration. Example: 05) DNS server entries: + 204.74.105.85 - 172.16.152.2 [...] Marked DNS server entries will be removed when you run the script. 06) Important registry entries This section contains information about important registry entries.
Example: 09) Critical files: * File: win.ini - [fonts] - [extensions] - [files] - MAPI=1 [...] * File: system.ini - [386Enh] - woafont=dosapp.fon - EGA80WOA.FON=EGA80WOA.FON [...] * File: hosts - 127.0.0.1 localhost - ::1 localhost [...] The selected items will either be deleted or reset to their original values. 4.6.4.3 Executing Service scripts Mark all desired items, then save and close the script.
How does ESET SysInspector evaluate the risk posed by a particular object ? In most cases, ESET SysInspector assigns risk levels to objects (files, processes, registry keys and so forth) using a series of heuristic rules that examine the characteristics of each object and then weight the potential for malicious activity. Based on these heuristics, objects are assigned a risk level from 1 - Fine (green) to 9 - Risky (red).
Below is a detailed description of the available options: Compare – Allows you to compare two existing logs. It is suitable if you want to track changes between the current log and an older log. For this option to take effect, you must select two snapshots to be compared. Create... – Creates a new record. Before that, you must enter a short comment about the record. To find out the snapshot creation progress (of the currently generated snapshot), see the Status column.
4.7.3 Target selection In addition to CD/DVD/USB, you can choose to save ESET SysRescue in an ISO file. Later on, you can burn the ISO image on CD/DVD, or use it some other way (e.g. in the virtual environment such as VMware or VirtualBox). If you select USB as the target medium, booting may not work on certain computers. Some BIOS versions may report problems with the BIOS - boot manager communication (e.g.
Security solution installed on the computer on which the ESET SysRescue CD is run. 4.7.4.3 Advanced settings The Advanced tab lets you optimize the ESET SysRescue CD according to the amount of memory on your computer. Select 576 MB and more to write the content of the CD to the operating memory (RAM). If you select less than 576 MB, the recovery CD will be permanently accessed when WinPE will be running.
4.7.5 Working with ESET SysRescue For the rescue CD/DVD/USB to work effectively, you must start your computer from the ESET SysRescue boot media. Boot priority can be modified in the BIOS. Alternatively, you can use the boot menu during computer startup – usually using one of the F9 - F12 keys depending on the version of your motherboard/BIOS. After booting up from the boot media, ESET Security solution will start.
The User interface features also include the option to password-protect the ESET Mail Security setup parameters. This option is located in the Settings protection submenu under User interface. In order to provide maximum security for your system, it is essential that the program be correctly configured. Unauthorized modifications could result in the loss of important data.
4.8.1 Alerts and notifications The Alerts and notifications setup section under User interface allows you to configure how threat alerts and system notifications are handled in ESET Mail Security. The first item is Display alerts. Disabling this option will cancel all alert windows and is only suitable for a limited amount of specific situations. For most users, we recommend that this option be left to its default setting (enabled).
4.8.2 Disable GUI on Terminal Server This chapter describes how to disable GUI of ESET Mail Security running on Windows Terminal Server for user sessions. Normally, ESET Mail Security GUI starts up every time a remote user logs onto the server and creates a terminal session. This is usually undesirable on Terminal Servers. If you want to turn off the GUI for terminal sessions follow these steps: 1. Run regedit.exe 2. Navigate to HKEY_LOCAL_MACHINE\SOFTWARE\Microsoft\Windows\CurrentVersion\Run 3.
It shows you some basic examples how to use eShell with Syntax, Prefix, Command path, Abbreviated forms, Aliases, etc. This is basically a quick guide to eShell. NOTE: If you want to display the first run screen in future, type in guide command. NOTE: Commands are not case sensitive, you can use upper case (capital) or lower case letters and the command will execute regardless. 4.9.
These are the prefixes that eShell lets you use.
Argument An argument an action which is performed for a particular command. For example, command CLEANLEVEL can be used with following arguments: none - Do not clean normal - Standard cleaning strict - Strict cleaning Another example are the arguments ENABLED or DISABLED, which are used to enable or disable a certain feature or functionality. Abbreviated form / Shortened commands eShell allows you to shorten contexts, commands and arguments (provided the argument is a switch or an alternative option).
will display SYNTAX, OPERATIONS, ARGUMENTS and ALIASES for the command with a short description for each. Command history eShell keeps history of previously executed commands. This applies only to the current eShell interactive session. Once you exit eShell, the command history will be dropped. Use the Up and Down arrow keys on your keyboard to navigate through the history.
PASSWORD Normally, to execute password-protected commands, you are prompted to type in a password for security reasons. This applies to commands such as those that disable antivirus protection and those that may affect ESET Mail Security functionality. You will be prompted for password every time you execute such command. You can define this password in order to avoid entering password every time. It will be remembered by eShell and automatically be used when a password-protected command is executed.
get - Show antivirus protection status set - Disable/Enable antivirus protection restore - Restores default settings ARGUMENTS: disabled - Disable antivirus protection enabled - Enable antivirus protection EXAMPLES: get status - Shows current protection status set status disabled - Disables protection restore status - Restores protection to default setting (Enabled) VIRLOG This is an alias of the DETECTIONS command. It is useful when you need to view information about detected infiltrations.
newly-detected threats. This information may include a sample or copy of the file in which the threat appeared, the path to that file, the filename, the date and time, the process by which the threat appeared on your computer and information about your computer‘s operating system. While there is a chance that this may occasionally disclose some information about you or your computer (usernames in a directory path, etc.
4.11.1 Suspicious files The Suspicious files tab allows you to configure the manner in which threats are submitted to ESET‘s Threat Lab for analysis. If you find a suspicious file, you can submit it for analysis to our ThreatLabs. If it is a malicious application, its detection will be added to the next virus signature update. File submission can be set to occur automatically, or select the Ask before submitting option if you wish to know which files have been sent for analysis and confirm the submission.
4.11.2 Statistics The ThreatSense.Net Early Warning System collects anonymous information about your computer related to newly detected threats. This information may include the name of the infiltration, the date and time it was detected, the ESET security product version, your operating system version and the location setting. The statistics are typically delivered to ESET‘s servers once or twice a day.
4.11.3 Submission You can select how files and statistical information will be submitted to ESET. Select the By means of Remote Administrator or directly to ESET option for files and statistics to be submitted by any available means. Select the By means of Remote Administrator option to submit files and statistics to the remote administration server, which will ensure their subsequent submission to ESET’s Threat Lab.
4.12 Remote administration ESET Remote Administrator (ERA) is a powerful tool to manage security policy and to obtain an overview of the overall security within a network. It is especially useful when applied to larger networks. ERA not only increases the security level, but also provides ease-of-use in the administration of ESET Mail Security on client workstations. Remote administration setup options are available from the main ESET Mail Security program window.
4.13 Licenses The Licenses branch allows you to manage the license keys for ESET Mail Security and other ESET products such as ESET Mail Security, etc. After purchase, license keys are delivered along with your username and password. To Add/ Remove a license key, click the corresponding button in the license manager window. The license manager is accessible from the Advanced Setup tree under Miscellaneous > Licenses.
5. Glossary 5.1 Types of infiltration An Infiltration is a piece of malicious software trying to enter and/or damage a user’s computer. 5.1.1 Viruses A computer virus is an infiltration that corrupts existing files on your computer. Viruses are named after biological viruses, because they use similar techniques to spread from one computer to another. Computer viruses mainly attack executable files and documents. To replicate, a virus attaches its “body“ to the end of a target file.
Backdoor – An application which communicates with remote attackers, allowing them to gain access to a system and to take control of it Keylogger – (keystroke logger) – A program which records each keystroke that a user types and sends the information to remote attackers Dialer – Dialers are programs designed to connect to premium-rate numbers. It is almost impossible for a user to notice that a new connection was created.
If a file is detected as spyware on your computer, it is advisable to delete it, since there is a high probability that it contains malicious code. 5.1.7 Potentially unsafe applications There are many legitimate programs whose function is to simplify the administration of networked computers. However, in the wrong hands, they may be misused for malicious purposes. ESET Mail Security provides the option to detect such threats.
5.2.1 Advertisements Internet advertising is one of the most rapidly growing forms of advertising. Its main marketing advantages are minimal costs and a high level of directness; what’s more, messages are delivered almost immediately. Many companies use email marketing tools to effectively communicate with their current and prospective customers. This type of advertising is legitimate, since you may be interested in receiving commercial information about some products.
5.2.4.1 Rules In the context of Antispam solutions and email clients, rules are tools for manipulating email functions. They consist of two logical parts: 1) Condition (e.g., an incoming message from a certain address) 2) Action (e.g., deletion of the message, moving it to a specified folder) The number and combination of rules varies with the Antispam solution. These rules serve as measures against spam (unsolicited email).
5.2.4.5 Server-side control Server-side control is a technique for identifying mass spam based on the number of received messages and the reactions of users. Each message leaves a unique digital “footprint” based on the content of the message. The unique ID number tells nothing about the content of the email. Two identical messages will have identical footprints, while different messages will have different footprints. If a message is marked as spam, its footprint is sent to the server.