
Installation manual


15
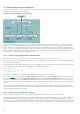
6.5.1 Operation principle
The esets_ssfi.so module is a plug-in to access all objects processed by the SafeSquid proxy cache. Once the plug-in accesses the
object, it is scanned for infiltrations using the ESETS daemon. If the object is infected, SafeSquid blocks the appropriate resource
and sends the predefined template page instead. The esets_ssfi.so module is supported by SafeSquid Advanced version 4.0.4.2 and
later. Please refer to the esets_ssfi.so(1) man pages for more information.
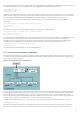
6.5.2 Installation and configuration
To integrate the module, you must create links from the SafeSquid modules directory to the appropriate installation locations of
the ESET Gateway Security package. In the following examples, it is assumed that SafeSquid is installed on a Linux OS in the ‘/opt/
safesquid’ directory.
mkdir /opt/safesquid/modules
ln -s @LIBDIR@/ssfi/esets_ssfi.so /opt/safesquid/modules/esets_ssfi.so
ln -s @LIBDIR@/ssfi/esets_ssfi.xml /opt/safesquid/modules/esets_ssfi.xml
/etc/init.d/safesquid restart
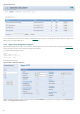
To complete the SafeSquid plug-in installation, first logon to the SafeSquid Web Administration Interface. Select the Config menu
from the main interface page and browse Select a Section to Configure until you find ESET Gateway Security. Click Submit and
create the antivirus profile for the ESET Gateway Security section by clicking the Add button at the bottom. Define the below
parameters within the list that appears and click Submit. Remember to save the Safesquid configuration by clicking the Save
settings button.
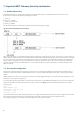
Comment: ESET Gateway Security
Profiles: antivirus
The SafeSquid plug-in is operational immediately after installation, but additional fine tuning should be performed. In the
following paragraphs, we explain how to configure SafeSquid to use ESETS predefined blocking templates, in the event that a
transferred source object is infected (or not scanned).
Logon to the SafeSquid Web Administration Interface. Select the Config menu from the main interface page and browse Select a
Section to Configure until you find ESET Gateway Security. Next, edit the newly created antivirus profile by clicking Edit at the
bottom of the ESET Gateway Security section. Then define the following parameters in the list that appears:
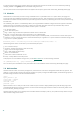
Infected template: esets_infected
Not scanned template: esets_not_scanned
After submitting the list of templates, navigate to the Templates page of the main Config menu. You will see a Path parameter that
defines the SafeSquid templates directory path. Assuming the parameter is ‘/opt/safesquid/safesquid/templates’, ensure that an
appropriate directory exists and if not, create it. In order to access the ESETS predefined templates from within this directory,
add the appropriate links using the following commands:
ln -s @LIBDIR@/ssfi/templates/ssfi_infected.html \
/opt/safesquid/safesquid/templates/ssfi_infected.html
ln -s @LIBDIR@/ssfi/templates/ssfi_not_scanned.html \
/opt/safesquid/safesquid/templates/ssfi_not_scanned.html
Next, click Add in the Templates section to add the new template definitions to the SafeSquid configuration. The following
parameters must be defined within the list that appears for the infected ESETS blocking page:
Comment: ESET Gateway Security infected template
Name: esets_infected
File: ssfi_infected.html
Mime type: text/html
Response code: 200
Type: File
Parsable: Yes
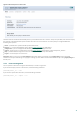
For the unscanned ESETS blocking page, the list is as follows:
Comment: ESET Gateway Security not scanned template
Name: esets_not_scanned
File: ssfi_not_scanned.html
Mime type: text/html
Response code: 200
Type: File
Parsable: Yes
To reread the newly created configuration, reload SafeSquid and the ESETS daemon.