User Guide DX-Series / DL-Series Gas Fireplace For the latest documentation, visit www.escea.
! WARNING If the electrical cord is damaged, it must be replaced by the manufacturer, its service agent or similarly qualified persons in order to avoid a hazard. The data label for this appliance, containing technical information and specifications, can be found adhered to the metal work under the burners. DO NOT PLACE ARTICLES ON OR AGAINST THIS APPLIANCE. DO NOT USE OR STORE FLAMMABLE MATERIALS NEAR THIS APPLIANCE. DO NOT SPRAY AEROSOLS IN THE VICINITY OF THIS APPLIANCE WHILST IN OPERATION.
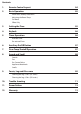
Contents 1. Remote Control Layout 04 2. Basic Operation 05 Initial Start / Battery Placement Adjusting the Room Temp Fan Boost Effect Only 3. Setting the Time 05 4. Keylock 06 5. Timer Operation 06 Activate Timer De-activate Timer 6. Auxiliary On/Off Button 07 7. Over Temp Shutoff Operation 07 8. Sound and Smell 08 Sounds Fan: Gas Control Valve: Appliance Metalwork: Smells: 9.
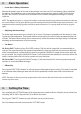
Remote Control Layout Display 1 On / Off 2 Flame Effect 3 Places the fire in a constant low output mode. Minus Adjusts the temperature and time settings down. NOTE: The fan will operate at its lowest settings. R SE E Set Time Allows you to set the clock. 5 TIM Timer Select Allows you to program in advance the times you wish to automatically turn the fire on and off. 4 LE CT AC A TI V Fan Boost 8 Plus 9 Activate Timer Puts the fan into a high output mode.
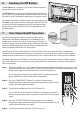
2. Basic Operation −− Initial Start / Battery Placement Remove the battery cover on the rear of the remote. Insert the new “AA” size batteries, being careful of the polarity. You should now see on the display of the remote the time showing “0:00”. To turn the fire on, press the “POWER” (2) button once, and within a few seconds the appliance will begin its startup sequence.
4. Keylock Should you wish to keep the fire from being tampered with by children or to discourage people from altering the temperature you can engage a keylock function which stops the remote buttons from changing any settings. To engage the keylock simply press the “Flame Effect” and “Fan Boost” buttons (3 + 7) simultaneously until the main temperature digits display “LO”.
6. Auxiliary On/Off Button The DL-Series has a manual On/Off button located under the bottom fascia panel as shown. The DX-Series has a manual On/Off button located inside the fire. To access this you will need a long thin tool (such as as allen key) and insert this through the opening on an angle as shown. This button should be used if the wireless control becomes lost, damaged, or its batteries are flat.
. Sound and Smell Note: Each time the fire is lit from cold the glass will fog up with condensation. This is normal and the condensation will disappear within a few minutes once the glass heats up. −− Sounds It is possible that you will hear some sounds from your gas appliance. This is perfectly normal due to the fact that there are various types of materials used within your appliance. Listed below are some examples.
. Fascia, Log and Glass care The Fascia is the visible surround of your Escea Gas Fireplace and must be treated carefully to prevent unsightly marks from tarnishing the visual quality of the product. Some marking over time is inevitable however, so the following directions will assist you in getting the maximum enjoyment from your Escea Gas Fireplace. NEVER, EVER RUB THE FASCIA. The outside of an Escea Fascia must only be cleaned with a soft microfibre cloth.
−− Cleaning the logs / Glass (DL series): Step 1: If using a Velo or Rado fascia, Remove the lower trim which is held in place by magnets Step 2: Lift off the inner fascia by unscrewing the base of the inner fascia, then pulling it out and lifting it up and off. Step 3: Unscrew the top and side glass retainers and remove them. Take care that the glass does not fall forwards at this stage. Step 4: Lift out glass and place it carefully aside.
−− Cleaning the logs / Glass (DX series): Step 1: If the fireplace has a fascia, it is recommended that you remove it first by simply pulling it towards you evenly, using protective gloves to protect the paint finish. The clips holding it in place will release. Step 2: Unscrew all of the fasteners holding the glass in place as shown below using a 3mm allen key and carefully pull the glass and frame towards you, ensuring you hold onto the glass aswell as the metal surround frame.
Flame Failure or Power Flue trip Appliance Over Temperature Sensor Trip Valve Solenoid Check Failure Remote Cannot communicate with fire The fire has tried to light three times and failed. • Check gas supply and check other gas appliances to see if they are affected. If you have two separate gas cylinders, switch over to the full bottle or contact your gas supplier. You may need to retry igniting the fire a few times after re-establishing gas supply.
• Combustion Air Flow Error • • • (DX Only) Duct Overtemp 11. Check whether the pressure switch is activating at startup (there is an orange indicator LED in the control tray). If not check the pressure switch electrical connection is correct. Check that the hoses are connected at both ends. Ensure the hoses are not kinked. Ensure the pressure switch is mounted vertically and the diaphragm is operational.
Part Type of express warranty Firebox and Heat Exchanger 10 years parts and labour warranty* All other parts 1 year parts and labour warranty followed immediately by 1 year parts only warranty* * Where a Escea product is covered by a parts and labour warranty, the warranty covers both the repair of the defective part or the provision of a spare part to replace the defective part and the installation of that part.
5 How to make a claim You may make a claim under this warranty by contacting us by: For New Zealand, contact the dealer you purchased the fire from to file a claim. For Australia with the exception of Western Australia, visiting www.glendimplex.com.au, contacting our customer care line (1300 556 816) or visiting a Glen Dimplex service centre. For Western Australia, visiting www.airgroup.com.au, contacting us on 8 9350 2200.