
User manual


5 INSTALLATION
0463 373 101
- 37 -
© ESAB AB 2015
5. Connect the blow-out hose (black rubber cap) to the corresponding outlet of the wire
feeder.
NOTE!
If the blow-out function is not used, the blow-out hose must be sealed with
the rubber cap enclosed. With Infiniturn systems, the blow-out air must be
supplied to the corresponding connection hose, if it is not permitted to
connect blow-out air to the shield gas connection!
6. Install the necessary plug on the control cable and connect it to the safety off circuit
interface of the wire feeder (see section "Electrical connections").
5.8 Electrical connections
NOTE!
After connecting the control cable, secure the cable in order to protect it from
getting caught while the robot is moving.
Usually, the control cable will be directly connected to the wire feeder. Please see
the manufacturer's documentation for details. The link to the robot control is then
implemented via the power source controller.
5.8.1 Standard RT system
5.8.1.1 Connecting the safety-off mechanism KS-2
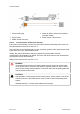
The switch for the safety-off functionality KS-2 is connected through the control cable, see (3)
in the illustration below. This connects to the KS-2 unit via the 4-pole plug (4) that contains
circuits for the push-button (6) and the safety-off signal (7).
If a collision is detected, the control circuit for the safety-off signal (7), which is normally
closed, will be interrupted.
Rating of the control circuit: max. 48 V / 1 A
1. Push-button for wire run-in 6. Switch for KS-2 push-button (brown/white)
2. Control cable (1-wire) for nozzle sense
function
7. Switch for KS-2 safety-off mechanism
(blue/black))
3. Control cable (4-wire) 8. Circuit for nozzle sense function (black)
4. Control cable plug 9. Power source / robot control
5. KS-2 connector for control cable plug