
User manual


dha20001
-- 4 5 --
dha2d1ea
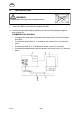
S Check that the wire feed roller (1) and
contact jaws (4) are the correct size.
S Guide the wire through the two small bolt
eyes.
S Insert the end of the wire into the
groove in the feed roller.
S Adjust the feed roller pressure on the wire
using the adjuster screw (6).
NOTE! Tighten only enough to ensure smooth wire
feed. Do not tighten the adjuster screw all the way,
there must be some play left.
S Feed the wire through using switch A 02 on the
PEG box.
S While the wire is being fed through, straighten it out by
adjusting the knob (5) on the wire straightener, or by
using a special wir e straightener for thin wire or twin
wire. When the wire straightener is correctly adjusted
the wire should come straight out between the contact
jaws and contact tip.
5. Changing the wire feed roller (see wear components on page 123).
S Single wire:
S Loosen the knob (5) and adjuster screw (6).
S Undo the hand wheel (2).
S Change the feed roller. T he wire size is m arked on the rollers.
S Twin wire:
S Change feed rollers with twin grooves in the same way as for single wire.
S NOTE! Change the pressure roller at the same time. T he special
spherical roller for twin wire replaces the standard pressure roller for
single wire.
S Fit the pressure roller using the special shaft stud
(order no. 146 253--001).
S Hollow wire:
S Replace the feed roller and pressure roller with rollers of the correct size.
NOTE! A special shaft stud is required for the pressure roller
(order no. 2129 011--01).
S Tighten the adjusting screw to a moderate pressure so that the wire is
not deformed.
6. Position the flux nozzle so that it does not catch and provides a good coverage
of flux (Sub--arc welding).
N.B! The lenght of the flux delivery hose is to be adapted to the welding head
position.
7. Check that the wheels of the carriage do not come closer than 50 mm to the
weld during welding.
GB