
Specifications


VCES-ERV-IOM-3B – Indoor ERV
14
Motor and Blower Service
Belt Tension Adjustment
Cassette Removal
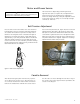
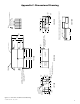
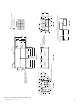
The belt tension is adjusted by positioning the rotat-
ing motor base plate (see Figure 10). Set adjustment for
proper belt tension. The fan RPM can be adjusted to
achieve the design airflow by setting the adjustable sheave
on the motor shaft. The pulley set screw torque setting is
110 in-lbs to 130 in-lbs.
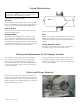
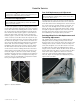
Excessive belt tension is the number one cause of blower
bearing failure. Proper belt tension and pulley alignment
are essential for trouble free operation. A simple rule of
thumb for checking belt tension is illustrated in Figure 9.
When the belt is grasped as shown, a total deflection of
approximately 1” [25 mm] should be attained. Insufficient
deflection indicates that the belt is too tight, which may
result in noise from excessive vibration, premature bearing
failure and short belt life. Tight belts may overload a motor
that would otherwise be adequate.
Loosen the two pivot bolts (#1, Figure 10). Loosen the two
adjustment bolts (#2, Figure 10). Rotate the motor and
base plate to achieve the maximum belt deflection as de-
scribed above. Tighten the drive belt side adjustment bolt.
Adjust the motor plate so that the sheave and pulley faces
are parallel and the belt is aligned. Tighten the remaining
adjustment bolt and the two pivot bolts.
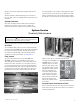
After disconnecting the power from the unit, open the
service door for the cassette access. Disconnect the ser-
vice connector between the motor and the control box.
Remove the exhaust filters and slide the cassette out of
the unit. Take care not to damage the rotor face or any of
the cassette seals. Proper support must be provided so the
cassette is not dropped.
WARNING
Disconnect the main power switch to the unit before per-
forming service and maintenance procedures.
!
Figure 9: Belt tension adjustment
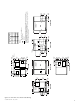
Figure 10: Motor (ERV2000 shown)