
Specifications


VCES-ERV-IOM-3B – Indoor ERV
13
Annual maintenance should include:
Air Filters
Replace medium efficiency filters. Replace high efficiency
filters in the ERV3000i. For more detail on replacing filters,
see the Air Filters section under Quarterly Mainteance.
Interior of Unit
Wash the foil faced insulation surfaces with a soft cloth
and mild cleaning solution.
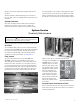
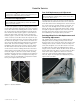
Enthalpy Wheel
No cleaning of the enthalpy wheel is required, it is self-
cleaning due to the opposing airflows. If the enthalpy
wheel needs to be cleaned, use low pressure air or vac-
uum. Wash the cassette panels with a soft cloth and mild
cleaning solution. Visually inspect the cassette brush seals,
perimeter seal and drive belt for proper operation.
Fans
Blower wheels and fan housing should be checked for dirt
buildup. If they are dirty, it will be necessary to remove
the blower assembly to clean the dust out through the fan
mouth.
System Operation Check
Verification of all control modes should be checked to en-
sure proper operation. Refer to Start-up section.
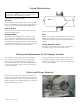
After disconnecting the power from the unit, determine
if the actuator is defective. Disconnect the 24V power
source. Connect the actuator directly to a 24V power
source with an appropriate cable. If the damper operates
correctly, the problem is either in the wiring connections
or main circuit board.
If the actuator does not work, it must be replaced. Take
out the two mounting screws to remove the assembly.
Install a new actuator assembly, connect all linkages and
test for proper operation.
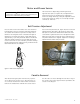
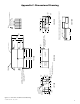
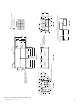
Disconnect the four-wire service connector between the
motor and the control box (#1, Figure 8). Loosen the two
front bolts (#2, Figure 8). Remove the two back bolts (#3,
Figure 8). Slide the fan assembly away from the discharge
opening and lift out of the unit.
Annual Maintenance
Testing and Replacement of the Damper Actuator
Motor and Blower Removal
WARNING
Disconnect the main power switch to the unit before per-
forming service and maintenance procedures.
!
Rotor
Brush seal
Figure 7: Cassette brush seals
Figure 8: Supply fan (ERV2000 shown)