
User Guide

8 © Copyright 2006 TAC All Rights Reserved. F-27013-4
Sweat End Valves
1. Slowly position the actuator’s manual operating lever (on the front of the actuator) to the
middle position, to manually open the valve so that the plug is not in contact with the
valve body.
W
C A U T I O N
• The plug inside the valve is made of a plastic material. It may be damaged by heat con-
ducted through the valve body if it remains seated against its port during soldering. Be
sure to manually open the valve before soldering to prevent damage.
• If the manual operating lever does not move freely for manual positioning, the solenoid
may have latched during shipping. Do not force the lever. Instead, first unlatch the sole-
noid by placing the red manual solenoid latch lever (on the side of the actuator) in the
"Up" position, then placing the manual operating lever in the middle position.
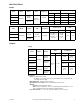
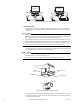
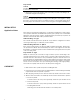
2. With the valve in the mid-position, latch the solenoid by placing the manual solenoid
latch lever in the "Up" position. Then, detach the actuator by depressing the release but-
ton and pulling it away from the valve body (Figure-9).
W
C A U T I O N
• Be sure to remove the actuator from the valve body before soldering, to avoid damage to
the actuator and to ease the soldering process.
• Use only lead or tin based solder with a melting point below 600°F (315°C).
3. Thoroughly clean the ends of the water supply tubing for a minimum distance of 1 inch
(25 mm) from the end, so that a good joint can be made in the shortest time and without
an excessively large flame.
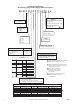
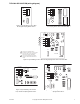
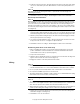
Spring Return
Normally Closed
COIL
A
B
Spring Return
Normally Open
COIL
A B
Figure-8 Three-Way Spring Return Valves.
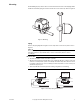
Release
Button
Stem Mating Hole
Stem
Pin
Pin Mating Hole
Solenoid Latch
Lever
Manual Opening
Lever
Figure-9 Three-Way Spring Return Valves.