1
WARNING To prevent damaging the door gasket, make sure to have the door all the way opened when pulling shelves out of the appliance. The appliance must be positioned so that the plug is accessible. Release the electric cord. Move your cabinet to its final location. Do not move your cabinet while loaded with wine, as you might distort its body. The appliance should be installed in a suitable place in order to avoid touching the compressor.
UNPACKING AND INSTALLING THE DOOR HANDLE Remove the exterior and interior packing materials. Install the door handle provided with the appliance by following these steps: 1. Remove the gasket at the inner side of the door to expose the two screw holes. 2. Install the handle tightly with the screws and washers provided. 3. Replace the gasket. Gasket Flat Washer Lock Washer Screw Handle Door Frame INSTALLATION INSTRUCTIONS Before Using Your Appliance Remove the exterior and interior packing.
Ambient Room Temperature Limits This appliance is designed to operate in ambient temperatures specified by its temperature class marked on the rating plate. Class Extended Temperate Temperate Subtropical Tropical Symbol SN N ST T Ambient Temperatures range (℃ / ℉) ﹢10℃/ 50 ℉ to﹢32℃ / 89.6℉ ﹢16℃ / 60.8℉ to﹢32℃ / 89.6℉ ﹢16℃ / 60.8℉ to﹢38℃ / 100.4℉ ﹢16℃ / 60.8℉ to﹢43℃ / 109.
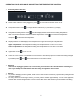
OPERATING YOUR APPLIANCE AND SETTING THE TEMPERATURE CONTROL Control System Instruction Power button: After the unit is plugged in, press Temperature button: Press Temperature Setting button: Press for 3 seconds to turn the unit on or off. to change between Fahrenheit (℉) and Celsius (℃) display. and the display flashes and shows the setting temperature. After 5 seconds it shows the measured interior temperature. Press and press to increase the temperature to decrease the temperature.
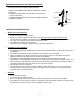
Reverse the door with visible hinge This appliance has the capability of the door opening from either the left or right side. The unit is delivered to you with the door opening from the left side. Should you desire to reverse the opening direction, please follow the below instruction. 1 2 3 ① Lock screws ④ Top hinge (right) ⑦ Top hinge (left) 4 ② Lower hinge (right) ⑤ Door ⑧ Lower hinge (left) ③ Door axis ⑥ Cabinet Unscrew the Lock screws ① (Fig. 1) Pull the door ⑤ outward and take it out (Fig.
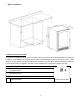
Built-in Installation CHARCOAL FILTRATION SYSTEM To preserve the quality and taste of your fine wines, they must be stored at the ideal temperature and ambient conditions. Your appliance is equipped with an active charcoal filtration system to ensure air purity, cooling efficiency, and to maintain an odor free cabinet for the storage of your fine wines. The filter assembly is located at the rear panel inside your appliance. The filter must be changed every 12 months.
CARE & MAINTENANCE Clean your Appliance Turn off the power, unplug the appliance, and remove all items including shelves and rack. Wash the inside surfaces with a warm water and mild solution. Wash the shelves with a mild detergent solution. Use a dry cloth when cleaning area of the controls, or any electrical parts. Wash the outside cabinet with warm water and mild liquid detergent. Rinse well and wipe dry with a clean soft cloth.
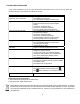
TROUBLE SHOOTING GUIDE If you feel the appliance is out of order, follow these instructions to try to see if you can solve the problem simply by yourself before calling for service. Problem Appliance does not operate Appliance is not cold enough Turns on and off frequently The light does not work Vibrations Too much noise The door will not close properly The control panel does not work Possible Cause Not plugged in The appliance is turned off The circuit breaker tripped or a blown fuse.