
Installation guide


QuadroM32x/8L/26x/12Li/26xi Manual II: Administrator's Guide Administrator’s Menus
QuadroM32x/8L/26x/12Li/26xi; (SW Version 5.3.x)
107
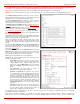
The next page of the wizard is FXS Gateway Configuration
Wizard - FXS Gateway Lines. This page displays a list of FXS
lines provided by the FXS Gateway and is used to assign each
FXS line to an IP line on the QuadroM
IP PBX. System will
automatically assign the provided FXS lines to the first available
IP lines on the QuadroM IP PBX. You may adjust the
configuration from this page.
Please Note: The FXS lines can be assigned only to inactive IP
lines on the QuadroM IP PBX. If there are no enough free IP lines
available on the QuadroM IP PBX, you should first deactivate the
IP line from the
IP Line Settings
page to use it in the FXS
Gateway Configuration Wizard.
The next page of the wizard is FXS Gateway Configuration
Wizard - Summary where the configured settings should be
verified.
Once FXS Gateway Configuration Wizard terminates, a new
entry is added to the table and the corresponding FXS Gateway's
configuration gets updated according to the settings defined in
the wizard, i.e. corresponding routing rules will be added to the
Call Routing table of the FXS Gateway. If you need to reboot the
FXS gateway, use the Reboot functional button in the FXS
Gateway Management page.
Fig. II-186: FXS Gateway Management Wizard – page 2
Loopback Settings
The FXS Lines Loopback Settings page is used to configure the lines for voice loopback diagnostics. When loopback is enabled on the line, any
incoming calls to the corresponding line will automatically pick up on the first ring and any voice towards the line will automatically be sent back to the
caller (the caller will hear themselves in the handset). Loopback Timeout provides the option of limiting the voice loopback diagnostics duration, i.e.
the caller will be disconnected from the Quadro when the Loopback Timeout expires.
The FXS Lines Loopback Settings page shows the only table where all FXS lines of the Quadro are listed. On this page, the loopback diagnostics
may be enabled/disabled and the Loopback Timeout can be adjusted for FXS lines.
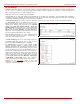
The FXS Lines Loopback table lists all the FXS lines on the
Quadro along with their loopback parameters (Loopback State
and Loopback Timeout).
The Edit functional link leads to the FXS Lines Loopback
Settings - Edit Entry page where Loopback Timeout (in
seconds) may be configured for one or more selected FXS
line(s).
The Enable/Disable Loopback functional link is used to
enable/disable the Loopback service on the selected FXS line(s).
Fig. II-187: IP Line Settings –Loopback page
Hot Desking
If Quadro has limited number of analogue and IP phones connected and much more users wishing to make and receive calls through the Quadro,
some of the connected phones can be announced as public. Public phones have no static owners; they are just connected to the analogue or IP
lines. Each user that accesses the public phone should first login with the previously created virtual extension and the corresponding password in
order to make the phone assigned to the certain extension. From that point forward and unless the user with log off the phone, he may place and
receive calls and use all the supplementary PBX services of the Quadro.
The Hot Desking feature is used to organize the user login/logout on the public phones. Each user should have a virtual extension configured in the
Extensions Management table. The virtual extensions can be configured as needed to use all the available supplementary PBX features when the
user will log in from the phone with that extension. The Hot Desking option should be enabled on the corresponding analogue or IP lines from the
Line Settings or IP Line Settings page accordingly.
To login to the phone, use the
feature code (for more details see Feature Codes chapter). You will be prompted for the extension and the
password. When you login to the phone with your extension, the phone becomes a fully featured phone connected to the Quadro. You may place
and received calls with the SIP address configured in the
Extensions Management page, use Voice Mail services, etc. When you have finished using
the phone, logout with the
feature code. From that moment forward, your extension becomes again virtual and is not connected to any
analogue or IP line but it still can handle calls (using Call Forwarding, Many Extension Ringing, Hunt Grouping, etc. services) and voice mails
according to the supplementary service configured on that virtual extension. The phone becomes no more assigned to your extension and is now
available for other users to login and use it.