
Installation guide


QuadroM32x/8L/26x/12Li/26xi Manual II: Administrator's Guide Administrator’s Menus
QuadroM32x/8L/26x/12Li/26xi; (SW Version 5.3.x)
105
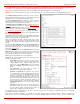
The Manage IP Phone Templates page consists of a table
where the available IP phone templates are listed. The
systemdefault template in this table indicates the Quadro
default template for all IP phones. This template cannot be
edited or deleted.
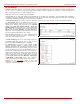
Add opens the Add Entry
page where an IP phone
template can be created.
The Add Entry page includes the following text fields:
• Template Name text field indicates the name of the
template. This name will be visible in the Edit IP Line
Settings page when defining the template for the IP
phone.
• Description text field requires optional information
about the template.
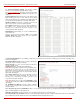
Edit opens the Manage IP Phone Templates - Edit Entry
page where the selected template’s settings can be
adjusted.
The Manage IP Phone Templates - Edit Entry page
allows configuration of multiple IP phones. The IP phones
templates help you manage the settings for group of IP
phones, which saves your time and ensures consistency.
This page allows you to adjust the IP phone’s template
general settings and define options for advanced
configuration of the IP phones models, which can be
common for group of IP phones.
The subpages for each supported IP phone model allows
you to define a set of extensions mapped to keys on IP
phones (see Programmable Keys Configuration).
Fig. II-181: Manage IP Phone Templates page
Fig. II-182: Manage IP Phone Templates – Add Entry
For Aastra models the General Settings page contains the following components:
• Local Dial Plan – indicates the number and pattern of digits dialed by the user in order to reach a particular destination.
• Send Dial Plan Terminator – is used to switch a dial plan terminator or timeout. When the IP phone is configured to use a dial plan
terminator (such as the pound sign (#)), the phone waits for 4 or 5 seconds after the handset is picked up or a key is pressed to place a
call.
Play a Ring Splash - is used to switch a "call waiting tone" when there is an incoming call on the BLF (Busy Lamp Field) monitored extension. If the
host tone is idle, the tone plays a "ring splash".
For snom models the General Settings page contains the following components:
• Dial-Plan String – indicates a dial plan string used to match dialed digits from the handset to the certain actions, e.g. dialing.
Dialog-Info Call Pickup - is used to switch a subscription to the status information of SIP URLs mapped as “Destination/Extension” on the
programmable keys.
• Transfer on Onhook - is used to switch the call transfer when the handset is placed on hook.
• Call join on Xfer (2 calls) - when this option is enabled, you will connect the newly arrived incoming call to the call on hold by pressing
Xfer button. When this option is disabled and you press the Xfer button, you will have an option to choose the call on hold to transfer the
newly arrived incoming call to, or to dial a new destination manually.
• Message LED for Dialog State/Missed Calls – when this option is enabled, the phone will indicate missed calls and changing dialog
states using the message LED.
• Dialtone during Hold - when this option is enabled and the call is held the caller gets dial tone. Otherwise there will be no dial tone after
pressing Hold.
• Do not Disturb – this selection allows you to manipulate with the IP phone DND service. When the *72 is selected from this list, the DND
service of the IP Phone and the DND service of the Quadro for the corresponding extension will be activated when enabling the DND
service from IP Phone. This option is recommended. When keyeventF_DND is selected only DND service of the phone will be activated
when enabling the DND.
• Record Missed Calls – when this option is selected, the information about the missed calls will be displayed on the IP Phone.
Any parameters not listed above or parameters defined in this page for other IP phone models can be found in the user’s manual of the
corresponding IP phone.
Please Note: Save changes before moving among the configuration pages.