
Operation Manual


3. Press the OK button.
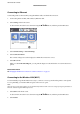
If the network connection is already set up, the connection details are displayed. Select Change Settings to
change the settings.
If the printer is already connected by Ethernet, select Change to Wi-Fi connection., and then select Ye s aer
conrming the message.
4. Select Wi-Fi Setup Wizard.
5. Select the SSID for the access point.
If the SSID you want to connect to is not displayed on the printer's control panel, press the
button to
update the list. If it is still not displayed, press the
button, and then enter the SSID directly.
6. Select Enter Password, and then enter the password.
Note:
❏ e password is case-sensitive.
❏ If you enter the SSID directly, select Available for Password, and then enter the password.
7. When you have nished, select OK.
8. Check the settings, and then select Start Setup.
9.
Select OK to nish.
If you fail to connect, select Print Check Report to print a network connection report, and then check the
printed solutions.
10.
Press the
button.
Related Information
& “Messages and Solutions on the Network Connection Report” on page 64
& “Making Wi-Fi Settings from the Control Panel (WPS)” on page 80
& “Changing from Wi-Fi Connection to Ethernet Connection” on page 84
Administrator's Guide
Network Connection
25